Affiliate Disclosure

Some of the links on this page may be affiliate links, and I will make a small amount of money when you click on them, or buy the product. I have not been paid to review any products, nor have I been given any products for free in exchange for a review, and any affiliate links that may be present will not change the price you pay for an item.
Showing posts with label Compiling in Scrivener. Show all posts

Wednesday, January 13, 2016

Scrivener Compiling by Example: Novel for Submission in Microsoft Word Format

Last time out, we were printing our novel onto paper, so we could head out to the local library or coffee shop with a red pen to mercilessly revise the document. Now, we’ve finished revising the document, we’ve queried agents or publishers or both and have had a request for the manuscript. However, they want it in Microsoft Word format, emailed as an attachment to their email server. How do we handle that? Fortunately, this is a common event, and Scrivener has all the tools we need to make this reasonably painless. Here, I will walk you through Scrivener compiling by example, creating a novel for submission by compiling into Word format.

Binder Layout and Project Setup


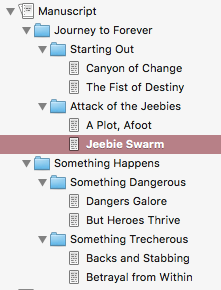
Setting up the binder for Word is not much different from the setup when you want to Print to Revise. The only real concern I have is to make sure that the text files are in the levels appropriate for inclusion in the Contents Option pane for compiling later. I recommend at least using folders for Chapters, with scenes in text files underneath those. If you use Parts, each of these should be in their own folder, with Chapters inside the Part folder and text files inside Chapter folders. If you choose to have introductory text for each Chapter or Part, as shown in the this image, you will need to make an adjustment to the Formatting Options pane when compiling (this would also be true in any compiling, not just for Word).

For the purposes of this example, I am going to format the output to open in a “modern” version of Word—2007 or later for PC, or 2008 or later for Macintosh, using the .docx format. One reason for that is I don’t have access to earlier versions, and so I can’t test them! These are also the first versions of Word that use the .docx format for files, and the current document translator for Scrivener does an excellent job with these Compile To outputs. I realize that there are likely a lot of you who may still have older versions of Word, I just don’t have any way to test the output in those older versions.

Compile for Word


To start with, change the “Compile To:” format at the bottom to be “Microsoft Word (.docx)” and make sure the Contents are the ones you want. In general, here you want to let the Compiler handle most of the work, so unless you have a specific need to leave something “as is” (such as your title page) or absolutely must force a page break, use the “Formatting” and “Separators” panes to handle breaks. There are some good reasons to handle certain things here, however. If you want most of your text documents to use the Separators (say, if you use a blank line or a “#” symbol between scenes), you might want to check the “Pg Break Before” box for your front matter documents. This will ensure those documents are individual pages in the final output.

This is what the document looks like in Word 2016 if you rely only on the Separators option pane to handle front matter and documents, with the scene separator appearing where there should probably be page breaks.


To fix it, use the Contents pane to force a page break before the Front Matter pages, and print them "as is" as well.


Before going on, let’s take a moment to discuss submitting documents to agents and publishers. I am assuming that you’ve already sent the query letter and received a positive response asking for the full manuscript. Also, always follow the agency or publisher’s requests for submissions. Really, don’t deviate from them. The time to make font size and color and face decisions is after you sign the contract.

If they don’t have any specific submission requirements, follow the ones from The Editor’s Blog (http://theeditorsblog.net/2011/01/05/format-your-novel-for-submission/) with these highlights:
  • 12-point Times, Times New Roman, or Courier font
  • Double-spaced line spacing
  • 1” margin, top/bottom/left/right
  • Separate scenes with a single “#” character, centered by itself on a line
  • Chapters start on new pages, with the title centered about 1/3 of the way down the page
    
Fortunately, Scrivener handles this explicitly with the proper Compile options set.
On the Separators pane, set “Text separator” to the “#” symbol, “Folder separator” to Page Break, “Folder and text separator” to "Empty line", and “Text and folder separator” to “Page break.” These will be the same as the settings above.


With the Formatting pane, make sure to set up the checkboxes to reflect what’s in the various sections. As shown here, if you have any folders with text associated “on” them (like the intro text discussed earlier), make sure to check the “Text” box and format the text as well as the title. Check the Page padding number, and set it to appear as appropriate. The default for Scrivener for folders and text documents (those that are not, themselves, containers) is to insert 14 lines of padding, which should fit the criteria of Chapter titles above, but may not work for your scenes. Make sure to examine your output afterward, and make adjustments here as needed.


When setting Titles in the Formatting pane, keep in mind that you can use many of the placeholders to handle the exact output. Here is a brief list of some common placeholders for titles, remembering that in the actual text they are surrounded by less-than and greater-than symbols (so, <$title>):
  • $title will put the title of the current document (so, for the compiled document here, “Journey to Forever” for the first Part, and “Starting Out” for the first Chapter, with “Canyon of Change” and “The Fist of Destiny” for the first two scenes.)
  • $n inserts the Arabic numeral for the current “n” listing (that is, the first “n” is “1”, the next is “2”, etc.); $r instead inserts lower-case Roman numerals with $R for capitalized Roman numerals; $L inserts upper-case and $l lower-case alphabetical numbering (“outline” numbering, AabcBabcCabc etc.); with $W and $w inserting the word for the current number (UPPER and lowercase, respectively, so “ONE” or “one” then “TWO” or “two”)
  • Finally, you can specify stream names by inserting a colon, followed by a name, after any of the numbering placeholders; doing so will substitute the next number in the sequence for that stream name only. $n:bdwpart will insert the next Arabic numeral for the named stream “bdwpart” (starting at 1) wherever it is placed.
Title Adjustments options, by default, are usually fine. The exception would be if you have titles enabled for any Front Matter documents, and need to remove any prefix or suffix information.

In the Layout options pane, you might consider making sure the “Do not add page padding” and “Avoid widows and orphans” settings are enabled; these will first avoid pushing the page content down on the first page if there is a break before it (which, to me, is weird to do but happens sometimes as a result of the settings in Formatting), and second will help to make sure that widows and orphans are reduced in the output document, by adding page padding as needed to avoid them.

Transformations pane settings allow you to fix certain kinds of output issues; I recommend first compiling with all of these options disabled and see what the output looks like. My experience with recent versions of Word and Scrivener shows that smart quotes, ellipses, italics, em-dashes, and so forth all come through just fine, so I usually leave these all unchecked. Run it, and see if you like the output. If not, try enabling only exactly the Transformation you have issues with, and re-compile.


Replacements will expand any text tokens you might use to substitute for long phrases in your document. If you use any such tokens, make sure the Replacements pane has the expanded version!

Statistics settings are mainly used to control how the compiler counts words and characters. Standard behavior for submissions is to never count words in any of the front matter documents. That checkbox should be enabled. If you have any other documents embedded in the manuscript that are not story documents, make sure to mark the “only documents matching” checkbox and select the appropriate criteria.

Since we’re discussing a fiction novel, it is unlikely there are any tables in your document; if there are, the Tables options would come into play. By default, these settings are not enabled. The same is true of Footnotes & Comments in general, although there certainly might be a reason to include comments in a submitted document there are not likely to be footnotes in a fiction novel.

Page Settings should be set as per the agency or publisher’s recommendation; otherwise, use the 1” margin all around settings as recommended above. In addition, many agents and publishers request that you include your last name, book title, and page number in the upper-right header, so putting that information here ensures that it appears. Remember that $title is the document title, so use the $projecttitle tag here. 

If you have Meta-Data to include, add it on the Meta-Data option pane.

With this being a fiction novel, the RTF Compatibility pane should be left alone since there are not likely to be any footnotes anyway. If there are, check or leave unchecked this box as appropriate.

Finally, if your settings are all set up for Cochin or Bookman Old Style as your typeface, but your agent wants Courier, the Quick Font Override can be used to make that a rapid change here, instead of changing all of your Format Presets.

Open and Edit


Once the compile process is complete, open the new document and give it the once-over. Make sure the page breaks appear where you want them, look for problems with spacing or issues related to italics or using smart quotes or some of the other Transformation items, and make sure the document has the right look, font face, and so forth. While older versions of Scrivener and Word sometimes have had issues, and there are some issues to check if you use tables or columns, basic novel formatting does not usually run into these problems (they do sometimes occur in non-fiction works with embedded tables and such). You should definitely go over the entire document, however, to make sure the compiler didn’t spit out something unusual.

If it doesn’t look right, note where it seems to have gone wrong, and then take a look at the compile option related to that. One weird problem I ran into involved a hidden table in Scrivener (copied from an HTML page I wrote). If you see some weird formatting or options in your output, go into your Scrivener document where the problem occurred, and right-click on the text there. If you see any table options, select the option to remove the table. Save the document, and then recompile, and see if the problem has gone away.

In Conclusion


Finally, you’ve gotten a good output from Scrivener to Word, cleaned up any problems, and now you can send it off to your agent. Congratulations! I hope that this edition of Scrivener compiling by example for a novel for submission has helped you to get your Scrivener compiling under control. If you have questions or comments, leave them below, and happy writing!

Friday, January 8, 2016

Scrivener Compiling by Example: Print to Revise

Now that we’ve had a chance to go over all the Option panes under the Compile sheet in Scrivener, I’d like to look at some scenario-based setup for compiling. First, let’s print a fiction novel for revising.

Binder and Project Settings


I’m going to show a setup using the Scrivener project template “Novel (with Parts).” This organization uses folders to create Parts, which contain Chapter folders, which contain Scenes in text files. The basic setup is the same if you choose the regular “Novel” project, which omits the extra level of folders for the Parts. This will mostly impact Separators and Formatting. With the “Parts” option, you will need to specify what happens between folders in the Separators pane (something you usually won’t need to specify with “Novel” projects), and with Formatting you will need to specify how the Compiler handles Parts titles and Chapter titles along with Scene titles (if you use them).


One thing you can do now that will help down the road is setting up some Formatting presets. Before starting on your actual writing, start by typing in just a little bit of text. Then, format it to within an inch of its life for your own use when editing the document in Scrivener. Set the font, font size, line height, inter-line spacing, paragraph spacing, tabs, first-line indent, hanging indent, whatever you want. Then when you’re satisfied, select the text you’ve formatted, and select the Format menu, then Formatting->New Preset From Selection. Give this preset a logical, obvious name, such as “Novel Editing” or “Novel Writing.” Then, change the formatting to the settings you will want when you are printing. Let’s say you like the font and paragraph spacing, but you need line height to be double-spaced (2.0), and font size to be slightly smaller (12 point instead of 14). Make those changes, then create a New Preset From Selection and give it a logical name such as “Novel Printing.” You can do this for each kind of output you need. I suggest that if you don’t edit your printed documents with the same settings as your submissions, then you might want to consider having a third option for “Novel Submission” that matches the criteria for your agent or publisher. Generic settings for submissions are usually: font face of Times, Times New Roman, or Courier, a font size of 12 point, black font color,  0.5” first line indent for new paragraphs, left aligned, and double-spaced (2.0 for line height).

Compile Options


When you compile to print for revising, there are a few changes you’ll want to consider. For some of these, you’ll see the images below to help. Many of the settings panes do not need any changing, or if they do it is reasonably straightforward to do it so I won’t demonstrate those. Set the "Compile For:" output at the bottom to "Print" to start.

First, make sure you have included all of the manuscript pages you want to include in the Contents pane, including any front matter you want. I recommend having a draft-only front matter folder, with only basic information (a title page with your name & contact information, the title, and not much else). This will help if you accidentally leave your manuscript behind in a coffee shop or library.
Under Print Settings, leave it in “Publishing Mode.” As you may remember from my entry on this pane, "Publishing Mode" really just enables certain settings, including recto/verso, and header and footer settings that you may find useful when printing for revision.

For Separators, how you handle breaking up the document depends a lot on how you write and the story you tell. For this scenario, Parts don’t have their own text. They do have a title, and will get printed onto their own page. Chapters will start on a new page as well, with scenes separated by a page break. For printing a copy, particularly if it’s just going to be for revision, you might consider having folder-to-folder and even folder-to-page separators be a blank line, to cut down on the number of pieces of paper to print. This would mean the Part title would appear on the first Chapter page, above the Chapter title, which would appear above the Scene title.

With the Formatting pane, when printing to revise you might consider the titles being pretty plain, really just enough for you or your editor(s) to be able to distinguish the transitions. Since I have Parts and Chapters, the folder levels should have their own settings (as they do here). Since neither of these two folder types has any text, I uncheck that checkbox. If yours do, say because you use introductions for each chapter or part, make sure the “Text” checkbox is checked, and format the text appropriately.
When formatting the text files, keep in mind you will probably be marking the pages up with a pen or pencil, so use a line spacing of 2.0 and a readable font, but not too large. Here is where having a distinct set of Formatting Presets is useful. I use a slightly larger font size when editing on screen than for printing or compiling to other formats, so I have a preset for body text editing (with a clear label) as well as a different preset for printing and compiling, as discussed above. Click in the body text area of the pane (that is, not the Title but the actual body text), and select the appropriate preset under the button circled in the image.


Title Adjustments would only need to be adjusted if you use the title prefix or suffix and it will appear on front matter, but you don’t want it to.

The Layout pane should be fine with defaults; you might want to change the “End-of-Text” option if you don’t like the default setting.

When printing for my own editing and revising, I turn off all of the options in the Transformations pane. I want to see the em-dashes, the smart quotes, and italics. You may feel different about your own printed output, and that’s okay!

In the Replacements pane make sure to add any text expansions you need. I sometimes will use this to avoid having to type “Interstellar Consortium for the Stability of Stars and Novae” over and over again, putting ICSSN in the text and using Replacements to make sure it gets expanded upon compiling.

Default settings for Statistics are probably fine unless you need the words in the front matter to count toward your $wc numbers.

Since this is a fiction novel, you are unlikely to have any tables in your document. If you do, check the settings in the Table pane. Ditto for footnotes and comments.

In Page Settings, there are a couple of ways to go. First is to use the “Page Setup” from the File menu, and create custom page sizes there if you need to, then check the “use project Page Settings” box to force the output to use those. Otherwise, you can set your page size and margins here. I always use the header setup with my last name and the current page number, printed in the upper-right corner. That way when I invariably drop my project, I can rearrange them properly. If I have multiple projects going at once, as sometimes happens, I will add the $projecttitle to this as well.

Finally, in Quick Font Override you can do a quick global font change if needed. I rarely need this, but if you decide at the last moment you want to print in Courier instead of Bookman Old Style, you can do a quick setting here for that.

Now, all that's left is to click "Compile," print, and get out your red pencil!

Up Next


Hopefully, this will get you started in the right direction when compiling your Scrivener to print for revising. Next time I’ll walk you through the settings for Word output to submit to an agent or publisher. As always, if you have questions or comments, leave them below, and happy writing! 
Tuesday, December 29, 2015

Compiling in Scrivener: The Last Four (Cover, Meta-Data, RTF Compatibility, and Kindle Gen)

Welcome back to Cogitations of a Semi-Pro Wordsmith. Today, I will be covering the last four of the “All Options” Options panes available for compiling in Scrivener: Cover, Meta-Data, RTF, and Kindle Gen. Three of these are specialized, only appearing for a few output types. The fourth (Meta-Data) actually appears for many types but has some different options depending upon your output file format. Let’s get started, shall we?

Cover


The Cover pane only appears when the compile output is set to .epub or .mobi types. It allows you to set the image for the book cover in those formats, which should be raster images (not vector). Both PNG and JPEG formats are raster images, and will both work for this pane. Scrivener recommends using JPEG files since some e-book readers don’t know how to handle PNG images.

To set the cover, it must be in your binder already, usually the Research folder somewhere (I always create a separate folder for cover art under the Research folder in my projects). For .epub files, there are three additional options: an SVG button, which permits you to specify SVG code if this is needed. If your graphic artist gave you SVG code or an SVG image for this, you’ll need to clarify the settings with him or her to make sure you get this right. There is also a field to set the title of this page in the compiled file. This is not the book title, but rather the title of this page. By default, Scrivener puts “Cover” in this field, and I recommend leaving it unless you know for sure you need another title for this page. Finally, there is a checkbox "For reading in iBooks only” that permits you to tell the compiler to set that image as the one for the iBooks shelf. If you will be sending the output file to iTunes Producer, un-check this setting, and use iTunes Producer to set the shelf image instead.

For .mobi file output, the only option is to set the image. 


Meta-Data


Meta-data appears for most file types (not including iBooks Author Chapters, Print, .txt, or the script outputs .fdx or .fcf), but what appears here depends on the output settings. For all the supported formats except .fountain, the pane is titled “Meta-Data”; for the .fountain output type, it is called “Title Page Meta-Data.” No matter what the settings are, this pane is for including the values for meta-data variables and their values that you select. There are basically four different panes, which I’ll discuss individually.

For PDF files, there are four meta-data variables: Title, Author, Subject, and Keywords. Any variable which have default values set in the Meta-Data Settings pane (Found under the “Project” menu) will appear in the proper variable field as gray type. You can override it by entering specific information in the field. For the Keywords field, entries are comma-separated values, and entries will appear as tags (with a light blue rounded rectangle inside of which is the “keyword” … which, frankly, makes them “key phrases” not just “words” but whatever). 


For the word processing output types (.rtf, .rtfd, .doc, .docx, and .odt) as well as the Web output formats (.html and web archive), all four of the PDF variables are present, as well as Company, Copyright, and Comments, and a background color setting. For .html and webarchive formats, the “Title” variable will become the page title (i.e., the value for <title>Title Here</title>). The Keywords field here acts just like the one for PDF outputs, and the Comments is a free-form text box just as the others are free-form text fields.


For the .epub and .mobi file types there are different fields, but most of them act like the ones from the first two. There are two major exceptions: the “Authors” field (note, changed from “Author” in the other two) and the new “Contributors” field permit semi-colon-separated values rather than free-form text; if there are multiple authors or contributors for the document, enter each name separated by a semi-colon. Besides Title, Authors, and Subject (no “Keywords” in this pane), this pane has the Contributors, Description (free-form text box), Publisher, Rights, Date, Language Code, and a checkbox to enable the use of a custom unique identifier. Of these, the one to be most concerned about is the Language Code, which should be the official ISO two-character code for the language of the document. If your publisher gave you a unique identifier, click the checkbox “on” and put it in that text field.

With MultiMarkdown (any output type) and .fountain (Title Page Meta-Data) output types the interface is different, using a table to add or subtract arbitrary variable names and a text box below to enter the values. There are no required Meta-Data entries for MultiMarkdown, but Scrivener does create a few by default in new projects. To add a new variable, click the “+” button in the lower right, and to delete one select it in the table at the top and click the “-“ button instead. To add a value to a variable, select it in the table and then click in the text box at the bottom and type in the value. Scrivener warns that empty lines in this text box will cause the Meta-Data block to end prematurely because it inserts these values verbatim and the MultiMarkdown format sees an empty line as the signal to stop processing Meta-Data. Be careful!

RTF Compatibility


The pane for RTF Compatibility is available to RTF compile types, both .rtf and MultiMarkdown RTF files, but does not appear for .rtfd files (a file format used mostly by the Mac OS X/NeXTSTEP application TextEdit). It will also appear for the .doc and .docx output formats if you have set your Word output formats (.doc or .docx) to use RTF, by enabling that setting in the Import/Export pane in the Preferences.
The setting for this pane when using .rtf or MultiMarkdown RTF output formats has four settings. The main thing to keep in mind about this is to only change the default settings if your output looks bad. By and large, the RTF output settings are pretty good and produce fine RTF files. If, however, your editor of choice is choking on something, invert the setting for whichever part with which it’s having problems. The first setting will essentially convert footnotes and comments into text endnotes, and converts their marker into the standard set (typically *, †, ‡, §, , ¶, etc.). The next setting tells the output compiler to essentially turn any tables into regular text, which you would need if your particular RTF editor doesn’t handle tables. If you are using Word as your editor but are exporting in straight RTF (that is, not using the .doc or .docx output formats) or MultiMarkdown RTF, you can tell the compiler to use Word’s list making tools. Since Word handles these differently than do other word processors, you will definitely want to check this if you have bulleted or numbered lists in your output document. Finally, there is a checkbox for underlining and coloring URLs/hyperlinks. This box is unchecked by default since most editors do this on their own. Word, however, does not, and will need this box checked if you intend to open your compiled RTF file in Word and have hyperlinks in the output document.

The RTF Compatibility pane when using .doc or .docx files is much simpler, and has only the setting to flatten footnotes. For both RTF and DOC output, checking this box will not override the setting to hide comments, but will only determine how they are displayed if they are included.


Kindle Gen


The Kindle Gen pane only appears for .mobi output formats and is where you specify what application the compiler should use to generate the .mobi file. Before you can output a .mobi file you must set this location. There are also two checkboxes at the bottom of the pane. The first enables you to tell the compiler to create a log file of the Kindle Gen output. This is unchecked by default and is really only needed if you are running into problems creating a valid .mobi file from Scrivener. The second checkbox (also unchecked by default) will output both the generated source files that Scrivener feeds to the Kindle Gen application as well as the .mobi file output itself. If you need or want to make changes to these files (perhaps you have a very specific layout need or something, I’ve never run across anything that would require me to modify the output files in this way), you can do so before manually flinging them at Kindle Gen yourself if you enable this checkbox first.

In Conclusion


We’ve come a long way on this journey, but I hope I’ve been able to simplify and explain each of the various Option panes available in the “All Options” for Compiling in Scrivener. These final four are the last of the panes. In a couple of future blog entries (within the next couple of weeks), I will be stepping through a few very common output scenarios, and going over each pane’s settings that I needed to modify to set the correct output. I think that armed with the general knowledge from these past blogs, and the few more to come, most Scrivener compile output scenarios will be a snap for you to set up. If you have any questions or comments, post them below, or you can shoot me a tweet (@BacilDonovan on Twitter) or an email at (), and I’ll do my best to answer your question. If you do, please note that I may re-use the question (with personal details omitted, unless we both agree otherwise) for clarification purposes on my blog later. If I do, I will notify you of my intent to do so.

Saturday, December 19, 2015

Compiling in Scrivener: Script Settings, HTML, and Compatibility Settings

Hello, and welcome back to Cogitations of a Semi-Pro Wordsmith. Today’s Compiling in Scrivener topic is three of the final option panes available only to certain output formats: Script Settings, HTML, and Compatibility. As you will soon see, these are highly specialized option panes for particular output types, and may prove very useful if you output into these compile formats.

Script Settings


As you might expect, the Script Settings option pane is aimed at setting options when the compile output is Final Draft (.fdx) script, although the .fountain script type does have a few plaintext options available in this pane. This setting is not available for .fcf output types, or any non-script outputs.
A few of these are pretty straightforward. “First document is title page” will do exactly that; be sure, however, that your first document actually is a title page! If you click this checkbox and then fail to add a title page at the beginning, it will chop off the first page of your script. “Include document titles as scene titles” and “Include document synopses as scene summaries” are useful if you title your documents in the Binder with your scene titles, and/or if you use the synopsis section of the Inspector pane to keep scene notes you want to appear in the Final Draft document as a scene summary. “Include footnotes […]” and “Include comments and annotations […]” will allow you to choose whether you want to have footnotes, and/or comments & annotations, appear in the Final Draft output as script notes. If either option is unchecked, those items will not be compiled into the final output at all.
“Break dialog and action at sentences” is sort of the scriptwriting equivalent of widow/orphan control; that is, in scriptwriting it is normal to keep action and dialog together. If this checkbox is on, any time that a dialog or action sentence will be separated by a page break, the compiler will force them to stay together by placing them after the break. “Include revision colors from Preferences” enables you to control whether or not the changes made to the document (if you are tracking them) will display with the colors set in the Preferences pane. This way, the compiled output will maintain the change order & keep them labeled with the color you’ve chosen. If you don’t track revisions this way, this setting will have no effect.
Finally, if you check the “Use default Final Draft screenplay elements” checkbox, the compiled output will tell the compiler to ignore your formatting, and instead have Final Draft handle the formatting of your output file. With this checkbox unchecked, the compiler will keep your formatting decisions intact.

When using .fountain output, this pane changes somewhat, with only a few checkbox options. The checkboxes for “Include document titles […]” and “Include document synopses […]” remain, with an additional checkbox for “Section headers use binder indenting levels,” which simply formats the sections in the output file to reflect, visually, their depth in the hierarchy. The “Include footnotes […]” and “Include comments […]” checkboxes also remain.


HTML


The HTML option pane is only available when the selection is set to the .html (but not webarchive!), .epub, or .mobi compile outputs. Selections here allow you to turn on or off the option to convert Scrivener links into HTML links—allowing you to keep references to other Scrivener documents intact in the final output—and whether to underline those links or not (.epub and .html only). There is also an option to “Preserve Formatting” as raw HTML; you can mark selections of text to Preserve Formatting under the Format menu->Formatting->Preserve Formatting. For .html output, you can also select whether to restrict the body text to a particular width or not.


Compatibility


The Compatibility pane enables certain options, depending on whether the output type is set to the MultiMarkdown (without clarification), MultiMarkdown .tex, or MultiMarkdown .html format.


In “straight” MultiMarkdown, the only option is whether to enable MultiMarkdown 2 support.


For a .tex format, the only option is whether to enable XSLT post-processing.
In .html format, the two options include the ability to enable the same XSLT post-processing, as well as Markdown Compatibility Mode.


In Conclusion


We’re nearing the end of the option panes available when compiling in Scrivener, with Script Settings, HTML, and Compatibility being three of the last seven. My next blog will finish the final four options available, the Cover, Meta-Data, RTF Compatibility, and Kindle Gen Option panes. I hope I’ve been able to give you some additional insight into these panes and enabled a better understanding of how they work. As always, leave comments or questions below, and happy writing!

Next in series -> The Last Four (Cover, Meta-Data, RTF Compatibility, and Kindle Gen)

Thursday, December 17, 2015

Compiling in Scrivener: Print Settings, Title Adjustments, and PDF settings

Hello, and welcome back to Cogitations of a Semi-Pro Wordsmith! Today, I’m continuing on in my series on Compiling in Scrivener, covering Print Settings, Title Adjustments, and PDF Settings. Here, we are starting to get into Option panes in the Compile sheet that are relatively limited in their applicability—though, not their importance!—and will be covering Option panes that sometimes only apply to one or two compile output types.

Print Settings


The Print Settings pane is only available if your output type, in the “Compile For:” menu, is either “Print” or “PDF.” There is one menu selection, for Layout Type, and two checkboxes. The two Layout Types are “Publishing” and “Proofing.” The purpose of this setting is to enable or disable certain options in other panes. The “Publishing” setting—which, according to Scrivener, is just a title not a hard-and-fast rule about its intended use—turns off the ability for printed or PDF output documents to have end-of-page footnotes or use columns. In so doing, it enables control over recto/verso page options and certain custom markings (specifically, custom end-of/start-of scene markings), as well as header/footer options. The “Proofing” setting essentially does the opposite, enabling end-of-page footnotes & columns in the output, while disabling the other options listed. It might be better even to think of the “Proofing” Layout Type as “Footnote & Columns” rather than “Proofing,” since it’s not just an output format for proofing your document in Printed or PDF formats. The two checkboxes at the bottom of the pane, when checked, enable hyperlinks to be either underlined, colored (blue, always), or both, in the printed or PDF output.

Title Adjustments


The Title Adjustments pane is only present if the Formatting pane has had a title prefix or suffix set at least one time. Once that is true, this pane appears, and you can use it to exercise more fine-grained control over the Title Prefix and Title Suffix settings from the Formatting pane. Specifically, it allows you to specify what documents you do not want to have a Title Prefix or Title Suffix, and to exclude all front matter entirely with a checkbox (one each for Prefix & Suffix). It also permits you to specify how Title Prefix and Title Suffix items are handled in document links (like, say, a Table of Contents), including disabling them or specifying a special separator for them in links. For example, if you have used the Formatting pane to set a Title Prefix of “Chapter <$n>:¶” (meaning, a carriage return after the Prefix of “Chapter 1:” etc.), the carriage return would also be in the Prefix in these document links. If you check the “Override title prefix…” checkbox on this panel, you can replace that carriage return with a separator of your own choosing, so as not to interrupt your Table of Contents with extraneous returns.


PDF Settings


The PDF Settings pane is only available when the output format for the compile is PDF and also only if the “Publishing” Layout Type is selected in the Print Settings pane. The PDF Settings pane allows you to specify whether the compiler will create an Outline that certain PDF readers (including Acrobat Reader) will display in the sidebar—not a table of contents—and whether to underline &/or color internal links (and if so, what color to use).

In Conclusion


Most of the settings in these panes are reasonably straightforward, and should not pose much of an issue. Do keep in mind that the Print Settings Layout Types are not hard-named. That is, the name “Publishing” is just a name to use to distinguish it from the other option, “Proofing,” which is also not just for creating a proof. They are really just names to distinguish the one from the other.
With that, I do hope I’ve been able to explain these options for you, and make your compiling in scrivener using the Print Settings, Title Adjustments, and PDF Settings panes a little easier. For my next post, I’ll go over the Script Settings, HTML, and Compatibility settings panes. As always, if you have questions or comments please leave them below, and happy writing!

Next in series -> Script Settings, HTML, and Compatibility 

Tuesday, December 15, 2015

Compiling in Scrivener: Footnotes, Quick Font Override, and Page Settings

Welcome back to Cogitations of a Semi-Pro Wordsmith! Today, I’ll be going over the last two of the Option panes that are available to almost all “Compile For:” output types. I will also cover one that is only available to about half of them, but is quite useful for many writers who use Scrivener. The final to almost-all panes are the Footnotes & Comments pane and the Quick Font Override pane. The third is the Page Settings pane.

Footnotes & Comments 


The Footnotes & Comments pane tells Scrivener how to deal with footnotes or comments that exist in the Scrivener project when it creates the compiled document. Since there are several different styles that dictate how to treat citations, footnotes, and other “meta-information”, this can be a complicated endeavor. Hopefully, I can simplify it for you. First, if you need footnotes to appear at the bottom of the page on which they appear, make sure that you are using a compile format that has a “page” concept. Most e-book formats do not have such a concept; the page size is dictated by the device, its viewable area size, the orientation of the viewable area, and the size of the display font. Scrivener cannot, in advance, anticipate all these options (and in the case of the font size, can’t even begin to start since the reader controls the font size, and can change it whenever she or he wants to). All “footnotes” in these e-book output formats (.epub and .mobi) are therefore endnotes of some kind; you can tell the compiler whether to put them at the end of the section, or at the end of the document. Other formats do have a page concept, such as .doc, .docx, .odt, and others, and they can put the footnotes at the bottom of the page. To do this, make sure both of the boxes “Export […] footnotes as endnotes” are not checked, this should permit the footnotes to appear on each page where they are referenced. If you prefer (or, if your publication style requires) endnotes instead of per-page footnotes, make sure to check these boxes as appropriate.


Note also that not every format that can output foot or endnotes has all the options shown on these images. These are the most complicated output formats for Footnotes & Comments, so I chose to display these to show you all the various options. Here are two simpler panes, the .txt output, and the MultiMarkdown->Flat XML output. Both of these have much simpler handling because their output types can’t handle any of the more complex options. As you can see, the option to remove footnotes is always available.


Quick Font Override


This one is simple: check this box if you want all the fonts in the document to have the identical font face. This option does not change the sizes, nor will it change italic, bold, or underline and such, and it will only do so for the compiled output. That is, marking this checkbox doesn’t change the selections you make in the Formatting pane, those settings remain. It simply adds one step after applying all of the formatting, and changes the font face for all fonts—even in documents checked “as-is” in the Contents pane—to be the same face.


Page Settings


Use the Page Settings pane to tell the compiler some information about the layout of the pages it will put out: at a minimum, the page length and width and the margins for the top, bottom, and left & right sides. Most output types that have this pane will also allow you to specify what, if anything, goes in the header & footer, whether to treat the first page differently than subsequent pages, and whether to treat verso/recto (facing) pages differently.
As you can see in these images if there is an option to create headers & footers, then there are six boxes where you can enter header/footer information, three per. The left-most are left justified and in the left corner. The right-most are right justified and in the right corner. The two middle ones are center justified and in the middle of the header or footer. You can see on this image there is a color difference between the Header/Right and all five of the others: the Header/Right has “<$surname> / <$” visible in the text field, in a black font color, and the other five have light gray fonts. If there is nothing entered, you will see the light gray font—this is a placeholder, intended to show you examples of information you can enter. If you actually enter something in a field, it will be in the dark black font you see in the Header/Right field. There are several tags you can use in these fields, including ones for page number, total pages, word count, author’s name, and so on. You can also use markup using BBCode, or the markup shown at the bottom of the pane, to format the text in these locations. You can also set the font face & size for the header & footer at the very bottom of the pane.

In Conclusion


I hope that this installment of Compiling in Scrivener has been informative, and helps you with compiling your projects (at least, as far as using the Footnotes, Quick Font Override, and Page Settings panes!). Next time I’ll go over the Print Settings, Title Adjustments, and PDF panes. As always, if you have comments or questions post them below, and happy writing!

Next in this series -> Print Settings, Title Adjustments, and PDF Settings

Saturday, December 12, 2015

Compiling in Scrivener: Separators, Layout, and Table Options

Welcome back to my series on Compiling in Scrivener. Today I’ll be going over three of the Option panes that are present in almost every “Compile For:” output kind, Separators, Layout, and Tables. To recap, these three Option panes are not available when compiling to .fcf, .fdx (file formats for Final Draft, a scriptwriting software package) or .fountain (a “plain text markup language for screenwriting”) formatted files. The Tables Option pane is also not available when the output is a MultiMarkdown file format.

Separators


The Separators Option pane allows you to configure how Scrivener’s compiler handles the transition between objects in the Binder, essentially. There are four transition types: from a text file to another text file; from a folder to another folder; from a folder to a text file; and, from a text file to a folder. For each of these transitions, there can be one of four separators selected: a single return, an empty line, a page
break, or a custom separator you type in the space next to the selection. You can get creative here if you want to since the “custom” type permits a line of text to be included. This includes the Image Placeholder tags. The image placeholder tag is <$img:>, with a required element after the colon that identifies the image to use. If you have already imported the image into the binder (which I recommend, just for simplicity’s sake), you can simply use the name that shows up in the binder. As an example, let’s say you have an image file called “transition”, which you have placed in your binder. To use that file in your “custom” file->file Separator type, select “Custom” for the Text separator and type <$img:transition> into the text field next to the popup menu. This image will now appear with a blank line above and another below
wherever two text documents appear in your binder, visually separating them.


Layout


Options available to the Options pane change somewhat depending on what kind of output type for which you are compiling. There is one option always present and one present to all output types except iBook Author, the “Do not add page padding to first document” (all) and “End of text marker” (all except iBooks). With the first option checked (“Do not add…”), the compiler will not insert padding on the top of the first page of the document if that document would otherwise have padding. This is an option available from the Formatting pane, “Page Padding.” If there is padding set on the Formatting page, any time a new page is created it will have the specified number of blank lines inserted at the top before the Title, Title Prefix, Title Suffix, or page text. For example, if your settings create a page break for every new chapter (folder) and “page padding” is set to 14 on the Formatting pane, the first page of every new chapter will have fourteen blank lines inserted before the Chapter Title. To avoid this from happening to the very first document of the compiled output, check this box here. This might happen if, for example, you print out only the manuscript, with no title or front matter, and don’t want that first page to start 14 lines down.
The “End of text marker” option allows you to specify a text string that will be placed at the very end of the document by the compiler, signaling the end of the manuscript’s text. This allows you to specify this text—which is sometimes required for submission or printing—without actually having it appear anywhere in the editor while you are working on your document (so you can’t accidentally delete it).
When you are compiling for PDF or Print output one more option appears here, “Empty Lines Across Page Breaks.” With this setting enabled, any empty line Separator (from the Separators pane) that would be the last element on a page before a page break or the first element after it will be replaced instead with the text you type in the field. This ensures that all scene transitions are visible in the output document.
Additionally, RTF (but not .rtfd), Word, and OpenOffice output types have three more options appear here. If enabled, “Use hyphenation” will hyphenate words that would normally be kept intact across line breaks; by default, this is not enabled. “Avoid widows and orphans” attempts to adjust paragraph padding only for paragraphs that will leave the last line on the following page (a ‘widow’) or will have all but the first line on the following page (an ‘orphan’). “Columns” will output the compiled document using the column settings specified (it does not create columns in the project itself, only the output).

Finally, if you select .epub or .mobi output types, there are several additional options that appear to help control the layout and appearance of these documents. Selecting “Downsize and resize inline images to visible size” will change the sizing on any inline images for your document to the actual visible size of the image in the document, for the compile output only, in order to reduce the size of the compiled file. For ePub, “Include standard Adobe Digital Editions page template” will generate an ADE file which may be required for certain devices to properly display the document. If your output is aimed at these documents (the Kobo, Sony reader, Nook, and others), select this option to make sure the ADE file is created. In the .mobi output type, this option changes to “Book begins after front matter” instead; selecting it with Front Matter enabled on the Contents Option pane will mark the first page of the actual manuscript as the start of the book, bypassing the any of the front matter when the reader opens the file initially.
With these two eBook formats, a Table of Contents section appears, allowing you to specify what table of contents will get created with your compiled output, if any, and if you have one already created you can put the name of that document in the field for “HTML table of contents file” and it will be used instead. Note that Amazon will not accept a .mobi file without an HTML table of contents. The setting for “Use flat list of contents in navigation controls” will generate the table of contents without regard to how deep the items appear in the document structure—say, if you use Parts with Chapters, each of which contain multiple Scenes, it will not differentiate those items based on their status as a level 1 (Part) or level 2 (chapter), but only their location in the overall structure. “Generate HTML table of contents” will create an actual document in the compiled output, in addition to the automatically created—but not user-visible—software table always created by the Scrivener compiler. Enabling “Center body text in HTML table of contents” creates a table of contents centered in the page, rather than aligned to the left side.

Tables


The final of these Option panes is the Tables Options. This pane is generally used if the compiled output needs to be formatted as a single table, for the entire output document. In general, it is a rarely used Option pane, but when you need it, you need it. Two of the options only become available if the first is ticked (“Stitch together adjacent tables if possible”); ticking this box will tell the compiler to do its best to combine all tables in the entire document that are separated only by spaces and blank lines. The other two options, “Insert blank row between stitched-together tables” and “Restrict width of stitched-together tables to page width” are reasonably straight forward, and do exactly as advertised. There is one additional option for .mobi output only, where you can tell the compiler to turn tables into images instead of text tables, and specify the maximum width of the resulting images.

In conclusion


So far, we’ve covered quite a large section of the compiling options available, but there are quite a few more yet to go. Hopefully, I’ve been able to inform your use of the Separators, Layout, and Tables Options when Compiling in Scrivener, making it easier and more reliable for you to take advantage of these features. The next blog post in this series will cover the Footnotes and Quick Font Override Options, as well as Page Settings. As always, leave any questions or comments below, and I hope to see you in a couple of days!

Next in this series -> Footnotes, Quick Font Overrides, and Page Settings