Welcome back to Cogitations of a Semi-Pro Wordsmith. Today, I will be covering the last four of the “All Options” Options panes available for compiling in Scrivener: Cover, Meta-Data, RTF, and Kindle Gen. Three of these are specialized, only appearing for a few output types. The fourth (Meta-Data) actually appears for many types but has some different options depending upon your output file format. Let’s get started, shall we?
Cover
To set the cover, it must be in your binder already, usually the Research folder somewhere (I always create a separate folder for cover art under the Research folder in my projects). For .epub files, there are three additional options: an SVG button, which permits you to specify SVG code if this is needed. If your graphic artist gave you SVG code or an SVG image for this, you’ll need to clarify the settings with him or her to make sure you get this right. There is also a field to set the title of this page in the compiled file. This is not the book title, but rather the title of this page. By default, Scrivener puts “Cover” in this field, and I recommend leaving it unless you know for sure you need another title for this page. Finally, there is a checkbox "For reading in iBooks only” that permits you to tell the compiler to set that image as the one for the iBooks shelf. If you will be sending the output file to iTunes Producer, un-check this setting, and use iTunes Producer to set the shelf image instead.
For .mobi file output, the only option is to set the image.
Meta-Data
Meta-data appears for most file types (not including iBooks Author Chapters, Print, .txt, or the script outputs .fdx or .fcf), but what appears here depends on the output settings. For all the supported formats except .fountain, the pane is titled “Meta-Data”; for the .fountain output type, it is called “Title Page Meta-Data.” No matter what the settings are, this pane is for including the values for meta-data variables and their values that you select. There are basically four different panes, which I’ll discuss individually.
For PDF files, there are four meta-data variables: Title, Author, Subject, and Keywords. Any variable which have default values set in the Meta-Data Settings pane (Found under the “Project” menu) will appear in the proper variable field as gray type. You can override it by entering specific information in the field. For the Keywords field, entries are comma-separated values, and entries will appear as tags (with a light blue rounded rectangle inside of which is the “keyword” … which, frankly, makes them “key phrases” not just “words” but whatever).
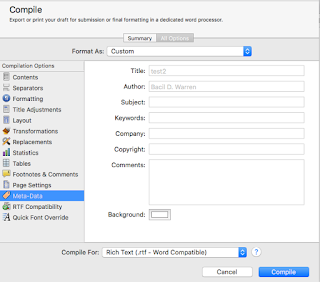 For the word processing output types (.rtf, .rtfd, .doc, .docx, and .odt) as well as the Web output formats (.html and web archive), all four of the PDF variables are present, as well as Company, Copyright, and Comments, and a background color setting. For .html and webarchive formats, the “Title” variable will become the page title (i.e., the value for <title>Title Here</title>). The Keywords field here acts just like the one for PDF outputs, and the Comments is a free-form text box just as the others are free-form text fields.
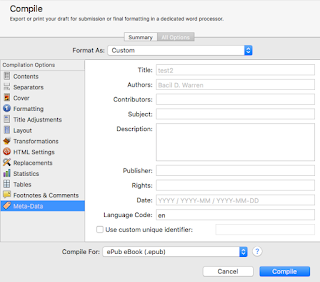 For the .epub and .mobi file types there are different fields, but most of them act like the ones from the first two. There are two major exceptions: the “Authors” field (note, changed from “Author” in the other two) and the new “Contributors” field permit semi-colon-separated values rather than free-form text; if there are multiple authors or contributors for the document, enter each name separated by a semi-colon. Besides Title, Authors, and Subject (no “Keywords” in this pane), this pane has the Contributors, Description (free-form text box), Publisher, Rights, Date, Language Code, and a checkbox to enable the use of a custom unique identifier. Of these, the one to be most concerned about is the Language Code, which should be the official ISO two-character code for the language of the document. If your publisher gave you a unique identifier, click the checkbox “on” and put it in that text field.
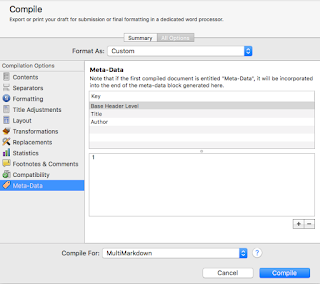 With MultiMarkdown (any output type) and .fountain (Title Page Meta-Data) output types the interface is different, using a table to add or subtract arbitrary variable names and a text box below to enter the values. There are no required Meta-Data entries for MultiMarkdown, but Scrivener does create a few by default in new projects. To add a new variable, click the “+” button in the lower right, and to delete one select it in the table at the top and click the “-“ button instead. To add a value to a variable, select it in the table and then click in the text box at the bottom and type in the value. Scrivener warns that empty lines in this text box will cause the Meta-Data block to end prematurely because it inserts these values verbatim and the MultiMarkdown format sees an empty line as the signal to stop processing Meta-Data. Be careful!
RTF Compatibility
The pane for RTF Compatibility is available to RTF compile types, both .rtf and MultiMarkdown RTF files, but does not appear for .rtfd files (a file format used mostly by the Mac OS X/NeXTSTEP application TextEdit). It will also appear for the .doc and .docx output formats if you have set your Word output formats (.doc or .docx) to use RTF, by enabling that setting in the Import/Export pane in the Preferences.
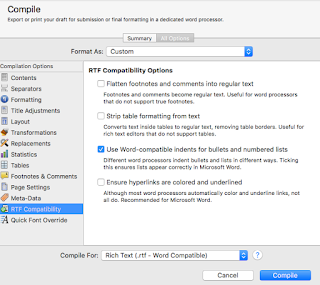 The setting for this pane when using .rtf or MultiMarkdown RTF output formats has four settings. The main thing to keep in mind about this is to only change the default settings if your output looks bad. By and large, the RTF output settings are pretty good and produce fine RTF files. If, however, your editor of choice is choking on something, invert the setting for whichever part with which it’s having problems. The first setting will essentially convert footnotes and comments into text endnotes, and converts their marker into the standard set (typically *, †, ‡, §, ‖, ¶, etc.). The next setting tells the output compiler to essentially turn any tables into regular text, which you would need if your particular RTF editor doesn’t handle tables. If you are using Word as your editor but are exporting in straight RTF (that is, not using the .doc or .docx output formats) or MultiMarkdown RTF, you can tell the compiler to use Word’s list making tools. Since Word handles these differently than do other word processors, you will definitely want to check this if you have bulleted or numbered lists in your output document. Finally, there is a checkbox for underlining and coloring URLs/hyperlinks. This box is unchecked by default since most editors do this on their own. Word, however, does not, and will need this box checked if you intend to open your compiled RTF file in Word and have hyperlinks in the output document.
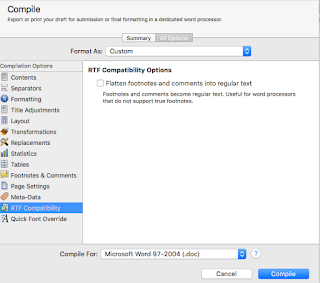 The RTF Compatibility pane when using .doc or .docx files is much simpler, and has only the setting to flatten footnotes. For both RTF and DOC output, checking this box will not override the setting to hide comments, but will only determine how they are displayed if they are included.
Kindle Gen
In Conclusion
We’ve come a long way on this journey, but I hope I’ve been able to simplify and explain each of the various Option panes available in the “All Options” for Compiling in Scrivener. These final four are the last of the panes. In a couple of future blog entries (within the next couple of weeks), I will be stepping through a few very common output scenarios, and going over each pane’s settings that I needed to modify to set the correct output. I think that armed with the general knowledge from these past blogs, and the few more to come, most Scrivener compile output scenarios will be a snap for you to set up. If you have any questions or comments, post them below, or you can shoot me a tweet (@BacilDonovan on Twitter) or an email at (), and I’ll do my best to answer your question. If you do, please note that I may re-use the question (with personal details omitted, unless we both agree otherwise) for clarification purposes on my blog later. If I do, I will notify you of my intent to do so.


No comments:
Post a Comment
Note: Only a member of this blog may post a comment.