Hello, and welcome back to Cogitations of a Semi-Pro Wordsmith. Today’s Compiling in Scrivener topic is three of the final option panes available only to certain output formats: Script Settings, HTML, and Compatibility. As you will soon see, these are highly specialized option panes for particular output types, and may prove very useful if you output into these compile formats.
Script Settings
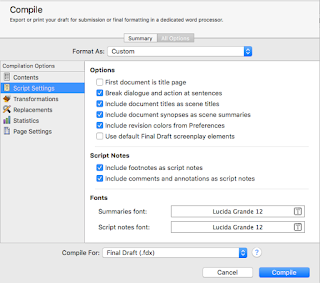
 As you might expect, the Script Settings option pane is aimed at setting options when the compile output is Final Draft (.fdx) script, although the .fountain script type does have a few plaintext options available in this pane. This setting is not available for .fcf output types, or any non-script outputs.
A few of these are pretty straightforward. “First document is title page” will do exactly that; be sure, however, that your first document actually is a title page! If you click this checkbox and then fail to add a title page at the beginning, it will chop off the first page of your script. “Include document titles as scene titles” and “Include document synopses as scene summaries” are useful if you title your documents in the Binder with your scene titles, and/or if you use the synopsis section of the Inspector pane to keep scene notes you want to appear in the Final Draft document as a scene summary. “Include footnotes […]” and “Include comments and annotations […]” will allow you to choose whether you want to have footnotes, and/or comments & annotations, appear in the Final Draft output as script notes. If either option is unchecked, those items will not be compiled into the final output at all.
“Break dialog and action at sentences” is sort of the scriptwriting equivalent of widow/orphan control; that is, in scriptwriting it is normal to keep action and dialog together. If this checkbox is on, any time that a dialog or action sentence will be separated by a page break, the compiler will force them to stay together by placing them after the break. “Include revision colors from Preferences” enables you to control whether or not the changes made to the document (if you are tracking them) will display with the colors set in the Preferences pane. This way, the compiled output will maintain the change order & keep them labeled with the color you’ve chosen. If you don’t track revisions this way, this setting will have no effect.
Finally, if you check the “Use default Final Draft screenplay elements” checkbox, the compiled output will tell the compiler to ignore your formatting, and instead have Final Draft handle the formatting of your output file. With this checkbox unchecked, the compiler will keep your formatting decisions intact.
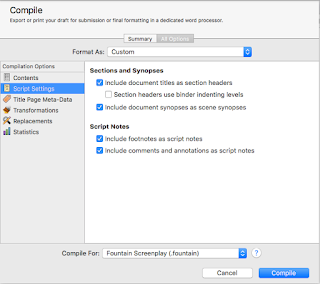
 When using .fountain output, this pane changes somewhat, with only a few checkbox options. The checkboxes for “Include document titles […]” and “Include document synopses […]” remain, with an additional checkbox for “Section headers use binder indenting levels,” which simply formats the sections in the output file to reflect, visually, their depth in the hierarchy. The “Include footnotes […]” and “Include comments […]” checkboxes also remain.
HTML
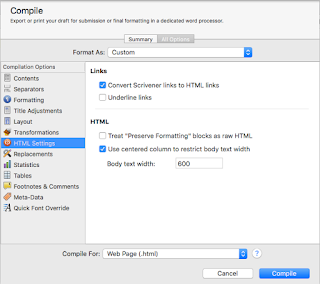
 The HTML option pane is only available when the selection is set to the .html (but not webarchive!), .epub, or .mobi compile outputs. Selections here allow you to turn on or off the option to convert Scrivener links into HTML links—allowing you to keep references to other Scrivener documents intact in the final output—and whether to underline those links or not (.epub and .html only). There is also an option to “Preserve Formatting” as raw HTML; you can mark selections of text to Preserve Formatting under the Format menu->Formatting->Preserve Formatting. For .html output, you can also select whether to restrict the body text to a particular width or not.
Compatibility
The Compatibility pane enables certain options, depending on whether the output type is set to the MultiMarkdown (without clarification), MultiMarkdown .tex, or MultiMarkdown .html format.
For a .tex format, the only option is whether to enable XSLT post-processing.
In .html format, the two options include the ability to enable the same XSLT post-processing, as well as Markdown Compatibility Mode.
In Conclusion
We’re nearing the end of the option panes available when compiling in Scrivener, with Script Settings, HTML, and Compatibility being three of the last seven. My next blog will finish the final four options available, the Cover, Meta-Data, RTF Compatibility, and Kindle Gen Option panes. I hope I’ve been able to give you some additional insight into these panes and enabled a better understanding of how they work. As always, leave comments or questions below, and happy writing!
Next in series -> The Last Four (Cover, Meta-Data, RTF Compatibility, and Kindle Gen)
Next in series -> The Last Four (Cover, Meta-Data, RTF Compatibility, and Kindle Gen)


No comments:
Post a Comment
Note: Only a member of this blog may post a comment.