Footnotes & Comments
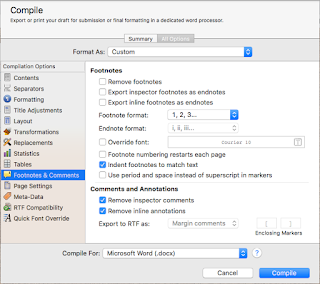
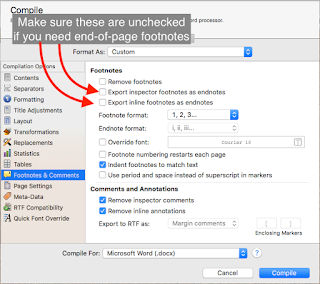 The Footnotes & Comments pane tells Scrivener how to deal with footnotes or comments that exist in the Scrivener project when it creates the compiled document. Since there are several different styles that dictate how to treat citations, footnotes, and other “meta-information”, this can be a complicated endeavor. Hopefully, I can simplify it for you. First, if you need footnotes to appear at the bottom of the page on which they appear, make sure that you are using a compile format that has a “page” concept. Most e-book formats do not have such a concept; the page size is dictated by the device, its viewable area size, the orientation of the viewable area, and the size of the display font. Scrivener cannot, in advance, anticipate all these options (and in the case of the font size, can’t even begin to start since the reader controls the font size, and can change it whenever she or he wants to). All “footnotes” in these e-book output formats (.epub and .mobi) are therefore endnotes of some kind; you can tell the compiler whether to put them at the end of the section, or at the end of the document. Other formats do have a page concept, such as .doc, .docx, .odt, and others, and they can put the footnotes at the bottom of the page. To do this, make sure both of the boxes “Export […] footnotes as endnotes” are not checked, this should permit the footnotes to appear on each page where they are referenced. If you prefer (or, if your publication style requires) endnotes instead of per-page footnotes, make sure to check these boxes as appropriate.
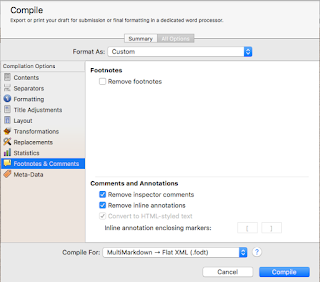
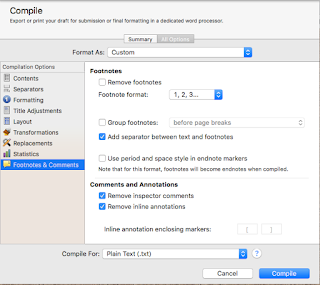 Note also that not every format that can output foot or endnotes has all the options shown on these images. These are the most complicated output formats for Footnotes & Comments, so I chose to display these to show you all the various options. Here are two simpler panes, the .txt output, and the MultiMarkdown->Flat XML output. Both of these have much simpler handling because their output types can’t handle any of the more complex options. As you can see, the option to remove footnotes is always available.
Quick Font Override
 This one is simple: check this box if you want all the fonts in the document to have the identical font face. This option does not change the sizes, nor will it change italic, bold, or underline and such, and it will only do so for the compiled output. That is, marking this checkbox doesn’t change the selections you make in the Formatting pane, those settings remain. It simply adds one step after applying all of the formatting, and changes the font face for all fonts—even in documents checked “as-is” in the Contents pane—to be the same face.
Page Settings
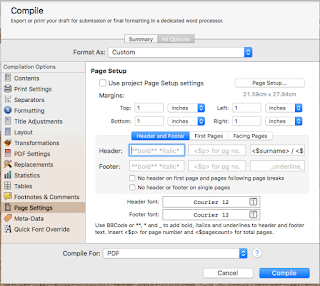 Use the Page Settings pane to tell the compiler some information about the layout of the pages it will put out: at a minimum, the page length and width and the margins for the top, bottom, and left & right sides. Most output types that have this pane will also allow you to specify what, if anything, goes in the header & footer, whether to treat the first page differently than subsequent pages, and whether to treat verso/recto (facing) pages differently.
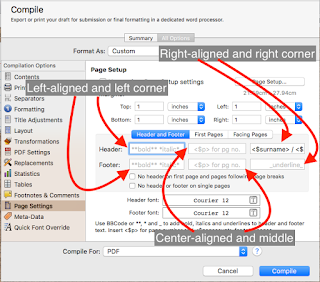 As you can see in these images if there is an option to create headers & footers, then there are six boxes where you can enter header/footer information, three per. The left-most are left justified and in the left corner. The right-most are right justified and in the right corner. The two middle ones are center justified and in the middle of the header or footer. You can see on this image there is a color difference between the Header/Right and all five of the others: the Header/Right has “<$surname> / <$” visible in the text field, in a black font color, and the other five have light gray fonts. If there is nothing entered, you will see the light gray font—this is a placeholder, intended to show you examples of information you can enter. If you actually enter something in a field, it will be in the dark black font you see in the Header/Right field. There are several tags you can use in these fields, including ones for page number, total pages, word count, author’s name, and so on. You can also use markup using BBCode, or the markup shown at the bottom of the pane, to format the text in these locations. You can also set the font face & size for the header & footer at the very bottom of the pane.
In Conclusion
I hope that this installment of Compiling in Scrivener has been informative, and helps you with compiling your projects (at least, as far as using the Footnotes, Quick Font Override, and Page Settings panes!). Next time I’ll go over the Print Settings, Title Adjustments, and PDF panes. As always, if you have comments or questions post them below, and happy writing!
Next in this series -> Print Settings, Title Adjustments, and PDF Settings
No comments:
Post a Comment
Note: Only a member of this blog may post a comment.