Hello, and welcome back to Cogitations of a Semi-Pro Wordsmith! Today, I’m continuing on in my series on Compiling in Scrivener, covering Print Settings, Title Adjustments, and PDF Settings. Here, we are starting to get into Option panes in the Compile sheet that are relatively limited in their applicability—though, not their importance!—and will be covering Option panes that sometimes only apply to one or two compile output types.
Print Settings
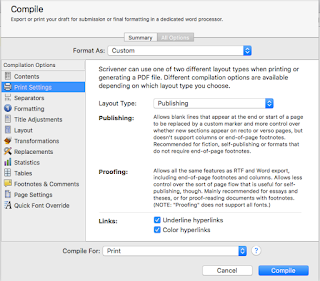
 The Print Settings pane is only available if your output type, in the “Compile For:” menu, is either “Print” or “PDF.” There is one menu selection, for Layout Type, and two checkboxes. The two Layout Types are “Publishing” and “Proofing.” The purpose of this setting is to enable or disable certain options in other panes. The “Publishing” setting—which, according to Scrivener, is just a title not a hard-and-fast rule about its intended use—turns off the ability for printed or PDF output documents to have end-of-page footnotes or use columns. In so doing, it enables control over recto/verso page options and certain custom markings (specifically, custom end-of/start-of scene markings), as well as header/footer options. The “Proofing” setting essentially does the opposite, enabling end-of-page footnotes & columns in the output, while disabling the other options listed. It might be better even to think of the “Proofing” Layout Type as “Footnote & Columns” rather than “Proofing,” since it’s not just an output format for proofing your document in Printed or PDF formats. The two checkboxes at the bottom of the pane, when checked, enable hyperlinks to be either underlined, colored (blue, always), or both, in the printed or PDF output.
Title Adjustments
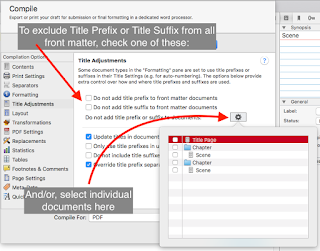
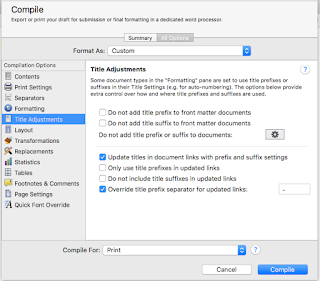
 The Title Adjustments pane is only present if the Formatting pane has had a title prefix or suffix set at least one time. Once that is true, this pane appears, and you can use it to exercise more fine-grained control over the Title Prefix and Title Suffix settings from the Formatting pane. Specifically, it allows you to specify what documents you do not want to have a Title Prefix or Title Suffix, and to exclude all front matter entirely with a checkbox (one each for Prefix & Suffix). It also permits you to specify how Title Prefix and Title Suffix items are handled in document links (like, say, a Table of Contents), including disabling them or specifying a special separator for them in links. For example, if you have used the Formatting pane to set a Title Prefix of “Chapter <$n>:¶” (meaning, a carriage return after the Prefix of “Chapter 1:” etc.), the carriage return would also be in the Prefix in these document links. If you check the “Override title prefix…” checkbox on this panel, you can replace that carriage return with a separator of your own choosing, so as not to interrupt your Table of Contents with extraneous returns.
PDF Settings
 The PDF Settings pane is only available when the output format for the compile is PDF and also only if the “Publishing” Layout Type is selected in the Print Settings pane. The PDF Settings pane allows you to specify whether the compiler will create an Outline that certain PDF readers (including Acrobat Reader) will display in the sidebar—not a table of contents—and whether to underline &/or color internal links (and if so, what color to use).
In Conclusion
Most of the settings in these panes are reasonably straightforward, and should not pose much of an issue. Do keep in mind that the Print Settings Layout Types are not hard-named. That is, the name “Publishing” is just a name to use to distinguish it from the other option, “Proofing,” which is also not just for creating a proof. They are really just names to distinguish the one from the other.
With that, I do hope I’ve been able to explain these options for you, and make your compiling in scrivener using the Print Settings, Title Adjustments, and PDF Settings panes a little easier. For my next post, I’ll go over the Script Settings, HTML, and Compatibility settings panes. As always, if you have questions or comments please leave them below, and happy writing!
Next in series -> Script Settings, HTML, and Compatibility
Next in series -> Script Settings, HTML, and Compatibility

No comments:
Post a Comment
Note: Only a member of this blog may post a comment.