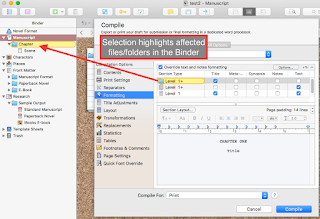
Selecting the Formatting pane reveals two settings areas for the current project: the Structure and Content at the top, and the Formatting Editor at the bottom. The Formatting Editor is where you can make changes to the document output formatting, and those changes apply to the "Section Type" selected in the Structure and Content area at the top. Initially, there should be a highlight around the "Level 1" folder item in the Structure area, and a corresponding highlight in the Binder of the document as seen in the second picture. This shows you what the selection in the Structure and Content area will actually apply to in your document, which I think makes it much easier to understand what is happening. With "Level 1" selected in this document, all changes will apply to the Chapter folder.
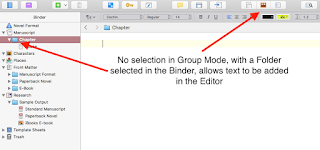
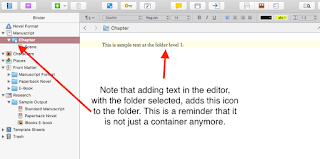 Recall that a "Folder" in Scrivener is not just a container, it can also have text. Not just contain text documents, but actually be both at the same time as you can see in these two images. In the top one, the folder is selected and the buttons in the Group Mode are all not-selected, which makes the middle area a regular text editor. Then, in the bottom image, you can see that text has been added to the Folder, which also has a new icon to show that it is both a Folder and text. If a Folder has text you wish to be part of the output, make sure the checkbox under the "Text" column is checked. If you have text there that should not be part of the output, un-check that checkbox.
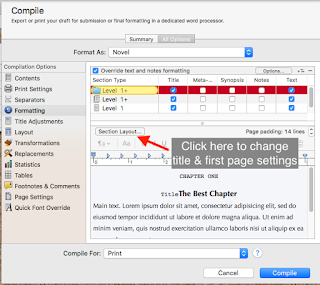
Whatever level you have selected, you can make changes to how the Title Prefix & Suffix, Title Appearance, and First Page display for that level by clicking on the Section Layout button. With the Prefix and Suffix, you can control the display of the items before and after the selected level's title as shown here. Since the "Title" checkbox is checked, the name of the folder or file is displayed (here, just as "Title" which is a placeholder name). As you can see, an entry in the "Prefix" shows up before the Title. In this case, the word "Chapter" and the special character $t enclosed in less than/greater than symbols (<, >), as well as a paragraph character (the blue ¶ symbol). What that will do is put the text "Chapter " and insert the appropriate text for the chapter number: "One," "Two," etc., counting from the beginning of the current Contents—that is, whatever you have selected in the Contents pane. You can force renumbering to start somewhere else, using certain placeholder tags, but I'm going to cover most of those in a different blog post.
However, here is a good place to cover a few very useful placeholders for formatting Titles. We saw the $t entry a moment ago; this will print the language-specific word version of the current chapter number in "Title Case," the exact rules of which are language-specific. There is the $n placeholder, which inserts the next Arabic number, $r and $R which insert the next number in roman numerals—lowercase and uppercase respectively. There is $w and $W which will insert the next number in word form in all lower or all uppercase respectively.
The Title Appearance tab allows you to control certain aspects of the Title, Prefix and Suffix all at once, and to permit the Title to run-in with the first line of the text document, if that can be done. There are other ways to format the title, not just the four here, but these four (shown in the second image) can be controlled from this pane. Formatting for the font, size, justification, and other settings will be shown shortly.
The First Page tab is where you can change certain aspects of how the compiled document treats the first page of a new section (including the first page of the document, in most cases). In the first image, you can see the various settings options: "Uppercase words" (and "Use small caps"), and "always start"/"start next section on." Uppercase words allows you to tell the compiler how many words of a new section will be in uppercase (or, use small caps instead if that option is checked), and the always start/start next options allow you to specify if all new sections (or only the next) will be forced to start on a verso (left-side, basically) or recto (right-side) page.
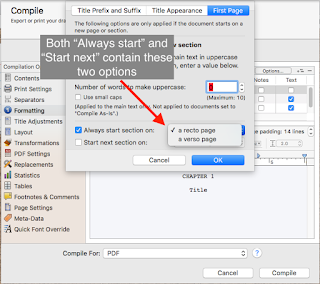
All of the options available under "Section Layout" can be changed for each Level of the document being compiled individually, if you should need to do that.
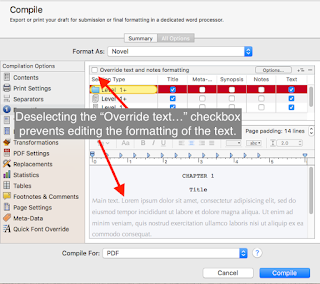 The rest of the Formatting Area, aside from the "Section Layout," is formatting for the text of the Level selected in the Structure and Content area. Once a selection is made at the top, simply click in the text area of the Formatting Area to format the text there, if you should need to. Any changes you make here will override the formatting in the documents at that level unless you have "As-is" checked for a document (on the Contents pane). You can also de-select the "Override text and notes formatting" at the top of the pane; if this is de-selected you will only be able to format the Title—and the Title Prefix and Suffix, if any, which can be formatted separately from the Title itself. As was mentioned earlier, in this pane you can change the formatting of the Title in addition to the four options available from the Title Appearance tab.
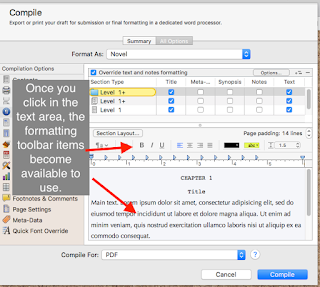 Once you've clicked in the text area at the bottom, you can select & change the various formatting options in the toolbar above the text itself. If you have a Title Prefix, Title, or Title Suffix in the text area, you can format them as well; all you have to do is select them in the text area and apply your new settings. Each of the Title, Title Prefix, Title Suffix, and Text can be formatted separately, even if they appear on the same line or if you only select part of one (as you can see in the second pic). Each Level selected will have their own settings for each item formatted.
As I noted, there are quite a few settings available here, and they can be highly tuned for exactly the kind of formatting you need on your output document. With that in mind, it is also really easy to get lost in the woods and over-think everything. A couple of tips might help you manage these settings without having to go nuts. First, consider your document structure. If you name your Chapters, and the only sub-level beneath your Chapter folders is text document scenes without titles, you can format the Level 1 folders to have "Title" checked, remove the text from the Prefix and un-check "Text", then un-check "Title" from the Level 2+ text documents (make sure the right items are highlighted in the binder!), and format the Text there. I know a lot of writers who write with a different font and size than they want to be in the finished product, and often have different line spacing than the output needs as well. Take advantage of this to have your editing text settings set up to make your life easier when you write—say, by using a 14, or 16 point font with 1.2 or 1.5 line spacing you find easy to read on your screen—and then use the Formatting available here in this Options pane to switch how those text document will appear in the "Compile For:" output, such as 12-point Times New Roman, left-justified with an initial .5 inch paragraph indent and 2.0 line spacing.
I hope that you've found Compiling in Scrivener: Formatting to be insightful and informative! As always, leave comments or questions in the comment box below. Next, I'll cover the four other Option Panes that are present regardless of the "Compile For:" settings.
Next in this series -> Other Common Options


No comments:
Post a Comment
Note: Only a member of this blog may post a comment.