Affiliate Disclosure

Some of the links on this page may be affiliate links, and I will make a small amount of money when you click on them, or buy the product. I have not been paid to review any products, nor have I been given any products for free in exchange for a review, and any affiliate links that may be present will not change the price you pay for an item.
Showing posts with label WritingTips. Show all posts

Friday, August 31, 2018

Save me! Backing up Scrivener projects part 3: Snapshots


Hello, and welcome to another cogitation! I hope that your summer continues to be awesome. I was able to fix the A/C, and now it’s working quite well, so this Tucson summer has been bearable.

In the “Save me!” series, I’ve talked about autosaves and automated backups in Scrivener proper, and the different ways that it can help save your hard writing work from falling prey to disaster. I also discussed the Automator tool for macOS, and how I have it set up so that I can make additional externally stored backups of important milestone versions of my Scrivener projects.

Today, I’d like to talk about one additional piece, the Snapshot feature of Scrivener, and how it works to help preserve your sanity (and documents!) while working on your project.


What is a Snapshot?


In Scrivener, a Snapshot is essentially a date-stamped copy of the text of a document (text only, not any metadata), and it is stored as a part of the document. I am not aware of any technical limit on the number of Snapshots a given document can have, but as we’ll see in a moment it isn’t usually necessary to keep more than about a half-dozen, maybe ten, of any given document.

A Snapshot is more than just a verbatim copy of that text, though. One of the very cool things about them is that the text in the Snapshot can be compared to the current document’s text, with added and deleted text highlighted in the Snapshot (more on this in a moment—also, note that as far as I am aware, the “compare” feature is macOS-only at this time). Snapshots can also be compared with other Snapshots, not just the current version of a document.

It is important to remember that a Snapshot only makes a copy of the text—not the keywords, metadata (custom or otherwise), notes, or other information, although it does copy the comments—and although it does preserve formatting, it doesn’t track changes in formatting.


Okay, but why would I want to use a Snapshot?


One main advantage of using a Snapshot is it gives you a touchstone for a given document’s contents. Since Scrivener does automatic saves and therefore there is no “revert” option, an excellent use for the Snapshot is to preserve the current text in a document before editing it. If you’re like many people, you have probably been conditioned to hit “save” frequently while writing (even I am conditioned this way, though I am slowly un-learning this habit). Since Scrivener does that part for you, as do many other current software programs, manually triggering a “save” isn’t really that important. Because of that, however, Scrivener doesn’t really have any way to “revert” changes (Word, Pages, other apps will do this, essentially by discarding the currently-open document and reloading it from storage).

The “revert” feature can be brought into play, though, using the Snapshot feature. There are at least a couple of ways to approach this, so I’ll cover two different thoughts.

First, what I informally refer to as the “Milestone Snapshot.” This is when you have completed a milestone for a document, and consider it ready to change status from (for example) “To Do” to “First Draft.” At that point, make a Snapshot (how, shortly), change the status, and work on the next document. Repeat that until every document is a “First Draft,” and then you’ll have a Snapshot of each document as it was when you completed that draft. This is generally my workflow. In this case, the Snapshot will enable you to fall back or compare to the First Draft version when you are making your edits on the way to your Second Draft.

Second is what I call the “Experimental Snapshot.” In this case, you create the Snapshot first (though, obviously not of a blank document, that doesn’t make any sense!), and then work on the document. If you get to a point where you are like “nah, this all stinks, I don’t want these edits anymore,” you can roll back to the previous Snapshot, and the experiment is wiped clean—though, it is possible to snapshot the current document before rolling back, as we shall see shortly.

One additional approach is to have Scrivener create Snapshots of any modified documents whenever a manual save is triggered (usually via Command-S or Control-S, but also by the File->Save command). This approach will provide a sort of analogue to the Revert option in some applications, especially if combined with the “Experimental” approach.


Snapshots sound like a useful tool, how do I create one?


Creating a Snapshot is quite straightforward. One way is to open your Scrivener project, click on the document you want to work on in the binder, and then type Command-5 or Control-5 (alternately, click in the “Documents” menu, and select Snapshots->Take Snapshot). The snapshot will appear in the Inspector pane under the “Snapshots” tab (the “camera” icon). Another way is to create a Titled Snapshot, by typing Command-Shift-5 or Control-Shift-5, or by selecting “Take Snapshot With Title” in the Snapshots menu under “Documents.” This will pop up a text entry field prompting you for a title to give the Snapshot, and then creates the Snapshot.


Another way is to tell Scrivener to take Snapshots of changed documents on a manual save, and then hit Command-S or Control-S, or select “Save” from the File menu. To tell Scrivener to do this, open the Preferences, click on the General tab, and click “Saving” in the left pane. In the right pane is a checkbox for “Take snapshots of changed text documents on manual save.” Click that checkbox on, and every time you manually save (via Command-S/Control-S or via “File->Save”) Scrivener will create a new Snapshot for each changed text document.


It is also possible to use these commands to create Snapshots of multiple documents at once. Let’s say you’ve decided that you want to work on one chapter today, and there are several scenes in that chapter. You know you may need to work back and forth on several scenes—or, you are like me and you like to edit in Scrivenings mode—and you want to Snapshot them all before starting. You could click on each one, hit Command or Control-5 (or Command or Control-Shift-5) and make Snapshots of each one, in turn, that would certainly work. If the documents are all at the same level, you could click on the top or bottom file in the list, shift-click the bottom or top file (thus selecting those two plus all files between them), and then create your Snapshot.

Another way to do this is you could click on the chapter folder in the binder (if you organize your work this way), then click on Edit->Select->Select with Subdocuments. This will basically do what it says, select all of this item’s subdocuments. Then you can create your Snapshot as you would otherwise.

One thing to keep in mind is that a Snapshot will only work on documents that have text. So, obviously text documents can have Snapshots, but “regular” folders can’t. If, however, your folder does have text (remember that folders in Scrivener are a loose definition), then the text can have a Snapshot. If you’re not familiar with this part of Scrivener, it’s not a huge deal, just know that “folders” by themselves can’t have (and don’t need) Snapshots.


Are there any caveats when using Snapshots?


Indeed, there are a couple of things to keep in mind about Snapshots (aside from the few things we’ve covered already).
Although Snapshots will preserve the formatting of your text, it will not track if or when formatting is changed—so, you can’t use the “compare” tool to easily see where formatting changes have occurred.
Snapshots do take up space, just like the text in the text document. It’s not a lot of space, but it is something to keep in mind—especially if you create a lot of Snapshots. This might happen if you turn on the option to create Snapshots on manual saves, and then instinctively hit Command or Control-S every few moments.
Also (as we’ll see shortly), rolling back a Snapshot is destructive, so it is important to pay attention during the process of reviewing, comparing, and rolling back Snapshots.


I’ve created a Snapshot, how do I compare (or rollback) changes?


Again, a note of caution: as of the publication of this blog post, the compare feature is a macOS-only feature.

Once you’ve created a Snapshot of a document, it will appear in the list under the “Snapshots” tab in the inspector. In addition, all Snapshots in the entire project will appear in the Snapshots Manager (under the Documents menu, in Snapshots->Show Snapshots Manager).


One way to look at/compare a Snapshot is to click it in the inspector, and click the “Compare” button. There, text that has been added in the current version (i.e., added since the Snapshot was taken) will show up underlined in blue, and text that has been deleted will be in strikethrough in red.


Although the inspector can be resized, it may make more sense to view the Snapshot in the editor. To do that, my favorite way is to right-click on the Snapshot, and then select “View Changes on Copyholder.” This will put the Snapshot into a copyholder window in the Editor. This makes it crazy easy to see the differences, and by scrolling line-by-line or page-by-page, it is quite simple to see where changes have been made (though, as noted, in terms of text added or deleted, not formatted differently).


There are a couple of other ways to view or compare Snapshots. One is to right-click on the Editor title bar of the document you’re interested in and select one of the “View Snapshot” options. If you have the Editor split, or if you have a copyholder window open, you can drag the Snapshot from the inspector into the title bar for the copyholder or split window, and it will load there. Unfortunately, neither of these options shows the changes highlighted, which is why I prefer to use the “View Changes on Copyholder” option.

One additional thing you can do is compare two different Snapshots, instead of comparing a Snapshot to the current document. To do this, click on a Snapshot you’d like to use as a comparison, and then Command-click on the Snapshot with which you’d like to compare the first, and click the “Compare” button. The inspector will show you the markup (red strikethrough for deleted, and blue underlined for added), identifying the changes between the two, just like comparing between the current version and a given Snapshot.

As for rolling back changes, once you’ve decided that you want to roll back to a Snapshot, select the Snapshot to which you want to roll back, and click the “Roll Back” button in the inspector. Because rolling back will destroy the current version, Scrivener will ask if you’d like to make a Snapshot of the current version of the document before rolling back the changes. If you are not 100% certain that you will not want the current version of the document, you can click “Yes” to create a new Snapshot of the current document, or “Cancel” to stop the rollback altogether.


What are some workflows that make the best use of Snapshots and other safety tools?


I can think of two primary workflows that make good use of Snapshots, automatic backups, and automatic save. Undoubtedly there are others.

One is in that “Milestone” workflow that I use myself. In this setup, automatic backups are set to occur when closing the project, and Snapshots are created when a document is ready to “graduate” to the next level of status (To Do to First Draft, First Draft to Second Draft, and so on). When I start a project, I do some basic outlining of how the manuscript will be structured, and then I go through it (not necessarily in any particular order) until I have a completed first draft. At that point, I will have finished each scene/chapter/whatever (for the first draft!), and each of them gets a Titled Snapshot. I change each document and folder to have the status “First Draft,” and then I close the project. Scrivener does a backup of the project, and once the backup is finished and the project is closed, I run my Automator action to make another backup (on external storage … actually, off-site storage, through Google Drive), so I have an additional copy of that project with all of the Snapshots. This is my First Draft milestone. I repeat that procedure for each draft that I write.

Another is to use Snapshots and backups as a fall-back (an extension of the “Experiment” idea earlier). Set the backup to run when the project is opened, and before you start editing a document, make a Snapshot of it (you can’t make a Snapshot of a blank document so you won’t start with a Snapshot in that case). Work on it, make changes, make additional Snapshots if you like, and then when you’re done, close the project. If at any point you decide you don’t like how a document has turned out, you can roll back the changes (making a Snapshot of the current document, if you wish)—a “revert,” if you like.

If you decide you don’t like how anything turned out, you can do that to every document you changed, or you can just close the project. Since Scrivener autosaves, you can put the current project in the trash (or move it somewhere temporarily, like your Desktop), and move the most recent backup to whatever location you keep your works-in-progress. If necessary, uncompress it from the ZIP file. Now, your project is in the state it was when you opened it, before making the changes that you ended up not liking. The formerly-current project is now just an experiment that didn’t work out, so you can safely trash it (or, compress it and move to storage).

Unquestionably, these are not the only two ways these tools can be combined. One thing I didn’t mention in the Automator article was the idea of using a Folder Action. Basically, this is using an Automator app or AppleScript to watch a given folder, which will automatically perform actions when certain criteria are met (usually, when items are added to the watched folder, but there are other watchable actions).

An example workflow for using a Folder Action in addition to other workflows would be to create an Automator app that watches the Backup folder for your Scrivener project, and every time a new file was added to that folder—i.e., any time Scrivener created a backup—the Automator app would make a copy of that backup and move the copy to other storage. Another option might be to have a Folder Action that watches the /Volumes/ folder for your USB Flash Drive. When it detects that your USB Flash Drive has mounted, the action could compare a folder on the USB against the Scrivener Backups folder, and copy any files or folders it sees in the Backups folder that are not present on the USB. Bam! Instant backup and all you had to do was create one Automator script (you don’t even have to run the script in this case, it runs itself when you plug in your USB drive).


Final thoughts


There are myriad ways to make autosave, automatic backups, Automator, and Snapshots work to help save you from the practically inevitable technology malfunctions that can drive writers insane, and help you recover from any such problems that may occur.

If you have other workflows that leverage these tools to make your life easier or any questions about Snapshots (or any of the other topics), feel free to comment below!

Wednesday, August 29, 2018

New Patreon page!


After quite a lot of deliberation and consideration, I decided to launch a Patreon page ( http://bit.ly/bdw_patreon ), both as a creative spur for me and as a benefit for fans, readers, and other writers and artisanal publishers.

The purpose of my Patreon will encompass a few things, chief among them:

  • To provide early access to my creative writing projects (novels, short stories, poetry, and others such as that)
  • Early access to many of my how-to, writing advice, writing tool, and review blog entries (from Scrivener to writing process, to editing and publishing, and others)
  • Exclusive access to some things, such as behind-the-scenes coverage of media events and other public functions
  • At certain tiers, early access consideration for beta reading new materials that I will publish
as well as others that I haven't quite figured out yet!


If you're so inclined, come join me on the ride … we'll learn, we'll laugh, and we'll shed a few tears. It'll be fun!

Monday, July 9, 2018

Save me! Backing up Scrivener projects part 1: Auto-save and Automatic backups in Scrivener

Hello again, and welcome back! Hopefully your summer has been less eventful than has mine. So far, the A/C has tried conking out three times (and one of those days it was 109 °F!), but fortunately I was able to get things right again. Today, I'm starting a new series covering some ways to save your hard work from technological issues that may strike the modern writer. In this series, I will go over some ways to use built-in Scrivener tools, as well as some of my thoughts on external automation tools, in order to help alleviate the inevitable crash, hard drive failure, or other disasters that may befall the CloudAge™ Author. In today’s cogitation, I’ll go over two Scrivener systems, auto-save and automatic backups. In Part 2, I'll look at a macOS option I use to help make this system more robust for my needs, as well as some ideas for modifications that others may find helpful and a note about possible ways Windows users can do something similar. In Part 3 I'll go over Snapshots and some ways they can help with disaster recovery, as well as some thoughts on them in general.

Scrivener itself has supported an automatic backup system since at least version 1.5, a system that offers the option for you to backup to a specific location, and when. It has also offered an auto-save feature as long as I’ve been aware, and I believe offered that from the very beginning. The automatic backup feature is optional, and fairly flexible. The auto-save feature is always-on, with a few configuration options.

With that, let’s take a look at auto-save and automatic backups in Scrivener 3 (which incidentally also work in Scrivener 2, although the preferences window will look slightly different).

Auto-save


Auto-save in Scrivener is always-on, but the amount of time it waits before saving is configurable, and it also offers a couple of options for the writer who doesn’t particularly care for auto-save (I know there are some, although I am not among them).

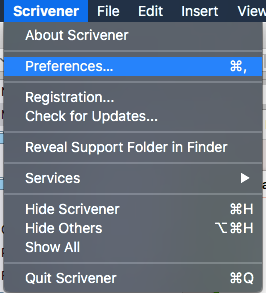
To access the settings for both auto-save and automatic backups, open a project in Scrivener and select the Scrivener menu, then click “Preferences …” (or, hold the command key and type a comma):


Once open, click the “General” tab, and click on the “Saving” item.


In this pane, you can tell Scrivener how long to wait before auto-saving, as well as whether to create Snapshots of any changed text documents when the “Save” command is manually invoked. There is also an option for notifications when an auto-save kicks off, if you’re in composition mode.

The latter two options may need a little exposition. The second one, “Show notifications when saving in composition mode,” will generate an on-screen display when a save occurs if you are writing in composition mode. That one is pretty straightforward, and if you want to be notified each time that happens, click that checkbox on.

The first of those two, “Take snapshots of changed text documents on manual save” allows you to  essentially create backstops for your work each time you save manually. Although the Snapshots feature deserves (and I will give it) its own blog post, the short of it is that within a Scrivener project, you can save a copy of any of the elements of your manuscript at a given point in time. A Snapshot is basically just a “frozen” copy of a document, and continued editing on a document is done in the current version of the document, with one or more Snapshots acting as fall-back points.

If you enable that checkbox, then auto-save continues as normal by saving the current state of any changed documents whenever Scrivener is idle for the number of seconds listed in the Preferences. Then, anytime you manually save (with either a Command-S/Control-S or by selecting "Save" under the File menu), instead of just saving the changed files it will create a Snapshot of each changed document.

I have seen some discussion in the Literature and Latte forums about the auto-save, including requests to make it optional (which the developer has ruled out, so that’s just the way it goes). I myself rely on that auto-save (I have ADHD, and sometimes get hyper-focused on writing—when I do, I often forget to save!). So, I am glad it is there but if you really dislike it, you can set the auto-save to a ridiculously long time. Just keep in mind that the longer you set it, the more work you could potentially lose.

The most often cited reason for this is that with this auto-save setup there is no "Revert" option for Scrivener, and there are some writers who don't like that. I understand that perspective and it makes sense, but allow me to try to summarize the main reason there is no "Revert" feature, and how to effectively replace it. First, "Revert" in Word, or Pages, or Acrobat (among many, many others) works there because there is only one document open to which the "Revert" command can apply (yes, those applications can have several documents open at a time, but any "Revert" command almost always—and maybe actually always—only applies to the front-most document). Scrivener projects are project files, with multiple files open. In fact, if you write or edit (as I sometimes do) in Scrivenings mode, where multiple items selected in the Binder are all displayed in the Editor as an editable single "document," what does "Revert" mean in that case? Because of how Scrivener views projects, the "Revert" option doesn't make a lot of sense, but by creating Snapshots with manual saves and extending the auto-save time a bit you can create a replacement option to allow you to go back to a previous version of any edited document.

As a test of the manual save time, I put one hundred fifty thousand seconds in that field, and Scrivener didn’t crash. I don’t know for sure if that will actually translate to a nearly 2-day delay. There may be an internal maximum that I can’t override, but the manual doesn’t specify any such thing. So, it could very well be that it will accept any valid integer value up to the maximum size of a signed integer, which I believe is 9,223,372,036,854,775,807 on 64-bit macOS. That’s nine quintillion, two hundred twenty-three quadrillion, three hundred seventy-two trillion, thirty-six billion, eight hundred fifty-four million, seven hundred seventy-five thousand, eight hundred seven seconds, or more than 106 trillion years. If anyone finds out the actual maximum, let us know in the comments!

So, in any event, if you are not a fan of the auto-save, you can effectively disable it if you put in a value that is larger than you ever expect to actually keep Scrivener open. I suspect most people are fine with the auto-save feature, and turning on the checkbox to create Snapshots on manual save will help ameliorate any concerns about auto-saving garbage if the cat jumps on the keyboard and accidentally selects all and replaces it with gobbledygook.

Automatic backups


Also in the Preferences for Scrivener is the option to turn on automatic backups:


This feature is awesome, and has been available since version 1.5. As you can see, there are a lot of options here, so let’s take a look at them.

First, the checkbox to turn them on at all is at the top. When this box is checked “on,” Scrivener will automatically create backups according to the instructions in the next four options. It will either automatically backup projects:

When a project is opened,
When a project is closed,
Every time you “Save” the project manually
Or before syncing with mobile devices

Or any combination of these options (including all four).

Below these four are three settings which control whether or not to compress (zip) the backups, use dates in the name of the backup file, and how many backup files to keep.

Below those three are two more items, the Backup location and a button to select a backup folder, as well as a button to open that folder.

By default, automatic backups are turned on, and set to backup when a project is closed and before syncing with mobile devices. If you don’t use a mobile device (iPad, iPhone), the last option  won’t have any effect (it only kicks in when you go into the File menu and select Sync->with Mobile Devices). Even though I don’t right now use my iPad as a writing tool, I might in the future (like, when I replace my current MacBook Air with what will likely be an iMac Pro, I may switch to using the iPad as my portable writing platform again), so I keep it ticked on. I also keep the “Backup on project close” option ticked on. Other people might prefer to have Scrivener backup the project when they open it, so that if they make a bunch of changes in a session and decide to scrap them, they can just recover from the project state as it existed before they started working. Either way it kind of amounts to the same thing, since a backup-on-close looks like the project did before opening it, so it’s really more about your personal preference and workflow.

The other option here is the “Backup with each manual save” option, which ties the backup process to the File->Save action (either by selecting "Save" in the File menu or by typing the keystroke shortcut). This means that whenever you either type Command-S (or Control-S in Windows) to "Save," or you click on the File menu and select the "Save" option, it will create a new backup for you. This is another way to create a fall-back point if you are one who doesn't like the auto-save feature. By combining the use of Snapshots on manual save with backups on manual save, you can create a series of intermediate fall-back points.

Depending on your circumstance, your computer, the size and available space of your backup drive, and so on, you may want to enable compressing backup files. If so, check “on” the checkbox for “Compress automatic backups as zip files (slower).” This will first backup the project, and then compress it. Beneath that is the option to add the date to the title of the backup file, which inserts the current date and time of the backup into the file name. Although the macOS Finder (and Windows) can sort folder items by created date, having the date and time in the title of the file can be helpful if you use other, external solutions for backing up these items.

Beneath that option is the option to control the number of backup files to maintain. If this checkbox is enabled, Scrivener will make a maximum of 3, 5, 10, or 25 backups of this project inside the backup folder. Once Scrivener has backed up a project the number of times equal to the one selected in the popup menu, the next time it tries to create a backup it will locate the oldest one, delete it, and create the new backup. How many of these backups you want to maintain will largely depend on how you write and work. I tell Scrivener to keep 5 backups. Since I have Scrivener backup on close, the amount of time it takes to backup is less relevant to me, so I tell Scrivener to compress those backups, and I also tell Scrivener to put the date in the file title.

If you tell Scrivener to backup on open, and close, and sync, and manual save, you may find that 25 better suits your style. If you find that 25 is still too few, you will need to implement some other kind of backup feature, such as a modification of the Automator action that I’ll discuss in part 2 of this series.

At the very bottom are the Backup location and “Open backup folder” items. Here, the “Choose…” button will enable you to select what folder Scrivener uses to store your backup files, and then to open that folder in the Finder (or Windows Explorer) if you need to access it. You can, of course, also open that folder normally in the Finder/Explorer if you need to. By default, this location is in your home folder, at ~/Library/Application Support/Scrivener/Backups (on Windows, I believe this is in your account’s AppData folder). You can change that location here if you wish. In my case, I have an external USB disk drive (“Backups”) that I use specifically for backup purposes (not just for Scrivener). I tell Scrivener to use a folder on that disk, instead of the default setting.

A word of caution about the backups. If you find you need to open a backup copy of a project, drag it out of the folder with the other backups. This can be by dragging it to the desktop, or making a copy in another folder, or (what I do) by holding down the option key and dragging the zip file to the desktop and then opening the zip file from there. Holding option while dragging a file or folder (or disk, or anything else really) in the Finder will create a copy of the dragged item. If you open a Scrivener project from within the folder it uses for automatic backups, you will get a warning dialog that the project is not in a recommended location. This will also happen if you tell Scrivener to use a folder for automatic backups where you are also saving your normal projects.

There’s a discussion about this on the Literature and Latte forums, but the short version of how to avoid the whole issue is to use a separate folder for your automatic backups. If you are like many people, and you have a separate folder in Documents for your Scrivener projects, set the “Backup location” to be anything else.

From a general perspective, the best thing to do is to have the “Backup location” be on a separate drive, such as a USB thumb drive or a Thunderbolt disk drive. If you don’t have any of these, at the very least the “Backup location” must be different from the folder where you store the projects you are working on. If you are like many writers and use Dropbox for your Scrivener projects (and if you're using Scrivener for iOS as well, you almost certainly are using Dropbox for that!), you could save your backups to your Documents folder instead. I still recommend having an external drive (SSD, Hard Disk, USB/SD flash drive, und so weiter), and keeping backups on there, because even if you use Dropbox it is still storing local copies on your internal drive. If your internal drive fails you may still be able to salvage your Dropbox from another location (assuming your drive's failure didn't trash the Dropbox folder and sync the trashed version, which is possible), but your backups are still on the internal drive if that doesn't work out. Safest thing is to do backups to an entirely different drive.

For me, I have an external hard disk drive (“Backups”) which has a subfolder (“Scrivener Backups”) where I tell Scrivener to store backups of my projects. In addition, occasionally I will drag-copy the “Scrivener Backups” folder onto a different drive, a USB flash drive, just to have an additional backup of the backups. Finally, I created an Automator action that I use when I reach milestones in my projects. Although this action makes a backup of my live project, not the backups, it could easily be modified to backup the backups instead of—or in addition to—my live project.

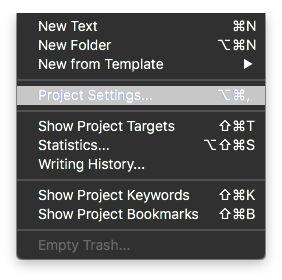
Finally, it is also possible to override a couple of the backup settings on a per-project basis (by going into the Project menu and selecting “Project Settings…”, or typing Option-Command-comma on a Mac):


The top checkbox, if checked “on,” will tell Scrivener to not automatically backup this particular project (all other projects will still be backed up automatically, unless they also have this setting checked “on”). The second checkbox allows you to specify a different location for this project’s backup files. The other settings remain unchanged, so if you have the settings to “Only keep” the 5 most recent backups, that will still apply. It will just use the folder you set here, instead of the one in the “Backup” pane of the Scrivener Preferences, and only for this project.

If you like, you can have a different backup folder for each project (which is not a bad idea!), but if you have a lot of projects this can be a little tedious to manage. It may be worth it, though, depending on your situation.

One such option might be to create a generic backup folder on an external drive, and then inside that folder create a new folder for each project. When you create a new project, remember to go to the Project->Project Settings… menu and set this backup location. That way, each project’s backups are separate from each other. As with any backup, however, this folder needs to be separate from the one where your “live” version of the project is stored. I also recommend backing up this folder periodically (say, every Friday afternoon to a USB stick).

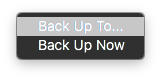
In addition to the automatic backups, you can also do manual backups by going into File->Backup:


Under File-Backup you will see two selection options, one to "Back Up To…" and one to "Back Up Now":

The "Back Up To…" option will prompt you (via a standard "Save" type dialog box) for a location to save a backup, as well as a checkbox option to Back up as a ZIP file. "Back Up Now" will create a manual backup using the settings in the Backup tab of the Preferences. Even if you have automatic backups disabled, it will use whatever other settings are set in the Backup tab (whether to ZIP or not, whether to use date in the filename or not, and the location for backups) and create a backup there. Keep in mind, however, that if you are using automatic backups, a manual "Back Up Now" create a backup of the project just as if it were automatic, so if you are at the limit for number of backups it will delete the oldest to make room for the manual backup.

In any event, Scrivener offers a fairly flexible automatic backup system for your writing projects, but there is still a little management for you, the writer, to make it work the way you need for it to work.

Some things to consider, and final thoughts


Scrivener offers a few options to help a writer avoid some of the disasters (such as a loss of power or computer crash) that can befall him or her, including automatic saving of modified open projects as well as automatic backups with some user-defined or -selected parameters. By considering your own needs and preferences, you can use these built-in tools to help maintain a robust system for preserving your hard work. In part 2 of this series, I will go over the Automator action that I use to manually backup important milestone versions of my live projects, and in part 3 I will take a look at the Snapshots feature of Scrivener, and how it can be used to help make auto-save and automatic backup even more useful.

If you use the automatic backups, what is your system for keeping them safe? How do you feel about the auto-save feature, and do you have any tips from your own experience? Feel free to share them in the comments!

Sunday, December 25, 2016

Audiobook setup changes

So I've been working on a few things in the background, one of which was a new setup for doing my audiobook recording.

As much as wanted to try to make the recording work out by spending less than $100, I wasn't able to make decent recordings at that level (others might, I just couldn't do it). So I was able to do some research, and get better insight about where to save, and where it was important to spend some money. Here are a few lessons I've learned.

  • First lesson: don't skimp on the mic. A prosumer microphone can be had for $300–400, and will make a huge difference in the quality of your recordings.
  • Second lesson: the software you choose is secondary. Great quality can be had using Logic Pro, Audition, Audacity, Garageband, Pro Tools, and several others.
  • Third lesson: you can skimp on the amount of money you spend to soundproof your recording space, because it can be done fairly cheaply.
Over the next few days I'll be re-examining each of these things, and detailing my experiences in blog entries. Hopefully, that will be enough to set you on your way to setting up your own audiobook recordings!

Wednesday, June 29, 2016

Audiobook progress

In my last two entries, I posted my workflow and my toolset for narrating my own audiobooks. A couple of days ago, I uploaded some test files to ACX's audio QA site. They have a 10-day queue, it seems, so I won't know for several more days what the QA results show. When they do I'll have a better idea what (if any) mistakes I made in my workflow, and I'll share that.

I also had a really fantastic day bargain-shopping yesterday; I found myself at Bookman's (a local resale store here in Tucson) looking for some second-hand DVDs. I'd been visiting the Bookman's stores periodically and had noticed in the past that they also carry second-hand musical instruments and equipment. While there, I happened to notice one of their employees working in that section, and asked him about shotgun microphones. It just so happened they'd just gotten one in, and I managed to land a super-cardioid dynamic shotgun Audio-Technica microphone for about 25% of what it sold for new. That will come in handy with my Almost 22 film project, but also for recording With It or in It.

So, the take-home for me there is: scour your local second-hand shops! You may find something really awesome in there! I'll also let you all know when ACX gets back to me about the QA results.

Also, once I get Hooray for Pain! finished and uploaded, and have the workflow & toolset more finalized, I'm going to post a series of videos on what I did, and how I did it.

Friday, January 22, 2016

The current status of CloudAge™ writing on iOS

To start, I’d like to go back and revisit a few of the more well-known and -loved apps for iOS, and see where they stand for the CloudAge™ Author in 2016: Storyist, iA Writer, Simplenote, and Scrivener.

Storyist


Since my original post on it, Storyist’s basics haven’t changed much. It still has the same basic layout, with the ability to create projects with multiple documents. In fact, all of the major changes for Storyist seem to be under the hood changes, like support for new iOS features (slide-over in iOS 9, Document Picker in iOS 8, and so forth). I personally think it’s excellent because that leaves the basic functionality of the app intact.
To review, Storyist is a “Writing Platform” similar to Scrivener. Creating a new document is creating a new writing project, with the capability to handle multiple documents, as well as the research associated with a project. The project has a storyboard that can be manipulated however you like, moving scenes and chapters around as you need to adjust the flow of the project. Storyist includes metadata documents (in a form called “sheets”) that allow you to keep notes about your settings, characters, plot points, and so forth. Storyist has a companion Mac app in addition to the iOS app, so you can work on a project on your home computer, then jet off to your local park, library, or coffee shop and work on your Great American Novel remotely. The Mac version is still $59, and the iOS version is currently listed at $14.99 on the App Store.
[ Update 12:06 PM -0700 (MST) 22 JAN 2016 ]: As Steve from Storyist points out in his comment below, Storyist now permits directly importing and editing Scrivener files within Storyist. Follow the steps listed on their page for details.

iA Writer


iA Writer has undergone significant changes since I last covered it. Some of these changes have been hard to uncover, since there was apparently some kind of “Pro” version, which either is now gone, or is not gone but is different, and the iA website is not at all clear about what changed and how. I have some questions about their product that were not covered on their quite useless support pages, questions which I have since emailed to their support team and from whom have not yet heard back. I will cover this product later, once I have those answers.

Simplenote


I recently wrote an article on using Scrivener and Simplenote together. Here I’m going to revisit using it by itself as a writing tool on the iPad, and how it has changed from my earlier review of it.
One major thing that has changed: Simplenote no longer offers a paid (premium) level. The app is free, and available for iOS, Mac, PC, as a Web-based app, and is in beta for Android (according to their latest blog post at the time I write this, it’s a beta, but the front page lists it as available to download for Android). It also appears to no longer sync with Dropbox—at least, I was unable to locate any way to tell the current iOS version of Simplenote to connect to Dropbox—but as long as you register with your email address all of your notes are synced to Simplenote apps on all platforms. Registration is also free. In the iOS version, you can send notes via the iOS sharing options, which are under the (i) icon in the Simplenote toolbar. Standard sharing options appear such as AirDrop, Message, Mail, etc., and you can customize the activities that appear on this list just as in any iOS app which uses the standard sharing features of iOS.
Simplenote also offers a “Dark Theme,” similar to other apps that do similar things. It puts the app into a color theme with dark gray background and lighter colored text. Also new is an automatic “list building” mode. If you start a new line with an asterisk, plus, or dash (*, +, or -) symbol, it automatically inserts the same marker on the next line when you type a return, until you type two returns in a row. 
What hasn’t changed is how drop-dead simple it is. Open the app, click the “+” button, and type. If you use an external keyboard, you get just a little tiny toolbar at the bottom and the tiny toolbar at the top, and like 85% or so of the screen is just a great big document to type in. This continues to make Simplenote a great choice for just sitting down and writing. Snag your iPad Air 2 and keyboard, hop over to the Library, park, or local coffee shop, and write. It can be very liberating.
Simplenote’s simplicity may be your annoyance, however, if you still desire things such as Multimarkdown (you can type it, but Simplenote doesn’t render it) or any formatting. For that, see iA Writer above.

Scrivener (just kidding!)


Perhaps the biggest CloudAge™ Author disappointment in the past couple of years is the vaporware status of Scrivener for iOS. Originally announced in December of 2011, it seems unlikely to be released anytime soon, if ever. Literature and Latte’s latest update on the issue seems to indicate that they have taken development back completely in-house, and are aiming for a 2016 release. However, they also have said they hoped to have it ready for NaNoWriMo 2012, 2013, 2014, and 2015, with nothing to show for it.
As a daily user of Scrivener on the Mac, I am quite disappointed in Literature & Latte’s seeming nonchalance regarding this app’s release. I am fortunate in many ways since I have a Mac Laptop, which I bought in large part because I love Scrivener and was getting frustrated with the lack of an iPad app. Many writers don’t want to throw down an additional $1,500 or more for a laptop just to write remotely, and I respect that. I wish Literature & Latte would respect it as well. There are alternatives (Simplenote or external folder syncing), but these are band-aid suggestions for an arterial bleed.

In Conclusion


With new technology coming all the time, it seemed prudent to review the state of the CloudAge™ Author’s choices for iPad writing before moving on into new advances. One of these is the newish availability of Word on the iPad in a state that admits of document creation and editing, not just consumption.