Last time out, we were printing our novel onto paper, so we could head out to the local library or coffee shop with a red pen to mercilessly revise the document. Now, we’ve finished revising the document, we’ve queried agents or publishers or both and have had a request for the manuscript. However, they want it in Microsoft Word format, emailed as an attachment to their email server. How do we handle that? Fortunately, this is a common event, and Scrivener has all the tools we need to make this reasonably painless. Here, I will walk you through Scrivener compiling by example, creating a novel for submission by compiling into Word format.
Binder Layout and Project Setup
For the purposes of this example, I am going to format the output to open in a “modern” version of Word—2007 or later for PC, or 2008 or later for Macintosh, using the .docx format. One reason for that is I don’t have access to earlier versions, and so I can’t test them! These are also the first versions of Word that use the .docx format for files, and the current document translator for Scrivener does an excellent job with these Compile To outputs. I realize that there are likely a lot of you who may still have older versions of Word, I just don’t have any way to test the output in those older versions.
Compile for Word
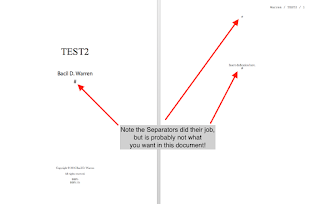
 This is what the document looks like in Word 2016 if you rely only on the Separators option pane to handle front matter and documents, with the scene separator appearing where there should probably be page breaks.
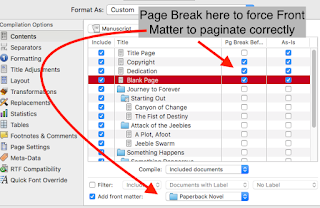
 To fix it, use the Contents pane to force a page break before the Front Matter pages, and print them "as is" as well.
Before going on, let’s take a moment to discuss submitting documents to agents and publishers. I am assuming that you’ve already sent the query letter and received a positive response asking for the full manuscript. Also, always follow the agency or publisher’s requests for submissions. Really, don’t deviate from them. The time to make font size and color and face decisions is after you sign the contract.
If they don’t have any specific submission requirements, follow the ones from The Editor’s Blog (http://theeditorsblog.net/2011/01/05/format-your-novel-for-submission/) with these highlights:
- 12-point Times, Times New Roman, or Courier font
- Double-spaced line spacing
- 1” margin, top/bottom/left/right
- Separate scenes with a single “#” character, centered by itself on a line
- Chapters start on new pages, with the title centered about 1/3 of the way down the page
Fortunately, Scrivener handles this explicitly with the proper Compile options set.
On the Separators pane, set “Text separator” to the “#” symbol, “Folder separator” to Page Break, “Folder and text separator” to "Empty line", and “Text and folder separator” to “Page break.” These will be the same as the settings above.
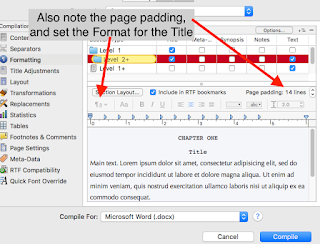
 With the Formatting pane, make sure to set up the checkboxes to reflect what’s in the various sections. As shown here, if you have any folders with text associated “on” them (like the intro text discussed earlier), make sure to check the “Text” box and format the text as well as the title. Check the Page padding number, and set it to appear as appropriate. The default for Scrivener for folders and text documents (those that are not, themselves, containers) is to insert 14 lines of padding, which should fit the criteria of Chapter titles above, but may not work for your scenes. Make sure to examine your output afterward, and make adjustments here as needed.
When setting Titles in the Formatting pane, keep in mind that you can use many of the placeholders to handle the exact output. Here is a brief list of some common placeholders for titles, remembering that in the actual text they are surrounded by less-than and greater-than symbols (so, <$title>):
- $title will put the title of the current document (so, for the compiled document here, “Journey to Forever” for the first Part, and “Starting Out” for the first Chapter, with “Canyon of Change” and “The Fist of Destiny” for the first two scenes.)
- $n inserts the Arabic numeral for the current “n” listing (that is, the first “n” is “1”, the next is “2”, etc.); $r instead inserts lower-case Roman numerals with $R for capitalized Roman numerals; $L inserts upper-case and $l lower-case alphabetical numbering (“outline” numbering, AabcBabcCabc etc.); with $W and $w inserting the word for the current number (UPPER and lowercase, respectively, so “ONE” or “one” then “TWO” or “two”)
- Finally, you can specify stream names by inserting a colon, followed by a name, after any of the numbering placeholders; doing so will substitute the next number in the sequence for that stream name only. $n:bdwpart will insert the next Arabic numeral for the named stream “bdwpart” (starting at 1) wherever it is placed.
Title Adjustments options, by default, are usually fine. The exception would be if you have titles enabled for any Front Matter documents, and need to remove any prefix or suffix information.
In the Layout options pane, you might consider making sure the “Do not add page padding” and “Avoid widows and orphans” settings are enabled; these will first avoid pushing the page content down on the first page if there is a break before it (which, to me, is weird to do but happens sometimes as a result of the settings in Formatting), and second will help to make sure that widows and orphans are reduced in the output document, by adding page padding as needed to avoid them.
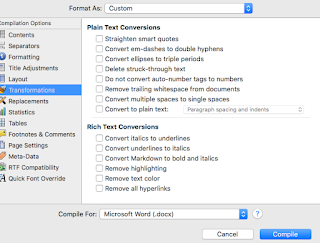
 Transformations pane settings allow you to fix certain kinds of output issues; I recommend first compiling with all of these options disabled and see what the output looks like. My experience with recent versions of Word and Scrivener shows that smart quotes, ellipses, italics, em-dashes, and so forth all come through just fine, so I usually leave these all unchecked. Run it, and see if you like the output. If not, try enabling only exactly the Transformation you have issues with, and re-compile.
Replacements will expand any text tokens you might use to substitute for long phrases in your document. If you use any such tokens, make sure the Replacements pane has the expanded version!
Statistics settings are mainly used to control how the compiler counts words and characters. Standard behavior for submissions is to never count words in any of the front matter documents. That checkbox should be enabled. If you have any other documents embedded in the manuscript that are not story documents, make sure to mark the “only documents matching” checkbox and select the appropriate criteria.
Since we’re discussing a fiction novel, it is unlikely there are any tables in your document; if there are, the Tables options would come into play. By default, these settings are not enabled. The same is true of Footnotes & Comments in general, although there certainly might be a reason to include comments in a submitted document there are not likely to be footnotes in a fiction novel.
Page Settings should be set as per the agency or publisher’s recommendation; otherwise, use the 1” margin all around settings as recommended above. In addition, many agents and publishers request that you include your last name, book title, and page number in the upper-right header, so putting that information here ensures that it appears. Remember that $title is the document title, so use the $projecttitle tag here.
If you have Meta-Data to include, add it on the Meta-Data option pane.
With this being a fiction novel, the RTF Compatibility pane should be left alone since there are not likely to be any footnotes anyway. If there are, check or leave unchecked this box as appropriate.
Finally, if your settings are all set up for Cochin or Bookman Old Style as your typeface, but your agent wants Courier, the Quick Font Override can be used to make that a rapid change here, instead of changing all of your Format Presets.
Open and Edit
Once the compile process is complete, open the new document and give it the once-over. Make sure the page breaks appear where you want them, look for problems with spacing or issues related to italics or using smart quotes or some of the other Transformation items, and make sure the document has the right look, font face, and so forth. While older versions of Scrivener and Word sometimes have had issues, and there are some issues to check if you use tables or columns, basic novel formatting does not usually run into these problems (they do sometimes occur in non-fiction works with embedded tables and such). You should definitely go over the entire document, however, to make sure the compiler didn’t spit out something unusual.
If it doesn’t look right, note where it seems to have gone wrong, and then take a look at the compile option related to that. One weird problem I ran into involved a hidden table in Scrivener (copied from an HTML page I wrote). If you see some weird formatting or options in your output, go into your Scrivener document where the problem occurred, and right-click on the text there. If you see any table options, select the option to remove the table. Save the document, and then recompile, and see if the problem has gone away.
In Conclusion
Finally, you’ve gotten a good output from Scrivener to Word, cleaned up any problems, and now you can send it off to your agent. Congratulations! I hope that this edition of Scrivener compiling by example for a novel for submission has helped you to get your Scrivener compiling under control. If you have questions or comments, leave them below, and happy writing!


No comments:
Post a Comment
Note: Only a member of this blog may post a comment.