• Contents
• Transformations
• Replacements
• Statistics
Contents
Let’s get right to it! The Contents option pane permits you to select what parts of your manuscript—or any sub-part of the project, in or out of the manuscript itself—you wish to “Compile For:” the current output type. By default, the entire manuscript is selected until you either save or compile. You can save the current settings as the “default” for this project by holding the OPTION key on a Mac and clicking the “Compile” button (which changes to read “Save” when the Option key is held down). On Windows, there is a “Save…” button in the interface, which will save the current settings as the new “default” for this project.
In the center area of the panel is a table with the currently selected group’s items listed, and four columns. The “Include” column shows which documents will be included in the “Compile For:” output. Any item with its “Include” box checked will be part of the compiled output (although, see a couple of paragraphs down for an exception you can make). The “Title” column shows you the title of each item in the currently selected group, and the icon of the item (Folder, Text, etc.). The “Page Break Before” column has a checkbox for each item in the group; if this checkbox is selected there will be a page break inserted in the compiled output before the document selected. In this window, there are none of these boxes checked; if you were to check the box next to the folder “Chapter” it would insert a page break between the document “Title” and the folder “Chapter” in the compiled output. Finally, the “As-is” column has a series of checkboxes, one for each document in the currently selected group. When the compiler runs and comes across any document with this checkbox checked, it will ignore the settings under “Formatting” completely, and print the text only of that document as it is formatted in the Scrivener editor.
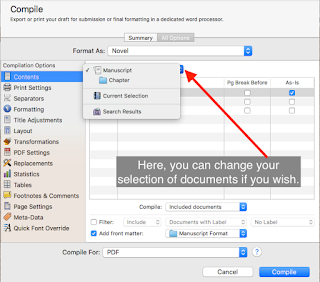
Within the Contents pane are some other options. First, at the top (in this image, showing “Manuscript”) is the selected group option, which can be changed as shown in this image. If you wish to compile only certain sub-parts of the Manuscript, you can select them here. If you wish to essentially flip the “Include” column, and exclude the items with “Include” checked, you can select “Excluded documents” instead. This will produce a compiled output of all the documents without a check in the “Include” column, and none of the documents with a check in that column.
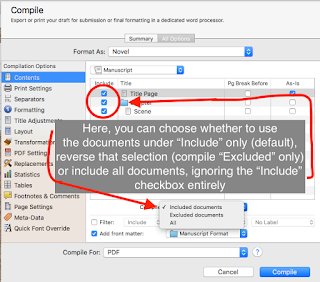 Next, you can further filter the documents to include or exclude if you choose, by selecting the “Filter” checkbox and making a few selections in the next three menus. You can choose to include, or to exclude, items that match the filter criteria. You can select which criteria kind you wish to filter on, and with the third menu what the filter must match. As an example, if you only wanted to include documents that had the label “No Label,” you’d make the selections as shown in the topmost image, which shows that the document “Title” is the only one that matches that filter. The second and third images show the other two menus available for the filter (with the third, criteria-to-match, only displaying the options which are available under “Documents with Label” for brevity).
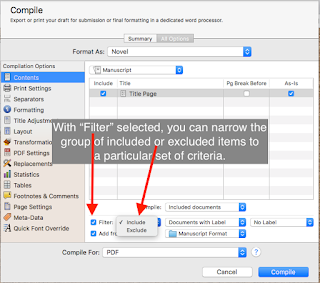 |
| Filter Selections can either Include or Exclude certain documents |
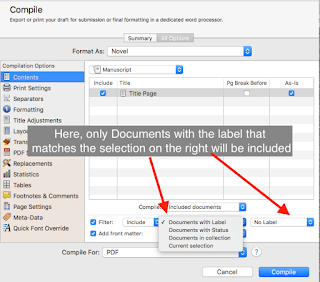 |
| Filter On selections |
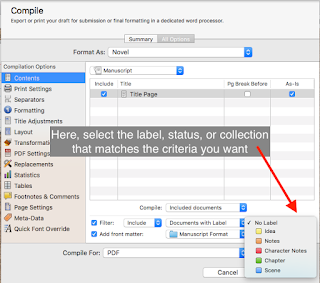 |
| Match criteria |
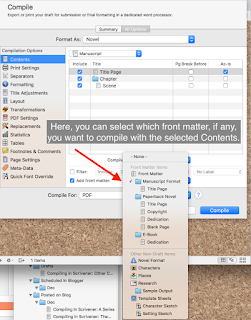 Finally, there is the “Add front matter” checkbox and menu. If this box is checked, then the compiler will add the front matter from the selected location in the popup menu. In this case, the only front matter in the currently-selected location is the “Title” page. This selection is handy if you have different final forms, some of which need items like a Table of Contents but others of which might not use it or can generate their own later (such as Kindle e-books, for example). In that case, you can select the appropriate front matter folder for the kind of output you are compiling.
Transformations
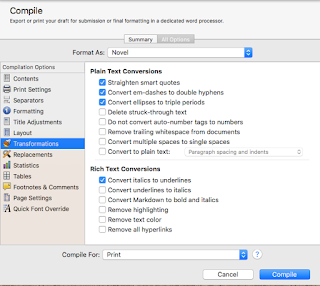 The Transformations Option pane is used to automatically switch certain kinds of text items to other kinds, often to avoid possible conflicts between how different applications and fonts may treat certain text items (such as quote characters or ellipses). Here is the image of the Transformation Options pane for the PDF compilation output format, with several Plain Text and RTF options for substitutions. Each output setting has a slightly different set of these that logically apply to it, and so the options pane for it will reflect that particular output’s options. Due to this, and the fact that most of these are pretty straightforward, I will not cover them.
Replacements
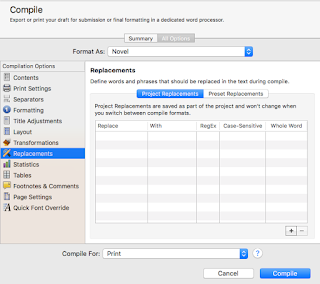 The Replacements Option pane allows you to define a set of text tokens that will be replaced one-for-one with another token when the document is compiled. Frequently, this is used to ease certain aspects of writing; for example, you might be writing a Sci-Fi novel that takes place on Alpha Centauri XVII. Writing that phrase out a dozen, two dozen, or even more times during the writing process might give you a solid case of Carpal Tunnel syndrome. You could use the “+” button in the lower right to add a Replacement item, say “ac17” and tell it to replace with “Alpha Centauri XVII” when compiled. The Reg Ex checkbox tells the compiler to treat both Replace and With columns for an item to be regular expressions–which, being an entire shelf of books worthy of an explanation, I will not cover here. If you check “Case Sensitive” it will always only match the items that are a case-for-case match of the Replace field. If you check “Whole Word” the compiler will only replace instances of the token if it is that token exactly, not a sub-token of another word (essentially). The two tabs at the top of the table, “Project Replacements” and “Preset Replacements” enable you to specify global replacements for this project (“Project Replacements”), which will be replaced no matter what is selected in the “Format As:” menu; and replacements for this “Format As”: preset only. That is if you need your ac17 replacement to happen no matter what, use the “Project Replacements” tab to define it. If instead, you have an item which you only care about being replaced in the “Synopses and Titles” preset (perhaps you use abbreviations in the synopses of your various documents), then define it in the “Preset Replacements” when “Synopses and Titles” is the selected preset under the “Format As:” menu.
Statistics
Finally, that brings us to the Statistics Option pane. This pane, simply explained, allows you to configure how certain of the placeholders work if you use them in your project. By default, the Title Page of many projects uses the $wc100 placeholder in the upper-right of the Title page, a placeholder that will be replaced with the current document’s word count to the nearest 100 words. On the Statistics pane, you can tell the compiler to only count words or characters in certain places, to include even footnotes, to or not to include spaces with character counts, and others.
And, with that, we’ve knocked out the final four of the five “always-on” Options panes in the Compile sheet. Yay, us! Coming up in the next few blogs I will cover some of the other panes that occur often, but not always, starting with the Separators, Layout, and Tables Options panes. As always, if you have questions or comments about compiling in Scrivener: other common options, just leave them below!
Next in this series -> Separators, Layout, and Table options


No comments:
Post a Comment
Note: Only a member of this blog may post a comment.