… Except to say that Scrivener seems to be nearing readiness on the iPad, having recently gone into a private Beta test phase. I am going to attempt to become a public beta tester for it, when they make that available, but I will definitely test & review it for you when it is released if I am not able to become a beta tester. And that, of course, the reason for my delay is that I switched from my iPad as my only portable option, to a MacBook Air, and have been unintentionally neglecting the iPad as my writing tool because of that. I am here to redress that imbalance!
So if you're a current Scrivener user, and already have or are planning to install Simplenote (free) on your iPad, here's how you connect Simplenote to your existing Scrivener projects.
First, launch and login to Simplenote on the iPad (create a free user account, if you have not yet done so).
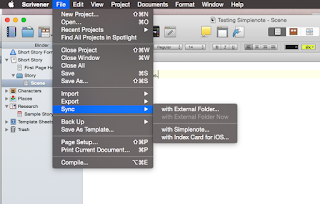
 Next, on your computer, open the project you wish to be able to use in Simplenote, within Scrivener on your computer. Next, go into the "File" menu, and select "Sync->with Simplenote …", as shown:
When you select the "with Simplenote …" option, a sheet will appear, permitting you to login to the Simplenote servers. Use the same username and password as you used on the iPad.
Please note that the Project keyword field is mandatory, as this is the method that Scrivener uses to sync with Simplenote.
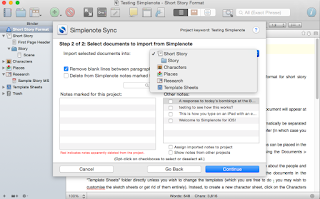
Next, you're greeted with a sheet to select which documents should sync between Scrivener and Simplenote for this project. By default, this is set to "Select documents to sync", which is the recommended setting. The rationale behind this setting is that you should sync only the documents you will work on remotely, saving space and bandwidth. For example, you might wish to work on text documents within the "Draft" folder (the generic name for the project's main content, whether a short story or a manuscript, etc.), as well as Characters, but not the Places or Setting items.
The settings for "Take snapshots of affected documents before updating", "Insert blank lines between paragraphs", and "Delete from Simplenote any project documents not selected for syncing" are enabled by default. Deselecting "Take snapshots" will stop Scrivener from making snapshot backups of the selected files before uploading, and before syncing back, and is not recommended (that is, leave it selected, that way it will make snapshots of the local file before any changes are uploaded or synced). Inserting blank lines between paragraphs will insert a blank link after any paragraph in the Scrivener document. Delete from Simplenote will remove from the Simplenote service any documents which are present in Simplenote—and are part of the current project—but which are not selected to be synced. As an example, lets say you work on one chapter at a time. You create a new folder for the chapter, and sync that folder and all of its subfiles to Simplenote. Then, after several weeks of editing, etc., you regard the chapter as finished, and sync all your changes back into Scrivener. Next, you work on chapter 2, create the Chapter 2 folder and some subfiles, then mark them for sync to Simplenote. If you then un-check the Chapter 1 folder & files, and leave "Delete from Simplenote any project documents not selected for syncing", all of the Chapter 1 files & folder(s) will be deleted from Simplenote (though, since you've already synced up from before, you will not be losing information). This can be a handy way to stay focused only on the highest-priority items, by removing any files that have already been finished and leaving behind only the ones that are still being edited.
 Once you've selected the items within Scrivener to sync, click "Continue" and you'll be presented with a sheet asking about importing from Simplenote. First, it will prompt you for the location in the current project where you'd like Simplenote documents to be placed. This will, of course, depend on what you're doing; if you are using the iPad as a research tool—say, by taking your iPad with you to the library or to wherever you do your research—then you might choose to have Scrivener add Simplenote files to the Research section of the project. If, instead, you are working on only one chapter of your novel on the iPad (maybe you'll be on a business trip and want to work on the new chapter while you're away), you can select that folder instead. There will also be a section to the left where any notes already marked for this project will appear (as you can see, there aren't any for now), and a section to the right where other notes from Simplenote will appear; you can elect to or not to sync any or all of these items.
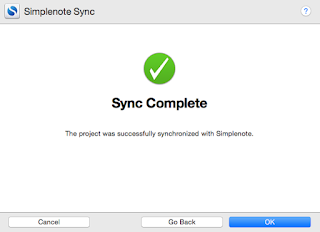
 Once you've selected where to sync these files, and which ones to sync, click Continue and it will sync the files you've selected up to Simplenote, and any you've told it to bring down from Simplenote. It should then give you a "Sync Complete" message like the one on the right.
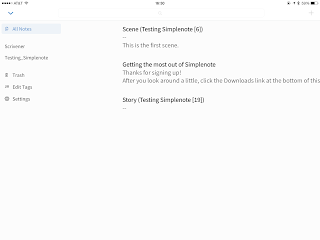
Next, open Simplenote on the iPad (or iPhone, if you prefer), and you should see a list of notes in the main viewing area, as shown. Here is a brand-new Simplenote installation, with no previously existing files (the only note listed, "Getting the most out of Simplenote", is automatically created when Simplenote creates your login).
Once the files in your new Scrivener project have been synced, you will see those files appear as well. You can see here, the titles of these notes contain not just the filename from the Scrivener file ("Scene" and "Story"), but also the left & right parentheses ("(" & ")"), left & right straight brackets ("[" and "]"), as well as the Project Keyword ("Testing Simplenote") and a number. In Simplenote, the first line of any note becomes the note's title, and in Scrivener the title is used to sync the files between Simplenote (the "remote"), and the Scrivener project (the "local"). When in Simplenote, remember do not edit the first line of any notes you sync with Scrivener, or those changes may be lost, overwritten, or otherwise mangled.
 On the right, you can also see what the Simplenote interface looks like if you have the "notes" pane expanded (click the < at the top left of the screen). This allows you to pick and choose between seeing "All Notes" (that is, everything in your Simplenote account), or only notes with particular "Tags" (such as "Scrivener", which is automatically tagged to any Scrivener-synced document, or "Testing_Simplenote", which is the tag automatically created from the Project Keyword when it was created in the Scrivener project).
When you have been out and about on your iPad (or iPhone), and you are back to your computer ready to re-sync the changes you've made on your project while working on the iPad, you basically do the same steps: Select "File->Sync->with Simplenote …", and make sure that any files from Scrivener you wish to keep synced with the Simplenote project are selected; then, click "Continue" to select any new files that you wish to sync, which you may have created in Simplenote but are not yet in the Scrivener project, and click "Continue" again. This will sync any changed documents (creating a snapshot, first, if that option is selected), then push any new Scrivener documents to Simplenote, pull any new Simplenote notes to Scrivener, and then show you the "Sync Completed" sheet.
Now, you have an updated version of all documents on both Scrivener on your computer, and the Simplenote app on your device!
Please, feel free to post any questions below. Both Scrivener (links to support page) and Simplenote (links to contact page) offer support for their products.


No comments:
Post a Comment
Note: Only a member of this blog may post a comment.