One of the beta readers of Universus Respondet posted a review of the book to her blog. Definitely take a gander at her review (and, while you're there, let her know I sent you, and check out her other posts!), but a short version would be: she really enjoyed it, and would definitely buy a ticket to see the movie version if that ever came to pass.
😃
Wednesday, October 17, 2018
Monday, October 1, 2018
Universus Respondet paperback is on sale, eBook version available for preorder
After almost three years of writing and revising—and almost eight years after I had the initial concept—Universus Respondet: Fermi's Paradox Answered—a Novel is available!
The paperback version is on sale now at Amazon.
The eBook version is in pre-order at the following bookstores online:
The paperback version is on sale now at Amazon.
The eBook version is in pre-order at the following bookstores online:
The paperback version on Amazon is linked so that if you buy the paperback, you can get the Kindle version for $0.99.
Pre-order pricing on all eBook stores is $5.99 (regular price will be $6.99, on the day of release, 23 NOV 2018), so be sure to pre-order to get the best price!
Sunday, September 16, 2018
Universus Respondet update
Beta reader feedback for Universus Respondet: Fermi's Paradox Answered—a Novel has been very positive, and tremendously helpful.
I spent most of the weekend revising based on their feedback and sent my editor the updates earlier this evening. There were a few minor typos that escaped three rounds of editing and revising, but these have been corralled. Over the next couple of days, I will be finishing up the remainder of these revisions, and then it will be time to start the process of compiling out of Scrivener and eBook and paperback formats.
Amazon pre-sale for Universus Respondet starts on 16 November 2018, and it will cost $9.99 in eBook formats. Paperback pricing is not yet available, but when it is I will post an update.
I'm excited to get this story into the hands of readers! I believe it will appeal to Sci-Fi fans, as well as many general readers.
Friday, August 31, 2018
Save me! Backing up Scrivener projects part 3: Snapshots
Hello, and welcome to another cogitation! I hope that your summer continues to be awesome. I was able to fix the A/C, and now it’s working quite well, so this Tucson summer has been bearable.
In the “Save me!” series, I’ve talked about autosaves and automated backups in Scrivener proper, and the different ways that it can help save your hard writing work from falling prey to disaster. I also discussed the Automator tool for macOS, and how I have it set up so that I can make additional externally stored backups of important milestone versions of my Scrivener projects.
Today, I’d like to talk about one additional piece, the Snapshot feature of Scrivener, and how it works to help preserve your sanity (and documents!) while working on your project.
What is a Snapshot?
In Scrivener, a Snapshot is essentially a date-stamped copy of the text of a document (text only, not any metadata), and it is stored as a part of the document. I am not aware of any technical limit on the number of Snapshots a given document can have, but as we’ll see in a moment it isn’t usually necessary to keep more than about a half-dozen, maybe ten, of any given document.
A Snapshot is more than just a verbatim copy of that text, though. One of the very cool things about them is that the text in the Snapshot can be compared to the current document’s text, with added and deleted text highlighted in the Snapshot (more on this in a moment—also, note that as far as I am aware, the “compare” feature is macOS-only at this time). Snapshots can also be compared with other Snapshots, not just the current version of a document.
It is important to remember that a Snapshot only makes a copy of the text—not the keywords, metadata (custom or otherwise), notes, or other information, although it does copy the comments—and although it does preserve formatting, it doesn’t track changes in formatting.
Okay, but why would I want to use a Snapshot?
One main advantage of using a Snapshot is it gives you a touchstone for a given document’s contents. Since Scrivener does automatic saves and therefore there is no “revert” option, an excellent use for the Snapshot is to preserve the current text in a document before editing it. If you’re like many people, you have probably been conditioned to hit “save” frequently while writing (even I am conditioned this way, though I am slowly un-learning this habit). Since Scrivener does that part for you, as do many other current software programs, manually triggering a “save” isn’t really that important. Because of that, however, Scrivener doesn’t really have any way to “revert” changes (Word, Pages, other apps will do this, essentially by discarding the currently-open document and reloading it from storage).
The “revert” feature can be brought into play, though, using the Snapshot feature. There are at least a couple of ways to approach this, so I’ll cover two different thoughts.
First, what I informally refer to as the “Milestone Snapshot.” This is when you have completed a milestone for a document, and consider it ready to change status from (for example) “To Do” to “First Draft.” At that point, make a Snapshot (how, shortly), change the status, and work on the next document. Repeat that until every document is a “First Draft,” and then you’ll have a Snapshot of each document as it was when you completed that draft. This is generally my workflow. In this case, the Snapshot will enable you to fall back or compare to the First Draft version when you are making your edits on the way to your Second Draft.
Second is what I call the “Experimental Snapshot.” In this case, you create the Snapshot first (though, obviously not of a blank document, that doesn’t make any sense!), and then work on the document. If you get to a point where you are like “nah, this all stinks, I don’t want these edits anymore,” you can roll back to the previous Snapshot, and the experiment is wiped clean—though, it is possible to snapshot the current document before rolling back, as we shall see shortly.
One additional approach is to have Scrivener create Snapshots of any modified documents whenever a manual save is triggered (usually via Command-S or Control-S, but also by the File->Save command). This approach will provide a sort of analogue to the Revert option in some applications, especially if combined with the “Experimental” approach.
Snapshots sound like a useful tool, how do I create one?


 Another way is to tell Scrivener to take Snapshots of changed documents on a manual save, and then hit Command-S or Control-S, or select “Save” from the File menu. To tell Scrivener to do this, open the Preferences, click on the General tab, and click “Saving” in the left pane. In the right pane is a checkbox for “Take snapshots of changed text documents on manual save.” Click that checkbox on, and every time you manually save (via Command-S/Control-S or via “File->Save”) Scrivener will create a new Snapshot for each changed text document.
It is also possible to use these commands to create Snapshots of multiple documents at once. Let’s say you’ve decided that you want to work on one chapter today, and there are several scenes in that chapter. You know you may need to work back and forth on several scenes—or, you are like me and you like to edit in Scrivenings mode—and you want to Snapshot them all before starting. You could click on each one, hit Command or Control-5 (or Command or Control-Shift-5) and make Snapshots of each one, in turn, that would certainly work. If the documents are all at the same level, you could click on the top or bottom file in the list, shift-click the bottom or top file (thus selecting those two plus all files between them), and then create your Snapshot.
 Another way to do this is you could click on the chapter folder in the binder (if you organize your work this way), then click on Edit->Select->Select with Subdocuments. This will basically do what it says, select all of this item’s subdocuments. Then you can create your Snapshot as you would otherwise.
One thing to keep in mind is that a Snapshot will only work on documents that have text. So, obviously text documents can have Snapshots, but “regular” folders can’t. If, however, your folder does have text (remember that folders in Scrivener are a loose definition), then the text can have a Snapshot. If you’re not familiar with this part of Scrivener, it’s not a huge deal, just know that “folders” by themselves can’t have (and don’t need) Snapshots.
Are there any caveats when using Snapshots?
Indeed, there are a couple of things to keep in mind about Snapshots (aside from the few things we’ve covered already).
Although Snapshots will preserve the formatting of your text, it will not track if or when formatting is changed—so, you can’t use the “compare” tool to easily see where formatting changes have occurred.
Snapshots do take up space, just like the text in the text document. It’s not a lot of space, but it is something to keep in mind—especially if you create a lot of Snapshots. This might happen if you turn on the option to create Snapshots on manual saves, and then instinctively hit Command or Control-S every few moments.
Also (as we’ll see shortly), rolling back a Snapshot is destructive, so it is important to pay attention during the process of reviewing, comparing, and rolling back Snapshots.
I’ve created a Snapshot, how do I compare (or rollback) changes?
 Once you’ve created a Snapshot of a document, it will appear in the list under the “Snapshots” tab in the inspector. In addition, all Snapshots in the entire project will appear in the Snapshots Manager (under the Documents menu, in Snapshots->Show Snapshots Manager).


Although the inspector can be resized, it may make more sense to view the Snapshot in the editor. To do that, my favorite way is to right-click on the Snapshot, and then select “View Changes on Copyholder.” This will put the Snapshot into a copyholder window in the Editor. This makes it crazy easy to see the differences, and by scrolling line-by-line or page-by-page, it is quite simple to see where changes have been made (though, as noted, in terms of text added or deleted, not formatted differently).
There are a couple of other ways to view or compare Snapshots. One is to right-click on the Editor title bar of the document you’re interested in and select one of the “View Snapshot” options. If you have the Editor split, or if you have a copyholder window open, you can drag the Snapshot from the inspector into the title bar for the copyholder or split window, and it will load there. Unfortunately, neither of these options shows the changes highlighted, which is why I prefer to use the “View Changes on Copyholder” option.
One additional thing you can do is compare two different Snapshots, instead of comparing a Snapshot to the current document. To do this, click on a Snapshot you’d like to use as a comparison, and then Command-click on the Snapshot with which you’d like to compare the first, and click the “Compare” button. The inspector will show you the markup (red strikethrough for deleted, and blue underlined for added), identifying the changes between the two, just like comparing between the current version and a given Snapshot.

As for rolling back changes, once you’ve decided that you want to roll back to a Snapshot, select the Snapshot to which you want to roll back, and click the “Roll Back” button in the inspector. Because rolling back will destroy the current version, Scrivener will ask if you’d like to make a Snapshot of the current version of the document before rolling back the changes. If you are not 100% certain that you will not want the current version of the document, you can click “Yes” to create a new Snapshot of the current document, or “Cancel” to stop the rollback altogether.
What are some workflows that make the best use of Snapshots and other safety tools?
I can think of two primary workflows that make good use of Snapshots, automatic backups, and automatic save. Undoubtedly there are others.
One is in that “Milestone” workflow that I use myself. In this setup, automatic backups are set to occur when closing the project, and Snapshots are created when a document is ready to “graduate” to the next level of status (To Do to First Draft, First Draft to Second Draft, and so on). When I start a project, I do some basic outlining of how the manuscript will be structured, and then I go through it (not necessarily in any particular order) until I have a completed first draft. At that point, I will have finished each scene/chapter/whatever (for the first draft!), and each of them gets a Titled Snapshot. I change each document and folder to have the status “First Draft,” and then I close the project. Scrivener does a backup of the project, and once the backup is finished and the project is closed, I run my Automator action to make another backup (on external storage … actually, off-site storage, through Google Drive), so I have an additional copy of that project with all of the Snapshots. This is my First Draft milestone. I repeat that procedure for each draft that I write.
Another is to use Snapshots and backups as a fall-back (an extension of the “Experiment” idea earlier). Set the backup to run when the project is opened, and before you start editing a document, make a Snapshot of it (you can’t make a Snapshot of a blank document so you won’t start with a Snapshot in that case). Work on it, make changes, make additional Snapshots if you like, and then when you’re done, close the project. If at any point you decide you don’t like how a document has turned out, you can roll back the changes (making a Snapshot of the current document, if you wish)—a “revert,” if you like.
If you decide you don’t like how anything turned out, you can do that to every document you changed, or you can just close the project. Since Scrivener autosaves, you can put the current project in the trash (or move it somewhere temporarily, like your Desktop), and move the most recent backup to whatever location you keep your works-in-progress. If necessary, uncompress it from the ZIP file. Now, your project is in the state it was when you opened it, before making the changes that you ended up not liking. The formerly-current project is now just an experiment that didn’t work out, so you can safely trash it (or, compress it and move to storage).
Unquestionably, these are not the only two ways these tools can be combined. One thing I didn’t mention in the Automator article was the idea of using a Folder Action. Basically, this is using an Automator app or AppleScript to watch a given folder, which will automatically perform actions when certain criteria are met (usually, when items are added to the watched folder, but there are other watchable actions).
An example workflow for using a Folder Action in addition to other workflows would be to create an Automator app that watches the Backup folder for your Scrivener project, and every time a new file was added to that folder—i.e., any time Scrivener created a backup—the Automator app would make a copy of that backup and move the copy to other storage. Another option might be to have a Folder Action that watches the /Volumes/ folder for your USB Flash Drive. When it detects that your USB Flash Drive has mounted, the action could compare a folder on the USB against the Scrivener Backups folder, and copy any files or folders it sees in the Backups folder that are not present on the USB. Bam! Instant backup and all you had to do was create one Automator script (you don’t even have to run the script in this case, it runs itself when you plug in your USB drive).
Final thoughts
There are myriad ways to make autosave, automatic backups, Automator, and Snapshots work to help save you from the practically inevitable technology malfunctions that can drive writers insane, and help you recover from any such problems that may occur.
If you have other workflows that leverage these tools to make your life easier or any questions about Snapshots (or any of the other topics), feel free to comment below!
Wednesday, August 29, 2018
New Patreon page!
After quite a lot of deliberation and consideration, I decided to launch a Patreon page ( http://bit.ly/bdw_patreon ), both as a creative spur for me and as a benefit for fans, readers, and other writers and artisanal publishers.
The purpose of my Patreon will encompass a few things, chief among them:
- To provide early access to my creative writing projects (novels, short stories, poetry, and others such as that)
- Early access to many of my how-to, writing advice, writing tool, and review blog entries (from Scrivener to writing process, to editing and publishing, and others)
- Exclusive access to some things, such as behind-the-scenes coverage of media events and other public functions
- At certain tiers, early access consideration for beta reading new materials that I will publish
as well as others that I haven't quite figured out yet!
If you're so inclined, come join me on the ride … we'll learn, we'll laugh, and we'll shed a few tears. It'll be fun!
Thursday, August 16, 2018
Sci Fi novel Universus Respondet now in the hands of beta readers
Just a brief note that this morning I sent Universus Respondet: Fermi's Paradox Answered—a Novel to beta readers!
As of right now, I am on track to publish by the end of the year, possibly sooner. As always, I will definitely let everyone know as I reach new milestones!
Tuesday, August 7, 2018
With It or in It audiobook now on sale!
Just today, the audiobook version of With It or in It: Desert Shield and Desert Storm from the Loader's Hatch, went on sale through Audible. Pete Beretta did the narration, and did a fantastic job! Pick up your copy today, and if you're not already an Audible member use these links:
If you click one of those links, become a member, and buy a book, both Pete and I get $25 each from Audible. The first link is a direct link to Audible and not part of that program, so if you prefer not do do the sharing/affiliate link thing, I totally get it.
Let me know what you think of the book!
- US Store—https://www.audible.com/pd/B07G5K7M9V/?source_code=AUDFPWS0223189MWT-BK-ACX0-124131&ref=acx_bty_BK_ACX0_124131_rh_us
- UK Store—https://www.audible.co.uk/pd/B07G5HLRBY/?source_code=AUKFrDlWS02231890H6-BK-ACX0-124131&ref=acx_bty_BK_ACX0_124131_rh_uk
- French Store—https://www.audible.fr/pd/B07G5JF52M/?source_code=FRAORWS022318903B-BK-ACX0-124131&ref=acx_bty_BK_ACX0_124131_rh_fr
- German Store—https://www.audible.de/pd/B07G5LJBC7/?source_code=EKAORWS0223189009-BK-ACX0-124131&ref=acx_bty_BK_ACX0_124131_rh_de
If you click one of those links, become a member, and buy a book, both Pete and I get $25 each from Audible. The first link is a direct link to Audible and not part of that program, so if you prefer not do do the sharing/affiliate link thing, I totally get it.
Let me know what you think of the book!
Thursday, July 19, 2018
Save me! Backing up Scrivener projects part 2: Automator workflow
Welcome back! Hopefully your summer continues to be awesome, and the A/C continues to hold out!
Today I’ll be discussing an Automator action that I use to make manual backups of my Scrivener projects when I reach milestones (or anytime, really, I just make sure I run it when I reach major milestones in a project).
Automator is an application for macOS, made by Apple and distributed in all versions of macOS (then, Mac OS X) since Tiger (10.4). It is an application that uses small libraries that other applications can create to automate tasks, and in a way that is much simpler to use than AppleScript (which is very powerful, but requires learning some basic programming). I have used both AppleScript and Automator for various things, but this is something that really lends itself well to Automator rather than AppleScript.
Also, since this is a macOS application, and made by Apple for the Mac, there is no Automator for Windows. Users of Scrivener for Windows can use similar tools, such as AutoHotKey or AutoIT, but since I haven’t had a Windows machine in many years I really cannot vouch for how simple (or hard) those tools are to use, nor how they work.
In any event, the general concepts of what I do should work, it’s really just an implementation detail on the Windows side, deciding which app can do the job, and exactly what steps need to be taken.
The basic idea
When I sat down to figure out how to make this additional step work, I knew I wanted to accomplish three basic things:
• Make a compressed copy of one Scrivener project,
• Rename the compressed file with the current time and date, and
• Move it to external storage.
Since these are things that are repetitive and should be reasonably easy to automate, that’s what I did.
Creating a new Application
Once I basically knew what I wanted to do, I opened up Automator (by default, this is in the Applications folder on the boot drive), and started putting together the workflow.


When Automator is first launched, it opens the standard Open dialog asking for you to choose a file. In the lower-left corner of that dialog is the “New Document” button. When you click that, it gives you an empty, untitled workflow, and asks you what kind of item it will be. For this, I created an Application. An Automator Application can be run on its own, and will sit in the Finder (wherever you put it) just like any other application. Another option would be to create a Workflow, which can’t be run on its own, but instead runs from within Automator. Either of these two would work, but I chose to make an Application. That way, when it was working the way I needed it to work, I could save it to my desktop and run it by itself.

If all you see is a blank window with “Drag actions or files here to build your workflow, click “Library” in the top left corner. The first column should have “Actions” highlighted (if not, click on it), and the master container “Library” should be selected in the left most of those two columns.
Click on the “Files & Folders” in that list to show only the actions that apply to Files & Folders.
The steps
Step one: get the right file(s)
 For me, the first step was to select the correct file. Since an Application will run on its own, it needs to have direction about what items to work on, and this can be done in one of two basic ways (for my purposes, anyway): I can either give the Application a file or folder to use every time, or I can have it ask me which file or folder to deal with. I chose the latter of these two, and put the “Ask for Finder Items” action at the top of the list. To do this, click and drag “Ask for Finder Items” from the second column on the left into the main workflow area on the right.
There are a few options to set here. In the text field next to “Prompt:” is some text you are supposed to be able to edit to remind yourself what is happening. My experience, however, is that this text is not displayed. This may be due to how macOS does Open/Save now, but in any event it doesn’t seem to show up anywhere, so you can (for now) ignore it. Or, add the text you want to have to remind yourself later, in case this does start showing up.
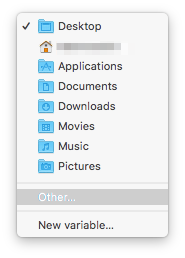 Next are the “Start at:” and “Type:” options. “Start at:” allows you to automatically set the folder where the “Open” dialog will start out. I set this to the top level folder where I keep all my Scrivener projects. If you keep yours loose in your Documents folder, say, you could select “Documents” from that dropdown menu, or whatever other folder you use for storing your documents. If your particular folder is not one of the ones listed in the menu, click the “Other…” item and select the folder where you want the “Open” dialog to start.
The “Type:” option allows you to permit Files, Folders, or Files and Folders both to appear as selectable items when the action runs. If you select “Files,” then you will only be able to select files, and clicking on Folders will drill down inside the folder. If you select “Folders” then files will be greyed out in the “Open” dialog and only folders will be able to be selected. You will still be able to drill down folder levels, but any files inside folders will be greyed out and unable to be selected. If you select “Files and Folders” it will permit you to select either files or folders in the Open dialog for further processing.
Quick aside, here: one key concept here is that this is a workflow, and that each step generally leads into the next step. Although Automator actions can be highly customized, and I will not even get into some of the more powerful things it can do, the basic idea is that there is a sequence of linked steps, each of which feeds the step after it.
What this step does is tells this workflow which file or folder (or, files or folders, if you click “Allow Multiple Selection” on) will be passed on to the next step.
Step two: compress the selected file
Once I’ve selected which file or folder I want to back up, next I want to tell the Finder to compress that file. This will leave the original unaltered, but will create a .zip archive of whatever was selected in the “Ask for Finder Items” action.
 To do this, drag the “Create Archive” action from the left side into the main document window, underneath the “Ask for Finder Items” action. What this will do is link the first action, the “Ask for Finder Items” action, to the second one in the list. That means the input from the first flows into the second, and the “Create Archive” will compress the file selected in the first action.
Options here include the ability to give the created archive a name, telling it where to save the archive, and whether the process should ignore unreadable items. In practice, “Ignore unreadable items” should probably always be checked (at least when starting out), so that any files which may be corrupted or are otherwise unreadable by the Finder don’t end up derailing the action.
I leave the “Save As:” text field blank so it gets the same name as the original file. This will not create a conflict, since this is a compressed .ZIP file of the Scrivener project (so, “Great American Novel.scriv” versus “Great American Novel.zip”). If you are uncomfortable with this, then of course you could add a filename in the text field, or you could save it to a different folder by selecting one under the “Where:” dropdown menu.
Step three: add the current time and date
 Next, I want my compressed file to have the current time and date added to the filename. To do this I need to add the “Rename Finder Items” action to the workflow, under the “Create Archive” action. Just as before, click the item in the Library and then drag it underneath the bottom item in the workflow. This will then feed the archive created in the previous step into this one.
 Dragging this action into the workflow will pop up a dialog box warning that this action will change the name of the existing Finder item, and offers to add the “Copy Finder Items” action (in between the previous action and this one) so that the original is not renamed. Since I have already created an archive, and am dealing with the archived file, I don’t worry about this warning and click “Don’t Add.” As the dialog notes, you can hold the Shift key down while dragging this action into place if you’d like to bypass the warning, and clicking “Do not show this message again” will prevent it from appearing in the future if you so desire.
 There are several possible options here, but what I do is I set this action to “Add Date or Time” of the “Date/Time:” to “Current”, set “Where” to “Before Name”, set the “Separator:” to “Space”, use the “Format:” of “Hour Minute”, and set the second “Separator:” to “None”. I also click on the “Use Leading Zeroes” checkbox.
I then add a second “Rename Finder Items” action immediately below this one, with the only difference being that I change “Format:” to be “Year Month Day” instead.
What this does is takes my “Great American Novel.zip” file and renames it to (for example) “0945 Great American Novel.zip” and then “20180718 0945 Great American Novel.zip” after.
All of this is just my personal preference. It makes it super easy for me to see by looking what file was backed up when. This is also overkill, in some ways, since the Finder can always sort folders by date created and such. I just am weird, and prefer this method.
You are, of course, under no obligation to subscribe to my weirdness, and could simply rename the archive in the “Create Archive” step and avoid all this. There are also other methods, such as putting the date & time after the filename, or changing “Add Date and Time” in the dropdown menu to “Make Sequential” or any of the other options there.
Step four: move to external storage
 Finally, I want my backup file, renamed and all, to be moved to an external storage medium. To do that, I drag the “Move Finder Items” action into the workflow, underneath the last “Rename Finder Item” action, and tell it where to send the backup file. In the “To:” dropdown menu are similarly options as in other locations, where you can pick one of several default locations, or “Other…” and navigate through the dialog to the external storage medium. One option here might be to select a cloud storage service like Dropbox, Box, Google Drive, or others, and save the archive to that location. If you have external disks (especially if you intend to use an SD card or USB stick), make sure that the volume you want to move the file to is mounted before you run the Application. Unless you decide to name your archives the exact same name, the “Replace existing files” option will have no effect.
 Here is my Automator workflow, in its entirety.
What happens now?
Now, save this Automator document, give it a fancy name and save it somewhere you can get to it, and that’s it! If you created an Application, double clicking on it will run the Automator workflow automatically, asking you for the file(s) or folder(s) you want to back up, create an archive of the selected item(s), rename the archive, and then move the renamed archive to the location you chose in the “Move Finder Items” action at the end.
If you created this as a Workflow document, double-clicking on it will launch Automator, where your Workflow will be sitting waiting for you to press the “Run” button at the top right. As a practical matter, it’s probably most convenient to opt for an Application. That way, you can just open it and have it run itself. Incidentally, Automator will give you the option to save the finished document as an Application, even if you chose “Workflow” at the beginning.
There are definitely some different ways you could approach this. As an example, the first action in the list could be “Get Selected Finder Items” instead of “Ask for Finder Items”. By using the “Get Selected” action instead, you can drag a file or folder onto the saved Automator Application, and the rest of the action will complete without asking for any input. In older AppleScript parlance, this used to be called a “Droplet,” meaning that it wouldn’t do anything on its own but would automatically process items dropped onto it.
With some additional research and experimentation, it should also be possible to modify the Workflow just described to take dropped items, ask for a destination, and then perform the rest of the actions.
Final thoughts
I use this Automator Application to make special backups of my Scrivener projects, specifically ones where I have reached critical milestones. For example, I recently completed the second revision of my upcoming novel Universo Responsoriis. Once I had created a good compile for my editor, I created snapshots of all the manuscript documents in the Binder (more on that in the next post on this topic!), then saved and closed the project.
This is important to note: the Scrivener project in question must be closed before … well, really any kind of Finder manipulation, automatic or otherwise. If the project is still open when this Automator Application is run, the project will be archived in the “I’m open!” state, which could cause issues later. Best bet is to just save and close the project, and then run the Automator Application.
In the next post on this topic, I will go over the Snapshot feature in Scrivener, and how to use it to create fall-back positions before or after you reach writing milestones.
If you are using Automator to create similar processes, what kinds of things are you running? What are your thoughts on Automator in general? Leave your comments below!
Monday, July 9, 2018
Save me! Backing up Scrivener projects part 1: Auto-save and Automatic backups in Scrivener
Hello again, and welcome back! Hopefully your summer has been less eventful than has mine. So far, the A/C has tried conking out three times (and one of those days it was 109 °F!), but fortunately I was able to get things right again. Today, I'm starting a new series covering some ways to save your hard work from technological issues that may strike the modern writer. In this series, I will go over some ways to use built-in Scrivener tools, as well as some of my thoughts on external automation tools, in order to help alleviate the inevitable crash, hard drive failure, or other disasters that may befall the CloudAge™ Author. In today’s cogitation, I’ll go over two Scrivener systems, auto-save and automatic backups. In Part 2, I'll look at a macOS option I use to help make this system more robust for my needs, as well as some ideas for modifications that others may find helpful and a note about possible ways Windows users can do something similar. In Part 3 I'll go over Snapshots and some ways they can help with disaster recovery, as well as some thoughts on them in general.
Scrivener itself has supported an automatic backup system since at least version 1.5, a system that offers the option for you to backup to a specific location, and when. It has also offered an auto-save feature as long as I’ve been aware, and I believe offered that from the very beginning. The automatic backup feature is optional, and fairly flexible. The auto-save feature is always-on, with a few configuration options.
With that, let’s take a look at auto-save and automatic backups in Scrivener 3 (which incidentally also work in Scrivener 2, although the preferences window will look slightly different).
 Auto-save in Scrivener is always-on, but the amount of time it waits before saving is configurable, and it also offers a couple of options for the writer who doesn’t particularly care for auto-save (I know there are some, although I am not among them).
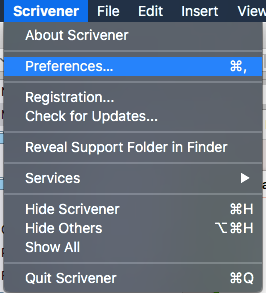
To access the settings for both auto-save and automatic backups, open a project in Scrivener and select the Scrivener menu, then click “Preferences …” (or, hold the command key and type a comma):
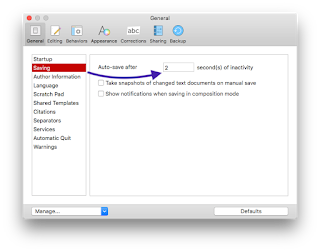
Once open, click the “General” tab, and click on the “Saving” item.
In this pane, you can tell Scrivener how long to wait before auto-saving, as well as whether to create Snapshots of any changed text documents when the “Save” command is manually invoked. There is also an option for notifications when an auto-save kicks off, if you’re in composition mode.
The latter two options may need a little exposition. The second one, “Show notifications when saving in composition mode,” will generate an on-screen display when a save occurs if you are writing in composition mode. That one is pretty straightforward, and if you want to be notified each time that happens, click that checkbox on.
The first of those two, “Take snapshots of changed text documents on manual save” allows you to essentially create backstops for your work each time you save manually. Although the Snapshots feature deserves (and I will give it) its own blog post, the short of it is that within a Scrivener project, you can save a copy of any of the elements of your manuscript at a given point in time. A Snapshot is basically just a “frozen” copy of a document, and continued editing on a document is done in the current version of the document, with one or more Snapshots acting as fall-back points.
If you enable that checkbox, then auto-save continues as normal by saving the current state of any changed documents whenever Scrivener is idle for the number of seconds listed in the Preferences. Then, anytime you manually save (with either a Command-S/Control-S or by selecting "Save" under the File menu), instead of just saving the changed files it will create a Snapshot of each changed document.
I have seen some discussion in the Literature and Latte forums about the auto-save, including requests to make it optional (which the developer has ruled out, so that’s just the way it goes). I myself rely on that auto-save (I have ADHD, and sometimes get hyper-focused on writing—when I do, I often forget to save!). So, I am glad it is there but if you really dislike it, you can set the auto-save to a ridiculously long time. Just keep in mind that the longer you set it, the more work you could potentially lose.
The most often cited reason for this is that with this auto-save setup there is no "Revert" option for Scrivener, and there are some writers who don't like that. I understand that perspective and it makes sense, but allow me to try to summarize the main reason there is no "Revert" feature, and how to effectively replace it. First, "Revert" in Word, or Pages, or Acrobat (among many, many others) works there because there is only one document open to which the "Revert" command can apply (yes, those applications can have several documents open at a time, but any "Revert" command almost always—and maybe actually always—only applies to the front-most document). Scrivener projects are project files, with multiple files open. In fact, if you write or edit (as I sometimes do) in Scrivenings mode, where multiple items selected in the Binder are all displayed in the Editor as an editable single "document," what does "Revert" mean in that case? Because of how Scrivener views projects, the "Revert" option doesn't make a lot of sense, but by creating Snapshots with manual saves and extending the auto-save time a bit you can create a replacement option to allow you to go back to a previous version of any edited document.
As a test of the manual save time, I put one hundred fifty thousand seconds in that field, and Scrivener didn’t crash. I don’t know for sure if that will actually translate to a nearly 2-day delay. There may be an internal maximum that I can’t override, but the manual doesn’t specify any such thing. So, it could very well be that it will accept any valid integer value up to the maximum size of a signed integer, which I believe is 9,223,372,036,854,775,807 on 64-bit macOS. That’s nine quintillion, two hundred twenty-three quadrillion, three hundred seventy-two trillion, thirty-six billion, eight hundred fifty-four million, seven hundred seventy-five thousand, eight hundred seven seconds, or more than 106 trillion years. If anyone finds out the actual maximum, let us know in the comments!
So, in any event, if you are not a fan of the auto-save, you can effectively disable it if you put in a value that is larger than you ever expect to actually keep Scrivener open. I suspect most people are fine with the auto-save feature, and turning on the checkbox to create Snapshots on manual save will help ameliorate any concerns about auto-saving garbage if the cat jumps on the keyboard and accidentally selects all and replaces it with gobbledygook.
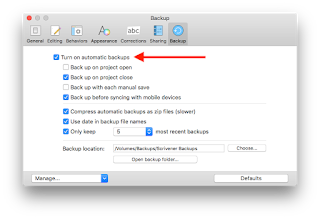
Also in the Preferences for Scrivener is the option to turn on automatic backups:
This feature is awesome, and has been available since version 1.5. As you can see, there are a lot of options here, so let’s take a look at them.
First, the checkbox to turn them on at all is at the top. When this box is checked “on,” Scrivener will automatically create backups according to the instructions in the next four options. It will either automatically backup projects:
• When a project is opened,
• When a project is closed,
• Every time you “Save” the project manually
• Or before syncing with mobile devices
Or any combination of these options (including all four).
Below these four are three settings which control whether or not to compress (zip) the backups, use dates in the name of the backup file, and how many backup files to keep.
Below those three are two more items, the Backup location and a button to select a backup folder, as well as a button to open that folder.
By default, automatic backups are turned on, and set to backup when a project is closed and before syncing with mobile devices. If you don’t use a mobile device (iPad, iPhone), the last option won’t have any effect (it only kicks in when you go into the File menu and select Sync->with Mobile Devices). Even though I don’t right now use my iPad as a writing tool, I might in the future (like, when I replace my current MacBook Air with what will likely be an iMac Pro, I may switch to using the iPad as my portable writing platform again), so I keep it ticked on. I also keep the “Backup on project close” option ticked on. Other people might prefer to have Scrivener backup the project when they open it, so that if they make a bunch of changes in a session and decide to scrap them, they can just recover from the project state as it existed before they started working. Either way it kind of amounts to the same thing, since a backup-on-close looks like the project did before opening it, so it’s really more about your personal preference and workflow.
The other option here is the “Backup with each manual save” option, which ties the backup process to the File->Save action (either by selecting "Save" in the File menu or by typing the keystroke shortcut). This means that whenever you either type Command-S (or Control-S in Windows) to "Save," or you click on the File menu and select the "Save" option, it will create a new backup for you. This is another way to create a fall-back point if you are one who doesn't like the auto-save feature. By combining the use of Snapshots on manual save with backups on manual save, you can create a series of intermediate fall-back points.
Depending on your circumstance, your computer, the size and available space of your backup drive, and so on, you may want to enable compressing backup files. If so, check “on” the checkbox for “Compress automatic backups as zip files (slower).” This will first backup the project, and then compress it. Beneath that is the option to add the date to the title of the backup file, which inserts the current date and time of the backup into the file name. Although the macOS Finder (and Windows) can sort folder items by created date, having the date and time in the title of the file can be helpful if you use other, external solutions for backing up these items.
Beneath that option is the option to control the number of backup files to maintain. If this checkbox is enabled, Scrivener will make a maximum of 3, 5, 10, or 25 backups of this project inside the backup folder. Once Scrivener has backed up a project the number of times equal to the one selected in the popup menu, the next time it tries to create a backup it will locate the oldest one, delete it, and create the new backup. How many of these backups you want to maintain will largely depend on how you write and work. I tell Scrivener to keep 5 backups. Since I have Scrivener backup on close, the amount of time it takes to backup is less relevant to me, so I tell Scrivener to compress those backups, and I also tell Scrivener to put the date in the file title.
If you tell Scrivener to backup on open, and close, and sync, and manual save, you may find that 25 better suits your style. If you find that 25 is still too few, you will need to implement some other kind of backup feature, such as a modification of the Automator action that I’ll discuss in part 2 of this series.
At the very bottom are the Backup location and “Open backup folder” items. Here, the “Choose…” button will enable you to select what folder Scrivener uses to store your backup files, and then to open that folder in the Finder (or Windows Explorer) if you need to access it. You can, of course, also open that folder normally in the Finder/Explorer if you need to. By default, this location is in your home folder, at ~/Library/Application Support/Scrivener/Backups (on Windows, I believe this is in your account’s AppData folder). You can change that location here if you wish. In my case, I have an external USB disk drive (“Backups”) that I use specifically for backup purposes (not just for Scrivener). I tell Scrivener to use a folder on that disk, instead of the default setting.
A word of caution about the backups. If you find you need to open a backup copy of a project, drag it out of the folder with the other backups. This can be by dragging it to the desktop, or making a copy in another folder, or (what I do) by holding down the option key and dragging the zip file to the desktop and then opening the zip file from there. Holding option while dragging a file or folder (or disk, or anything else really) in the Finder will create a copy of the dragged item. If you open a Scrivener project from within the folder it uses for automatic backups, you will get a warning dialog that the project is not in a recommended location. This will also happen if you tell Scrivener to use a folder for automatic backups where you are also saving your normal projects.
There’s a discussion about this on the Literature and Latte forums, but the short version of how to avoid the whole issue is to use a separate folder for your automatic backups. If you are like many people, and you have a separate folder in Documents for your Scrivener projects, set the “Backup location” to be anything else.
From a general perspective, the best thing to do is to have the “Backup location” be on a separate drive, such as a USB thumb drive or a Thunderbolt disk drive. If you don’t have any of these, at the very least the “Backup location” must be different from the folder where you store the projects you are working on. If you are like many writers and use Dropbox for your Scrivener projects (and if you're using Scrivener for iOS as well, you almost certainly are using Dropbox for that!), you could save your backups to your Documents folder instead. I still recommend having an external drive (SSD, Hard Disk, USB/SD flash drive, und so weiter), and keeping backups on there, because even if you use Dropbox it is still storing local copies on your internal drive. If your internal drive fails you may still be able to salvage your Dropbox from another location (assuming your drive's failure didn't trash the Dropbox folder and sync the trashed version, which is possible), but your backups are still on the internal drive if that doesn't work out. Safest thing is to do backups to an entirely different drive.
For me, I have an external hard disk drive (“Backups”) which has a subfolder (“Scrivener Backups”) where I tell Scrivener to store backups of my projects. In addition, occasionally I will drag-copy the “Scrivener Backups” folder onto a different drive, a USB flash drive, just to have an additional backup of the backups. Finally, I created an Automator action that I use when I reach milestones in my projects. Although this action makes a backup of my live project, not the backups, it could easily be modified to backup the backups instead of—or in addition to—my live project.
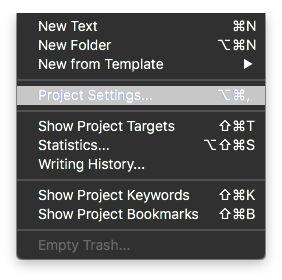 Finally, it is also possible to override a couple of the backup settings on a per-project basis (by going into the Project menu and selecting “Project Settings…”, or typing Option-Command-comma on a Mac):
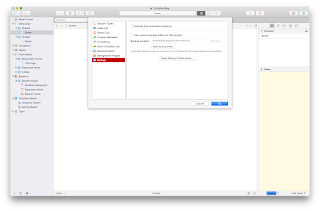 The top checkbox, if checked “on,” will tell Scrivener to not automatically backup this particular project (all other projects will still be backed up automatically, unless they also have this setting checked “on”). The second checkbox allows you to specify a different location for this project’s backup files. The other settings remain unchanged, so if you have the settings to “Only keep” the 5 most recent backups, that will still apply. It will just use the folder you set here, instead of the one in the “Backup” pane of the Scrivener Preferences, and only for this project.
If you like, you can have a different backup folder for each project (which is not a bad idea!), but if you have a lot of projects this can be a little tedious to manage. It may be worth it, though, depending on your situation.
One such option might be to create a generic backup folder on an external drive, and then inside that folder create a new folder for each project. When you create a new project, remember to go to the Project->Project Settings… menu and set this backup location. That way, each project’s backups are separate from each other. As with any backup, however, this folder needs to be separate from the one where your “live” version of the project is stored. I also recommend backing up this folder periodically (say, every Friday afternoon to a USB stick).
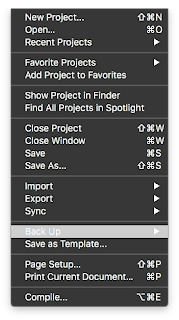 In addition to the automatic backups, you can also do manual backups by going into File->Backup:

Under File-Backup you will see two selection options, one to "Back Up To…" and one to "Back Up Now":
The "Back Up To…" option will prompt you (via a standard "Save" type dialog box) for a location to save a backup, as well as a checkbox option to Back up as a ZIP file. "Back Up Now" will create a manual backup using the settings in the Backup tab of the Preferences. Even if you have automatic backups disabled, it will use whatever other settings are set in the Backup tab (whether to ZIP or not, whether to use date in the filename or not, and the location for backups) and create a backup there. Keep in mind, however, that if you are using automatic backups, a manual "Back Up Now" create a backup of the project just as if it were automatic, so if you are at the limit for number of backups it will delete the oldest to make room for the manual backup.
In any event, Scrivener offers a fairly flexible automatic backup system for your writing projects, but there is still a little management for you, the writer, to make it work the way you need for it to work.
Scrivener offers a few options to help a writer avoid some of the disasters (such as a loss of power or computer crash) that can befall him or her, including automatic saving of modified open projects as well as automatic backups with some user-defined or -selected parameters. By considering your own needs and preferences, you can use these built-in tools to help maintain a robust system for preserving your hard work. In part 2 of this series, I will go over the Automator action that I use to manually backup important milestone versions of my live projects, and in part 3 I will take a look at the Snapshots feature of Scrivener, and how it can be used to help make auto-save and automatic backup even more useful.
If you use the automatic backups, what is your system for keeping them safe? How do you feel about the auto-save feature, and do you have any tips from your own experience? Feel free to share them in the comments!
Scrivener itself has supported an automatic backup system since at least version 1.5, a system that offers the option for you to backup to a specific location, and when. It has also offered an auto-save feature as long as I’ve been aware, and I believe offered that from the very beginning. The automatic backup feature is optional, and fairly flexible. The auto-save feature is always-on, with a few configuration options.
With that, let’s take a look at auto-save and automatic backups in Scrivener 3 (which incidentally also work in Scrivener 2, although the preferences window will look slightly different).
Auto-save
Auto-save in Scrivener is always-on, but the amount of time it waits before saving is configurable, and it also offers a couple of options for the writer who doesn’t particularly care for auto-save (I know there are some, although I am not among them).To access the settings for both auto-save and automatic backups, open a project in Scrivener and select the Scrivener menu, then click “Preferences …” (or, hold the command key and type a comma):

Once open, click the “General” tab, and click on the “Saving” item.
In this pane, you can tell Scrivener how long to wait before auto-saving, as well as whether to create Snapshots of any changed text documents when the “Save” command is manually invoked. There is also an option for notifications when an auto-save kicks off, if you’re in composition mode.
The latter two options may need a little exposition. The second one, “Show notifications when saving in composition mode,” will generate an on-screen display when a save occurs if you are writing in composition mode. That one is pretty straightforward, and if you want to be notified each time that happens, click that checkbox on.
The first of those two, “Take snapshots of changed text documents on manual save” allows you to essentially create backstops for your work each time you save manually. Although the Snapshots feature deserves (and I will give it) its own blog post, the short of it is that within a Scrivener project, you can save a copy of any of the elements of your manuscript at a given point in time. A Snapshot is basically just a “frozen” copy of a document, and continued editing on a document is done in the current version of the document, with one or more Snapshots acting as fall-back points.
If you enable that checkbox, then auto-save continues as normal by saving the current state of any changed documents whenever Scrivener is idle for the number of seconds listed in the Preferences. Then, anytime you manually save (with either a Command-S/Control-S or by selecting "Save" under the File menu), instead of just saving the changed files it will create a Snapshot of each changed document.
I have seen some discussion in the Literature and Latte forums about the auto-save, including requests to make it optional (which the developer has ruled out, so that’s just the way it goes). I myself rely on that auto-save (I have ADHD, and sometimes get hyper-focused on writing—when I do, I often forget to save!). So, I am glad it is there but if you really dislike it, you can set the auto-save to a ridiculously long time. Just keep in mind that the longer you set it, the more work you could potentially lose.
The most often cited reason for this is that with this auto-save setup there is no "Revert" option for Scrivener, and there are some writers who don't like that. I understand that perspective and it makes sense, but allow me to try to summarize the main reason there is no "Revert" feature, and how to effectively replace it. First, "Revert" in Word, or Pages, or Acrobat (among many, many others) works there because there is only one document open to which the "Revert" command can apply (yes, those applications can have several documents open at a time, but any "Revert" command almost always—and maybe actually always—only applies to the front-most document). Scrivener projects are project files, with multiple files open. In fact, if you write or edit (as I sometimes do) in Scrivenings mode, where multiple items selected in the Binder are all displayed in the Editor as an editable single "document," what does "Revert" mean in that case? Because of how Scrivener views projects, the "Revert" option doesn't make a lot of sense, but by creating Snapshots with manual saves and extending the auto-save time a bit you can create a replacement option to allow you to go back to a previous version of any edited document.
As a test of the manual save time, I put one hundred fifty thousand seconds in that field, and Scrivener didn’t crash. I don’t know for sure if that will actually translate to a nearly 2-day delay. There may be an internal maximum that I can’t override, but the manual doesn’t specify any such thing. So, it could very well be that it will accept any valid integer value up to the maximum size of a signed integer, which I believe is 9,223,372,036,854,775,807 on 64-bit macOS. That’s nine quintillion, two hundred twenty-three quadrillion, three hundred seventy-two trillion, thirty-six billion, eight hundred fifty-four million, seven hundred seventy-five thousand, eight hundred seven seconds, or more than 106 trillion years. If anyone finds out the actual maximum, let us know in the comments!
So, in any event, if you are not a fan of the auto-save, you can effectively disable it if you put in a value that is larger than you ever expect to actually keep Scrivener open. I suspect most people are fine with the auto-save feature, and turning on the checkbox to create Snapshots on manual save will help ameliorate any concerns about auto-saving garbage if the cat jumps on the keyboard and accidentally selects all and replaces it with gobbledygook.
Automatic backups

Also in the Preferences for Scrivener is the option to turn on automatic backups:
This feature is awesome, and has been available since version 1.5. As you can see, there are a lot of options here, so let’s take a look at them.
First, the checkbox to turn them on at all is at the top. When this box is checked “on,” Scrivener will automatically create backups according to the instructions in the next four options. It will either automatically backup projects:
• When a project is opened,
• When a project is closed,
• Every time you “Save” the project manually
• Or before syncing with mobile devices
Or any combination of these options (including all four).
Below these four are three settings which control whether or not to compress (zip) the backups, use dates in the name of the backup file, and how many backup files to keep.
Below those three are two more items, the Backup location and a button to select a backup folder, as well as a button to open that folder.
By default, automatic backups are turned on, and set to backup when a project is closed and before syncing with mobile devices. If you don’t use a mobile device (iPad, iPhone), the last option won’t have any effect (it only kicks in when you go into the File menu and select Sync->with Mobile Devices). Even though I don’t right now use my iPad as a writing tool, I might in the future (like, when I replace my current MacBook Air with what will likely be an iMac Pro, I may switch to using the iPad as my portable writing platform again), so I keep it ticked on. I also keep the “Backup on project close” option ticked on. Other people might prefer to have Scrivener backup the project when they open it, so that if they make a bunch of changes in a session and decide to scrap them, they can just recover from the project state as it existed before they started working. Either way it kind of amounts to the same thing, since a backup-on-close looks like the project did before opening it, so it’s really more about your personal preference and workflow.
The other option here is the “Backup with each manual save” option, which ties the backup process to the File->Save action (either by selecting "Save" in the File menu or by typing the keystroke shortcut). This means that whenever you either type Command-S (or Control-S in Windows) to "Save," or you click on the File menu and select the "Save" option, it will create a new backup for you. This is another way to create a fall-back point if you are one who doesn't like the auto-save feature. By combining the use of Snapshots on manual save with backups on manual save, you can create a series of intermediate fall-back points.
Depending on your circumstance, your computer, the size and available space of your backup drive, and so on, you may want to enable compressing backup files. If so, check “on” the checkbox for “Compress automatic backups as zip files (slower).” This will first backup the project, and then compress it. Beneath that is the option to add the date to the title of the backup file, which inserts the current date and time of the backup into the file name. Although the macOS Finder (and Windows) can sort folder items by created date, having the date and time in the title of the file can be helpful if you use other, external solutions for backing up these items.
Beneath that option is the option to control the number of backup files to maintain. If this checkbox is enabled, Scrivener will make a maximum of 3, 5, 10, or 25 backups of this project inside the backup folder. Once Scrivener has backed up a project the number of times equal to the one selected in the popup menu, the next time it tries to create a backup it will locate the oldest one, delete it, and create the new backup. How many of these backups you want to maintain will largely depend on how you write and work. I tell Scrivener to keep 5 backups. Since I have Scrivener backup on close, the amount of time it takes to backup is less relevant to me, so I tell Scrivener to compress those backups, and I also tell Scrivener to put the date in the file title.
If you tell Scrivener to backup on open, and close, and sync, and manual save, you may find that 25 better suits your style. If you find that 25 is still too few, you will need to implement some other kind of backup feature, such as a modification of the Automator action that I’ll discuss in part 2 of this series.
At the very bottom are the Backup location and “Open backup folder” items. Here, the “Choose…” button will enable you to select what folder Scrivener uses to store your backup files, and then to open that folder in the Finder (or Windows Explorer) if you need to access it. You can, of course, also open that folder normally in the Finder/Explorer if you need to. By default, this location is in your home folder, at ~/Library/Application Support/Scrivener/Backups (on Windows, I believe this is in your account’s AppData folder). You can change that location here if you wish. In my case, I have an external USB disk drive (“Backups”) that I use specifically for backup purposes (not just for Scrivener). I tell Scrivener to use a folder on that disk, instead of the default setting.
A word of caution about the backups. If you find you need to open a backup copy of a project, drag it out of the folder with the other backups. This can be by dragging it to the desktop, or making a copy in another folder, or (what I do) by holding down the option key and dragging the zip file to the desktop and then opening the zip file from there. Holding option while dragging a file or folder (or disk, or anything else really) in the Finder will create a copy of the dragged item. If you open a Scrivener project from within the folder it uses for automatic backups, you will get a warning dialog that the project is not in a recommended location. This will also happen if you tell Scrivener to use a folder for automatic backups where you are also saving your normal projects.
There’s a discussion about this on the Literature and Latte forums, but the short version of how to avoid the whole issue is to use a separate folder for your automatic backups. If you are like many people, and you have a separate folder in Documents for your Scrivener projects, set the “Backup location” to be anything else.
From a general perspective, the best thing to do is to have the “Backup location” be on a separate drive, such as a USB thumb drive or a Thunderbolt disk drive. If you don’t have any of these, at the very least the “Backup location” must be different from the folder where you store the projects you are working on. If you are like many writers and use Dropbox for your Scrivener projects (and if you're using Scrivener for iOS as well, you almost certainly are using Dropbox for that!), you could save your backups to your Documents folder instead. I still recommend having an external drive (SSD, Hard Disk, USB/SD flash drive, und so weiter), and keeping backups on there, because even if you use Dropbox it is still storing local copies on your internal drive. If your internal drive fails you may still be able to salvage your Dropbox from another location (assuming your drive's failure didn't trash the Dropbox folder and sync the trashed version, which is possible), but your backups are still on the internal drive if that doesn't work out. Safest thing is to do backups to an entirely different drive.
For me, I have an external hard disk drive (“Backups”) which has a subfolder (“Scrivener Backups”) where I tell Scrivener to store backups of my projects. In addition, occasionally I will drag-copy the “Scrivener Backups” folder onto a different drive, a USB flash drive, just to have an additional backup of the backups. Finally, I created an Automator action that I use when I reach milestones in my projects. Although this action makes a backup of my live project, not the backups, it could easily be modified to backup the backups instead of—or in addition to—my live project.
Finally, it is also possible to override a couple of the backup settings on a per-project basis (by going into the Project menu and selecting “Project Settings…”, or typing Option-Command-comma on a Mac): The top checkbox, if checked “on,” will tell Scrivener to not automatically backup this particular project (all other projects will still be backed up automatically, unless they also have this setting checked “on”). The second checkbox allows you to specify a different location for this project’s backup files. The other settings remain unchanged, so if you have the settings to “Only keep” the 5 most recent backups, that will still apply. It will just use the folder you set here, instead of the one in the “Backup” pane of the Scrivener Preferences, and only for this project.
If you like, you can have a different backup folder for each project (which is not a bad idea!), but if you have a lot of projects this can be a little tedious to manage. It may be worth it, though, depending on your situation.
One such option might be to create a generic backup folder on an external drive, and then inside that folder create a new folder for each project. When you create a new project, remember to go to the Project->Project Settings… menu and set this backup location. That way, each project’s backups are separate from each other. As with any backup, however, this folder needs to be separate from the one where your “live” version of the project is stored. I also recommend backing up this folder periodically (say, every Friday afternoon to a USB stick).
 In addition to the automatic backups, you can also do manual backups by going into File->Backup:
Under File-Backup you will see two selection options, one to "Back Up To…" and one to "Back Up Now":
The "Back Up To…" option will prompt you (via a standard "Save" type dialog box) for a location to save a backup, as well as a checkbox option to Back up as a ZIP file. "Back Up Now" will create a manual backup using the settings in the Backup tab of the Preferences. Even if you have automatic backups disabled, it will use whatever other settings are set in the Backup tab (whether to ZIP or not, whether to use date in the filename or not, and the location for backups) and create a backup there. Keep in mind, however, that if you are using automatic backups, a manual "Back Up Now" create a backup of the project just as if it were automatic, so if you are at the limit for number of backups it will delete the oldest to make room for the manual backup.
In any event, Scrivener offers a fairly flexible automatic backup system for your writing projects, but there is still a little management for you, the writer, to make it work the way you need for it to work.
Some things to consider, and final thoughts
Scrivener offers a few options to help a writer avoid some of the disasters (such as a loss of power or computer crash) that can befall him or her, including automatic saving of modified open projects as well as automatic backups with some user-defined or -selected parameters. By considering your own needs and preferences, you can use these built-in tools to help maintain a robust system for preserving your hard work. In part 2 of this series, I will go over the Automator action that I use to manually backup important milestone versions of my live projects, and in part 3 I will take a look at the Snapshots feature of Scrivener, and how it can be used to help make auto-save and automatic backup even more useful.
If you use the automatic backups, what is your system for keeping them safe? How do you feel about the auto-save feature, and do you have any tips from your own experience? Feel free to share them in the comments!
Wednesday, June 13, 2018
Styles and formatting in Scrivener 3 part 1—basic introduction
Welcome back! 😃 I hope everyone's summer is progressing well. Here in Tucson, it's hot and dry and that's just fine by me!
Today, I will briefly cover text styling in general, and point out some cool features in Scrivener version 3 that are different from version 2 (and 1).
First, what I mean by "text styling" is the option in certain applications to modify settings for the editable text in a document. In general, this is the font family (and the specific font in a family), font point size, font weight, text justification, and other information that describes what the text looks like on the page, either on screen or printed or both. Not all applications offer this ability.
Well, it depends on what you want to do! If you are using Notepad on a Windows PC to write your novel, and then sending the file to someone else for editing, page layout, book design and so forth, these really don't matter a whole lot. You can pick any application you want, and as long as the editor and other recipients will accept your file, no worries!
The inclusion of this new styles system in Scrivener 3 is a welcome addition, and one which I will explore a bit more in part 2. It takes the best writing tool around, and makes it even more awesome. In part 2, I will take you through how to create styles for your Scrivener projects, how to use styles in the editor as well as during compilation, and some things to think about when using the new styles system in Scrivener 3.
What are your thoughts on styles in general? How extensively (or not) have you used them in your works up to now? Just based on the information here, will you be more likely to set up and use the new style system? Let me know in the comments!
Today, I will briefly cover text styling in general, and point out some cool features in Scrivener version 3 that are different from version 2 (and 1).
Text Styling in general
First, what I mean by "text styling" is the option in certain applications to modify settings for the editable text in a document. In general, this is the font family (and the specific font in a family), font point size, font weight, text justification, and other information that describes what the text looks like on the page, either on screen or printed or both. Not all applications offer this ability.
The way I see it, there are basically two categories of applications for people who want to type stuff. One category shows text, as typed, in a fixed font & size or with extremely limited options for formatting text. Commonly, these are referred to as plain text applications, and text editor is probably the most common generic term for these kinds of applications and is the term I use myself. There are text editors of this kind available for every computer platform I know about, some of which are—for all intents and purposes—built into the platforms. Some examples of this are vi, emacs, TextEdit, Notepad, and there are a ton of others. Linux (in its various flavors), Unix (in its various flavors), macOS, Windows, iOS, Android, all of these have at least one, and sometimes several, basic text editors that are part of the default installation of the operating system. By and large, if a text editor can style text at all (and some really can't, or don't), they are usually limited to a very few such stylings. Sometimes the font itself is fixed (only Times, or only Helvetica, etc.) and cannot be resized or given any formatting at all. Most of the time, however, some basic styling is possible. Often, there are limited font choices, and the styling is often limited to a few point sizes, and to bold (strong, in HTML terms), italic (emphasis), or underlined text—the weight of the font. Some basic text editors also offer left/right/center aligned text, and some may also offer justification alignment, where the text is aligned to both left and right margins, with word spacing adjusted per-line so the right-most character of each line is right aligned, just like the left-most character is left aligned.
The second category I usually refer to as word processor applications. These applications nearly always offer a fairly extensive set of tools for formatting characters, words or other grammatical tokens, lines, paragraphs, pages, sections, and documents (collectively, I will refer to these as "text elements"). Most of the time, a word processing application offers the ability to fully control the font, point size, leading, kerning*, typographical weight (bold, italics, strikethrough, and others), and a slew of other settings on each element, individually and collectively. Many word processors also offer basic (or extensive!) page layout options, controlling precisely where text or other elements appear on a page.
Why does this matter?
Well, it depends on what you want to do! If you are using Notepad on a Windows PC to write your novel, and then sending the file to someone else for editing, page layout, book design and so forth, these really don't matter a whole lot. You can pick any application you want, and as long as the editor and other recipients will accept your file, no worries!
Where this really comes into play is for the author who is also an artisanal publisher (thanks to Guy Kawasaki and Shawn Welch for the phrase, and the outstanding advice from their book APE: Author, Publisher, Entrepreneur for this concept), using the tools of the CloudAge™ to publish independently. If you are a writer, and you will be print publishing your novel through IngramSpark, Createspace, FastPencil, KDP Print, or any of several other print publishing services, you'll want to have a keen understanding of how this text styling works, and how to make the version you send look right. Even if you decide not to publish paperbacks, but exclusively use digital services like KDP, Smashwords, Draft2Digital, IngramSpark, and others, understanding how to get the styling right will be a big help in formatting for these platforms.
How does this relate to Scrivener?
Although Scrivener does offer extensive text element formatting options (and, as such, I consider it to be, in part, a word processing application … at least in so far as it relates to putting words in documents), it is not (and has never been) an application for final production of written works. It does offer formatting, but certainly not on the level of Adobe InDesign, Quark XPress, or even Microsoft Word. Scrivener aims to give the writer tools to organize, structure, and write their works, and then hand those works off to a more specialized layout program (like those three I listed) by compiling the work in the compile pane, and opening that compiled output in one of those other applications.
As a result, the compile pane offers a tremendous amount of power and flexibility when creating those documents for output. One part of that is support for how text elements are formatted in the compiled document.
Okay, but what does that have to do with Scrivener 3?
In earlier versions of Scrivener, text could be formatted quite extensively, and preset formatting options could be defined and applied ad hoc in a Scrivener project. One limitation of the way Scrivener implemented this formatting in versions 1 and 2 was that these formats were a one-way, one-shot deal. Once applied, the fact that text was formatted with the preset was no longer "known" by Scrivener; all the preset did was allow a set of rules to be applied to the selected text. The text maintained that formatting, but had no idea what preset—if any—had been used to assign that formatting to that text.
In many other word processing applications, these preset formatting rules actually apply a state to the text (or, I guess more accurately they can apply a state, and if no specific state is applied, then the "default" is the assumed state), and that text can report back what state was applied to them. In essence, a concept like a "style sheet" in Microsoft Word is basically just a named state of formatting options, and when a style (named state) is applied to an element, the element "remembers" that named state.
Take Microsoft Word. By default, Word uses a style called "Normal" which defines the formatting for font, point size, character weight (bold etc.), kerning, etc., and applies that formatting to text in the document—unless otherwise specified or overridden. When you select a line of text and then change the style of that text to "Heading 1," not only does the formatting of the text change but so does that state. If you position the cursor in the document where the "Normal" style is applied, "Normal" appears as the selected style, and the same is true of "Heading 1" when the cursor is positioned inside text with that style applied.
Scrivener, in versions 1 and 2, did not have any concept of such "remembered" formatting. Although the formatting of compiled output could be assigned in the Formatting pane, it was still just a one-shot deal.
Scrivener 3, however, now supports styles in a way much more like that of other applications: as a named state that the text "remembers." It also can include information about those styles, including their names, in the compiled document.
The upshot is …
There are really two awesome things that are possible with the new style system in Scrivener 3. Probably the most important is the part where Scrivener will include the styles and their names in the final compiled output in certain formats (when compiling to a Word format, for example). This means that when you create a style for your chapter titles, your block quotes, captions, etc., Scrivener will not only apply the formatting but when you open the Word document later, those styles will show up in the style pane of the ribbon (or in the style window under Format->Style…, at least on the Mac version of Word). This significantly simplifies some aspects of the post-compile workflow. These don't only apply to Word formats, but also to the CSS for EPUB3 as well as Kindle output (according to the pre-release blog entry, at least).
A second upshot is that you can actually have one set of styles for the editor, styles which conform to your needs while creating your work, and a different set of styles for the compilation stage. This was sort of possible before, it's just considerably easier now.
Final thoughts
The inclusion of this new styles system in Scrivener 3 is a welcome addition, and one which I will explore a bit more in part 2. It takes the best writing tool around, and makes it even more awesome. In part 2, I will take you through how to create styles for your Scrivener projects, how to use styles in the editor as well as during compilation, and some things to think about when using the new styles system in Scrivener 3.
What are your thoughts on styles in general? How extensively (or not) have you used them in your works up to now? Just based on the information here, will you be more likely to set up and use the new style system? Let me know in the comments!
Notes:
*: Leading and kerning, for those who are not familiar with these terms, refer to kinds of spacing. Leading (as in the metal lead, Pb, not /LEE-ding/) comes from typesetting days, when small strips of lead metal were placed between lines of text. Increasing the leading basically means to put more space between lines (or, more accurately, between baselines of text). Kerning is a type of character spacing in proportional fonts. Specifically, it refers to the adjustment between particular character combinations. A character like "W" takes up more visual space at the top than at the bottom, and the letter "A" takes up more space at the bottom than the top. Because of this, the letter combination WA or AW will often have some negative kerning assigned to it, so that these two letters will actually be closer together than will WE or XL (for example). If you look closely at the WA, you can probably see that the bottom of the "A" is actually underneath the top of the "W", whereas the "E" does not overlap the box of the "W" at all. The exact amount of this overlap is the kerning, and is usually defined for certain character combinations (not all combinations need, or could benefit from, kerning). A related concept is that of tracking, which is the spacing between any two characters independent of the kerning. Tracking defines how closely spaced characters are overall, while kerning is basically an offset of the tracking for certain character combinations to be closer together, so as to give a more pleasing reading experience.
Thursday, June 7, 2018
Universo Responsoriis 2nd draft update
So, today I sent off the 2nd draft of my SciFi novel (working title: Universo Responsoriis) for editing and review.
I am hopeful that I’ll be able to start the beta reading stage starting at the end of July.
I will post information about how to become a beta reader soon, so if you might be interested, keep an eye out on this space for details!
I am hopeful that I’ll be able to start the beta reading stage starting at the end of July.
I will post information about how to become a beta reader soon, so if you might be interested, keep an eye out on this space for details!
Sunday, May 20, 2018
Brief Scrivener 3 post: Project Metadata in Scrivener 3
I know I promised an updated set of Scrivener posts for version 3 of Scrivener, and I will definitely do that sometime RealSoonNow™. I have been working pretty hard trying to get Universo Responsoriis ready for Beta readers, as well as working my actual job (transcriptions), and haven't has as much time to get to the updates as I had hoped.
I would like to take a few moments to praise the new metadata system in Scrivener 3.
For readers unfamiliar with metadata, in Scrivener at least, here's a basic rundown.
First, the concept is the same as it is for any other use of "metadata," in the sense that it's the data about the data. For example, the "Last Modified Date" of a file is metadata that tracks what date a file was last modified. It is not data inside the file per se, and updates automatically every time the file is modified, usually by the computer's operating system. For a non-computer use, the title and author of a book (say, Cryptonomicon by Neal Stephenson) are basically metadata. They are not part of the story; rather, they identify the work and the person who authored it. Additional metadata, in that case, might be the publisher, the date of copyright, the printing number (for a paper or hardback book), stuff like that.
In Scrivener, a project has quite a lot of metadata, some which are not directly editable (for example, the last modified date and/or time is updated automatically when a file is modified), and some which can be edited. In Scrivener version 1, a writer could add tags for labels, keywords, and status to documents inside a Scrivener project. Among other things, a writer could use the status tags to identify which documents in a project were still to-do, or were 1st draft ready, and so on. Labels could be used to mark whether a document was a scene, a chapter, an idea, and more. Keywords could tag a document's characters, plot arc, point-of-view character or voice, and a bunch more. All three of these features were customizable, and a writer could add labels, keywords, or status entries as they wished.
In version 2 of Scrivener, Literature and Latte added custom metadata to the mix. Custom metadata—which is defined on a per-project basis—serves a similar function to the keyword, status, and label, but in a different way. Although it is possible to include a document's status or label in the compiled document (using the placeholders), only one label or status can be assigned to a document at a time (one of each). A document can have essentially any arbitrary number of keywords, but the keyword placeholder will insert all of the document's keywords. So, while all three of these tools are useful for the writer (and others working on the project, like editors and such), the custom metadata added a whole new dimension of utility.
Say you're writing an historical fiction novel which parallels Caesar's Commentaries on the Gallic War, written from the perspective of his subordinate Titus Labienus. You want each scene in your novel to start with the date(s) that the scene covers. You could create a bunch of keyword tags, and then apply to each document the tag that corresponds with the scene's date(s). Then you could use the placeholder tag for keywords, and then remember to strip out all of the other keywords from each document just before compiling it: huge headache. Worse, you then lose the data about what other keywords were on the scenes, and have to spend time recreating that if you edit. Not ideal. You could use a Status or Label, and that would work, but then you can't use the Status or Label for other information that really are better suited to that (such as: 1st draft, 2nd draft, to-do, in progress, completed, etc. for the status, and Scene/Chapter/Note/Character/etc. information for labels). Instead, with custom metadata, you create a custom metadata field (let's name it "Scene_Calendar_Dates") and then give that field a specific value. Each document can have its own value for that field, as a text string. When compiling, you can insert placeholders where you want the value for that field to be inserted, then compile the document and hand it to your editor.
This is not just useful for compiling documents, either. Custom metadata fields can be added to the outline view for a project, and the outline can be sorted on the values in those fields (or, just printed/compiled as an outline for review, or included as supplemental material for an editor). Keywords, labels, and statuses can also be added to the outline (which is very handy, too), but each metadata field is treated as a distinct element.
In Scrivener version 3, custom metadata is no longer restricted to being simple text strings. In a blog post (written as Scrivener 3 was being finalized for release), Literature and Latte explains that custom metadata can also hold date fields, checkboxes, or lists, in addition to text strings. A date field (such as that in our historical novel example above) could be populated with the dates that correspond to each scene in the Labienus story, and then placeholder tags put into the document (or in the compile window) for output into the compiled document. In Universo Responsoriis, for example, I have set up certain custom metadata fields as lists (which show up as pop-up menus like the label or status) for things like time of day, or ephemeris settings (since some of the novel involves astronomical information). This makes it easy for me to check which scenes are associated with certain star positions—like, say, would Mars actually be visible in the night sky in this scene?—so I can make sure I have the right information.
What I have found the most useful (so far!) about these new metadata types is that the list types can have their settings changed in multiple files simultaneously, just like the label or status. One way to do that is to shift-click several items in the cork board, then right-click on them. Under the context menu that appears (once you have list-type custom metadata fields created), there will be an "Other Metadata" entry, and each field defined as a list will appear there.
As you might imagine, the possibilities here are quite wide. For example, instead of using keywords for POV or narrative voice, you could create a custom metadata list. When defining the field, set it up as a list type, and then populate the list with each character who has a POV. When you write the scene, select that scene's POV character from the popup list. Easy-peasy! Another option might be to create a list of locations—culled perhaps from the Locations folder under Research?—and select each scene's location from a different metadata popup list.
So, to sum up: Scrivener 1 metadata fine; Scrivener 2 custom metadata finer; Scrivener 3 custom metadata even finer!
I will, at some point, post a step-by-step tutorial on some ways that metadata (of all kinds!) can be tremendously helpful for organizing projects, but I was struck today with just how useful I have found the new custom metadata, and I couldn't wait to share that!
If you've used the new Scrivener 3 metadata features, what have you found the most useful (and least, as well)? What ways are you using these tools, or if you're not using them, what are some things that you find difficult about them?
Subscribe to:
Posts (Atom)