Welcome back! Hopefully your summer continues to be awesome, and the A/C continues to hold out!
Today I’ll be discussing an Automator action that I use to make manual backups of my Scrivener projects when I reach milestones (or anytime, really, I just make sure I run it when I reach major milestones in a project).
Automator is an application for macOS, made by Apple and distributed in all versions of macOS (then, Mac OS X) since Tiger (10.4). It is an application that uses small libraries that other applications can create to automate tasks, and in a way that is much simpler to use than AppleScript (which is very powerful, but requires learning some basic programming). I have used both AppleScript and Automator for various things, but this is something that really lends itself well to Automator rather than AppleScript.
Also, since this is a macOS application, and made by Apple for the Mac, there is no Automator for Windows. Users of Scrivener for Windows can use similar tools, such as AutoHotKey or AutoIT, but since I haven’t had a Windows machine in many years I really cannot vouch for how simple (or hard) those tools are to use, nor how they work.
In any event, the general concepts of what I do should work, it’s really just an implementation detail on the Windows side, deciding which app can do the job, and exactly what steps need to be taken.
The basic idea
When I sat down to figure out how to make this additional step work, I knew I wanted to accomplish three basic things:
• Make a compressed copy of one Scrivener project,
• Rename the compressed file with the current time and date, and
• Move it to external storage.
Since these are things that are repetitive and should be reasonably easy to automate, that’s what I did.
Creating a new Application
Once I basically knew what I wanted to do, I opened up Automator (by default, this is in the Applications folder on the boot drive), and started putting together the workflow.


When Automator is first launched, it opens the standard Open dialog asking for you to choose a file. In the lower-left corner of that dialog is the “New Document” button. When you click that, it gives you an empty, untitled workflow, and asks you what kind of item it will be. For this, I created an Application. An Automator Application can be run on its own, and will sit in the Finder (wherever you put it) just like any other application. Another option would be to create a Workflow, which can’t be run on its own, but instead runs from within Automator. Either of these two would work, but I chose to make an Application. That way, when it was working the way I needed it to work, I could save it to my desktop and run it by itself.

If all you see is a blank window with “Drag actions or files here to build your workflow, click “Library” in the top left corner. The first column should have “Actions” highlighted (if not, click on it), and the master container “Library” should be selected in the left most of those two columns.
Click on the “Files & Folders” in that list to show only the actions that apply to Files & Folders.
The steps
Step one: get the right file(s)
 For me, the first step was to select the correct file. Since an Application will run on its own, it needs to have direction about what items to work on, and this can be done in one of two basic ways (for my purposes, anyway): I can either give the Application a file or folder to use every time, or I can have it ask me which file or folder to deal with. I chose the latter of these two, and put the “Ask for Finder Items” action at the top of the list. To do this, click and drag “Ask for Finder Items” from the second column on the left into the main workflow area on the right.
There are a few options to set here. In the text field next to “Prompt:” is some text you are supposed to be able to edit to remind yourself what is happening. My experience, however, is that this text is not displayed. This may be due to how macOS does Open/Save now, but in any event it doesn’t seem to show up anywhere, so you can (for now) ignore it. Or, add the text you want to have to remind yourself later, in case this does start showing up.
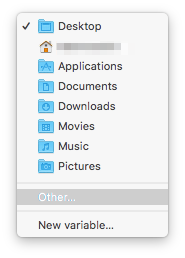 Next are the “Start at:” and “Type:” options. “Start at:” allows you to automatically set the folder where the “Open” dialog will start out. I set this to the top level folder where I keep all my Scrivener projects. If you keep yours loose in your Documents folder, say, you could select “Documents” from that dropdown menu, or whatever other folder you use for storing your documents. If your particular folder is not one of the ones listed in the menu, click the “Other…” item and select the folder where you want the “Open” dialog to start.
The “Type:” option allows you to permit Files, Folders, or Files and Folders both to appear as selectable items when the action runs. If you select “Files,” then you will only be able to select files, and clicking on Folders will drill down inside the folder. If you select “Folders” then files will be greyed out in the “Open” dialog and only folders will be able to be selected. You will still be able to drill down folder levels, but any files inside folders will be greyed out and unable to be selected. If you select “Files and Folders” it will permit you to select either files or folders in the Open dialog for further processing.
Quick aside, here: one key concept here is that this is a workflow, and that each step generally leads into the next step. Although Automator actions can be highly customized, and I will not even get into some of the more powerful things it can do, the basic idea is that there is a sequence of linked steps, each of which feeds the step after it.
What this step does is tells this workflow which file or folder (or, files or folders, if you click “Allow Multiple Selection” on) will be passed on to the next step.
Step two: compress the selected file
Once I’ve selected which file or folder I want to back up, next I want to tell the Finder to compress that file. This will leave the original unaltered, but will create a .zip archive of whatever was selected in the “Ask for Finder Items” action.
 To do this, drag the “Create Archive” action from the left side into the main document window, underneath the “Ask for Finder Items” action. What this will do is link the first action, the “Ask for Finder Items” action, to the second one in the list. That means the input from the first flows into the second, and the “Create Archive” will compress the file selected in the first action.
Options here include the ability to give the created archive a name, telling it where to save the archive, and whether the process should ignore unreadable items. In practice, “Ignore unreadable items” should probably always be checked (at least when starting out), so that any files which may be corrupted or are otherwise unreadable by the Finder don’t end up derailing the action.
I leave the “Save As:” text field blank so it gets the same name as the original file. This will not create a conflict, since this is a compressed .ZIP file of the Scrivener project (so, “Great American Novel.scriv” versus “Great American Novel.zip”). If you are uncomfortable with this, then of course you could add a filename in the text field, or you could save it to a different folder by selecting one under the “Where:” dropdown menu.
Step three: add the current time and date
 Next, I want my compressed file to have the current time and date added to the filename. To do this I need to add the “Rename Finder Items” action to the workflow, under the “Create Archive” action. Just as before, click the item in the Library and then drag it underneath the bottom item in the workflow. This will then feed the archive created in the previous step into this one.
 Dragging this action into the workflow will pop up a dialog box warning that this action will change the name of the existing Finder item, and offers to add the “Copy Finder Items” action (in between the previous action and this one) so that the original is not renamed. Since I have already created an archive, and am dealing with the archived file, I don’t worry about this warning and click “Don’t Add.” As the dialog notes, you can hold the Shift key down while dragging this action into place if you’d like to bypass the warning, and clicking “Do not show this message again” will prevent it from appearing in the future if you so desire.
 There are several possible options here, but what I do is I set this action to “Add Date or Time” of the “Date/Time:” to “Current”, set “Where” to “Before Name”, set the “Separator:” to “Space”, use the “Format:” of “Hour Minute”, and set the second “Separator:” to “None”. I also click on the “Use Leading Zeroes” checkbox.
I then add a second “Rename Finder Items” action immediately below this one, with the only difference being that I change “Format:” to be “Year Month Day” instead.
What this does is takes my “Great American Novel.zip” file and renames it to (for example) “0945 Great American Novel.zip” and then “20180718 0945 Great American Novel.zip” after.
All of this is just my personal preference. It makes it super easy for me to see by looking what file was backed up when. This is also overkill, in some ways, since the Finder can always sort folders by date created and such. I just am weird, and prefer this method.
You are, of course, under no obligation to subscribe to my weirdness, and could simply rename the archive in the “Create Archive” step and avoid all this. There are also other methods, such as putting the date & time after the filename, or changing “Add Date and Time” in the dropdown menu to “Make Sequential” or any of the other options there.
Step four: move to external storage
 Finally, I want my backup file, renamed and all, to be moved to an external storage medium. To do that, I drag the “Move Finder Items” action into the workflow, underneath the last “Rename Finder Item” action, and tell it where to send the backup file. In the “To:” dropdown menu are similarly options as in other locations, where you can pick one of several default locations, or “Other…” and navigate through the dialog to the external storage medium. One option here might be to select a cloud storage service like Dropbox, Box, Google Drive, or others, and save the archive to that location. If you have external disks (especially if you intend to use an SD card or USB stick), make sure that the volume you want to move the file to is mounted before you run the Application. Unless you decide to name your archives the exact same name, the “Replace existing files” option will have no effect.
 Here is my Automator workflow, in its entirety.
What happens now?
Now, save this Automator document, give it a fancy name and save it somewhere you can get to it, and that’s it! If you created an Application, double clicking on it will run the Automator workflow automatically, asking you for the file(s) or folder(s) you want to back up, create an archive of the selected item(s), rename the archive, and then move the renamed archive to the location you chose in the “Move Finder Items” action at the end.
If you created this as a Workflow document, double-clicking on it will launch Automator, where your Workflow will be sitting waiting for you to press the “Run” button at the top right. As a practical matter, it’s probably most convenient to opt for an Application. That way, you can just open it and have it run itself. Incidentally, Automator will give you the option to save the finished document as an Application, even if you chose “Workflow” at the beginning.
There are definitely some different ways you could approach this. As an example, the first action in the list could be “Get Selected Finder Items” instead of “Ask for Finder Items”. By using the “Get Selected” action instead, you can drag a file or folder onto the saved Automator Application, and the rest of the action will complete without asking for any input. In older AppleScript parlance, this used to be called a “Droplet,” meaning that it wouldn’t do anything on its own but would automatically process items dropped onto it.
With some additional research and experimentation, it should also be possible to modify the Workflow just described to take dropped items, ask for a destination, and then perform the rest of the actions.
Final thoughts
I use this Automator Application to make special backups of my Scrivener projects, specifically ones where I have reached critical milestones. For example, I recently completed the second revision of my upcoming novel Universo Responsoriis. Once I had created a good compile for my editor, I created snapshots of all the manuscript documents in the Binder (more on that in the next post on this topic!), then saved and closed the project.
This is important to note: the Scrivener project in question must be closed before … well, really any kind of Finder manipulation, automatic or otherwise. If the project is still open when this Automator Application is run, the project will be archived in the “I’m open!” state, which could cause issues later. Best bet is to just save and close the project, and then run the Automator Application.
In the next post on this topic, I will go over the Snapshot feature in Scrivener, and how to use it to create fall-back positions before or after you reach writing milestones.
If you are using Automator to create similar processes, what kinds of things are you running? What are your thoughts on Automator in general? Leave your comments below!
No comments:
Post a Comment
Note: Only a member of this blog may post a comment.