Starting today, I'm going to go over the options in Scrivener's Compile in great detail, going over each setting and formatting option. This will probably take several blog entries, so bear with me as I get to them all!
Today, I will go over the Compile sheet, identify each of the elements, and show the various options under the first layer of the UI for this sheet.
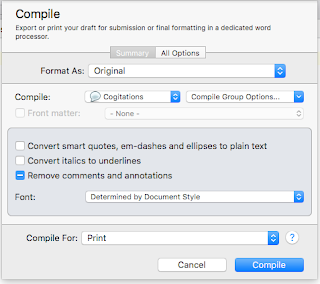
 Once you have the sheet up, this is the initial default setup, the Summary. It is relatively quick and straightforward, with only a couple of options. There is the "Format As:" menu, the "Compile:" menu, the "Front Matter" checkbox and menu, a few settings checkboxes, the "Font" menu, and the "Compile For:" menu.
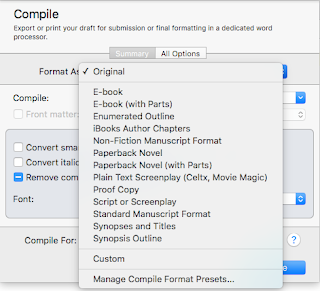
The "Format As:" menu shows all of Scrivener's basic formatting presets, and are designed each of them for a different kind of output. They are not the same as the "Compile For:" menu at the bottom. The "Format As:" menu is for selecting settings for the kind of manuscript output you want. Some of these are presets for manuscript submission for novel writers, some for creating eBooks, others for outlines or screenplays. The settings here will determine most of the settings as far as page breaks, fonts & styles, page sizes, and etc.
The "Compile:" menu allows you to select what parts of the current project will be included in the compile. If you are working on a novel, for example, and only want to compile one chapter or one part of the whole manuscript, you can select that here. Next to it is the Compile Group Options…" menu. Here, you tell Scrivener whether to treat the group (in this case, "Cogitations") as the entire draft. Selecting that option enables the "Front Matter" checkbox. By default, if you have selected the entire manuscript, the "Front Matter" checkbox is enabled. Also, if you select a container (a folder or other object in the Binder that contains other objects), you can deselect "Include selected container in contents" to compile only the sub-objects of that container. Here, I want the entire "Cogitations" compiled, including the actual container "Cogitations" itself.
The Front Matter checkbox, if enabled, allows you to tell the compiler where to look for the Front Matter for the compiled output. Often, a project will have multiple Front Matter pages, some of which are dictated by format. Certain e-books, for example, may need to have only a title and copyright page, with no forward, while a paperback novel may also need to include acknowledgment pages, a forward, an intro, and so forth.
In the center are three checkboxes and the "Font:" menu. Selecting the topmost will convert smart quote, em-dash, and ellipses characters to their plain text cousins (", --, and ..., three period characters in a row) if any are present in the compiled text. The second one will change any italicized text into underlined text. The third will keep comments and annotations out of the compiled output. Finally, the "Font" menu allows you to select an output font for the compiled document. By default, this is set to be the same one used in the Style(s) defined in the document, but you can set it to any of the installed fonts.
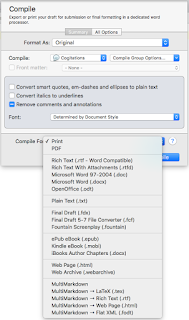
 At the bottom is the "Compile For:" menu. Here, you will select what format to output. Some options include Print, PDF, .DOCX (Word), .RTF (Rich Text), .MOBI (Kindle e-book), and a whole slew of others. This controls the actual format of the output file.
And finally, there is the "All Options" tab in the sheet. Here, you can see the very detailed set of options available to tweak and modify the output of the compiled document. The next few blog entries I make here will cover all of these items, in detail, hopefully empowering you as a writer to create the best-compiled documents that you can, ready for printing, submitting to an agent, or sending to Kindle Direct Publisher (or a host of others!) for publication.


No comments:
Post a Comment
Note: Only a member of this blog may post a comment.