Hello, and welcome to another cogitation! I hope that your summer continues to be awesome. I was able to fix the A/C, and now it’s working quite well, so this Tucson summer has been bearable.
In the “Save me!” series, I’ve talked about autosaves and automated backups in Scrivener proper, and the different ways that it can help save your hard writing work from falling prey to disaster. I also discussed the Automator tool for macOS, and how I have it set up so that I can make additional externally stored backups of important milestone versions of my Scrivener projects.
Today, I’d like to talk about one additional piece, the Snapshot feature of Scrivener, and how it works to help preserve your sanity (and documents!) while working on your project.
What is a Snapshot?
In Scrivener, a Snapshot is essentially a date-stamped copy of the text of a document (text only, not any metadata), and it is stored as a part of the document. I am not aware of any technical limit on the number of Snapshots a given document can have, but as we’ll see in a moment it isn’t usually necessary to keep more than about a half-dozen, maybe ten, of any given document.
A Snapshot is more than just a verbatim copy of that text, though. One of the very cool things about them is that the text in the Snapshot can be compared to the current document’s text, with added and deleted text highlighted in the Snapshot (more on this in a moment—also, note that as far as I am aware, the “compare” feature is macOS-only at this time). Snapshots can also be compared with other Snapshots, not just the current version of a document.
It is important to remember that a Snapshot only makes a copy of the text—not the keywords, metadata (custom or otherwise), notes, or other information, although it does copy the comments—and although it does preserve formatting, it doesn’t track changes in formatting.
Okay, but why would I want to use a Snapshot?
One main advantage of using a Snapshot is it gives you a touchstone for a given document’s contents. Since Scrivener does automatic saves and therefore there is no “revert” option, an excellent use for the Snapshot is to preserve the current text in a document before editing it. If you’re like many people, you have probably been conditioned to hit “save” frequently while writing (even I am conditioned this way, though I am slowly un-learning this habit). Since Scrivener does that part for you, as do many other current software programs, manually triggering a “save” isn’t really that important. Because of that, however, Scrivener doesn’t really have any way to “revert” changes (Word, Pages, other apps will do this, essentially by discarding the currently-open document and reloading it from storage).
The “revert” feature can be brought into play, though, using the Snapshot feature. There are at least a couple of ways to approach this, so I’ll cover two different thoughts.
First, what I informally refer to as the “Milestone Snapshot.” This is when you have completed a milestone for a document, and consider it ready to change status from (for example) “To Do” to “First Draft.” At that point, make a Snapshot (how, shortly), change the status, and work on the next document. Repeat that until every document is a “First Draft,” and then you’ll have a Snapshot of each document as it was when you completed that draft. This is generally my workflow. In this case, the Snapshot will enable you to fall back or compare to the First Draft version when you are making your edits on the way to your Second Draft.
Second is what I call the “Experimental Snapshot.” In this case, you create the Snapshot first (though, obviously not of a blank document, that doesn’t make any sense!), and then work on the document. If you get to a point where you are like “nah, this all stinks, I don’t want these edits anymore,” you can roll back to the previous Snapshot, and the experiment is wiped clean—though, it is possible to snapshot the current document before rolling back, as we shall see shortly.
One additional approach is to have Scrivener create Snapshots of any modified documents whenever a manual save is triggered (usually via Command-S or Control-S, but also by the File->Save command). This approach will provide a sort of analogue to the Revert option in some applications, especially if combined with the “Experimental” approach.
Snapshots sound like a useful tool, how do I create one?
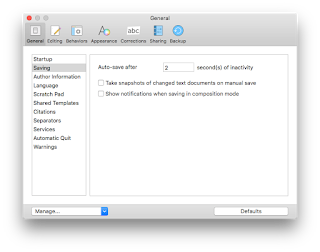
 Another way is to tell Scrivener to take Snapshots of changed documents on a manual save, and then hit Command-S or Control-S, or select “Save” from the File menu. To tell Scrivener to do this, open the Preferences, click on the General tab, and click “Saving” in the left pane. In the right pane is a checkbox for “Take snapshots of changed text documents on manual save.” Click that checkbox on, and every time you manually save (via Command-S/Control-S or via “File->Save”) Scrivener will create a new Snapshot for each changed text document.
It is also possible to use these commands to create Snapshots of multiple documents at once. Let’s say you’ve decided that you want to work on one chapter today, and there are several scenes in that chapter. You know you may need to work back and forth on several scenes—or, you are like me and you like to edit in Scrivenings mode—and you want to Snapshot them all before starting. You could click on each one, hit Command or Control-5 (or Command or Control-Shift-5) and make Snapshots of each one, in turn, that would certainly work. If the documents are all at the same level, you could click on the top or bottom file in the list, shift-click the bottom or top file (thus selecting those two plus all files between them), and then create your Snapshot.
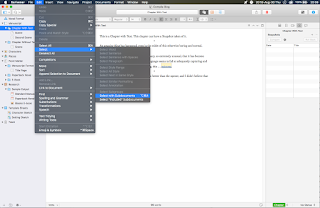
 Another way to do this is you could click on the chapter folder in the binder (if you organize your work this way), then click on Edit->Select->Select with Subdocuments. This will basically do what it says, select all of this item’s subdocuments. Then you can create your Snapshot as you would otherwise.
One thing to keep in mind is that a Snapshot will only work on documents that have text. So, obviously text documents can have Snapshots, but “regular” folders can’t. If, however, your folder does have text (remember that folders in Scrivener are a loose definition), then the text can have a Snapshot. If you’re not familiar with this part of Scrivener, it’s not a huge deal, just know that “folders” by themselves can’t have (and don’t need) Snapshots.
Are there any caveats when using Snapshots?
Indeed, there are a couple of things to keep in mind about Snapshots (aside from the few things we’ve covered already).
Although Snapshots will preserve the formatting of your text, it will not track if or when formatting is changed—so, you can’t use the “compare” tool to easily see where formatting changes have occurred.
Snapshots do take up space, just like the text in the text document. It’s not a lot of space, but it is something to keep in mind—especially if you create a lot of Snapshots. This might happen if you turn on the option to create Snapshots on manual saves, and then instinctively hit Command or Control-S every few moments.
Also (as we’ll see shortly), rolling back a Snapshot is destructive, so it is important to pay attention during the process of reviewing, comparing, and rolling back Snapshots.
I’ve created a Snapshot, how do I compare (or rollback) changes?
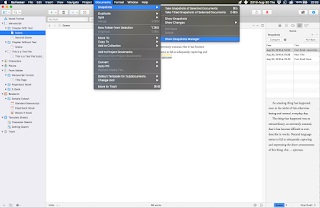
 Once you’ve created a Snapshot of a document, it will appear in the list under the “Snapshots” tab in the inspector. In addition, all Snapshots in the entire project will appear in the Snapshots Manager (under the Documents menu, in Snapshots->Show Snapshots Manager).
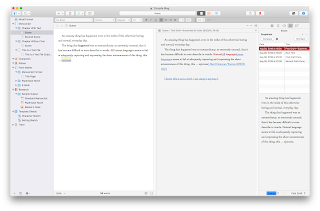
Although the inspector can be resized, it may make more sense to view the Snapshot in the editor. To do that, my favorite way is to right-click on the Snapshot, and then select “View Changes on Copyholder.” This will put the Snapshot into a copyholder window in the Editor. This makes it crazy easy to see the differences, and by scrolling line-by-line or page-by-page, it is quite simple to see where changes have been made (though, as noted, in terms of text added or deleted, not formatted differently).
There are a couple of other ways to view or compare Snapshots. One is to right-click on the Editor title bar of the document you’re interested in and select one of the “View Snapshot” options. If you have the Editor split, or if you have a copyholder window open, you can drag the Snapshot from the inspector into the title bar for the copyholder or split window, and it will load there. Unfortunately, neither of these options shows the changes highlighted, which is why I prefer to use the “View Changes on Copyholder” option.
One additional thing you can do is compare two different Snapshots, instead of comparing a Snapshot to the current document. To do this, click on a Snapshot you’d like to use as a comparison, and then Command-click on the Snapshot with which you’d like to compare the first, and click the “Compare” button. The inspector will show you the markup (red strikethrough for deleted, and blue underlined for added), identifying the changes between the two, just like comparing between the current version and a given Snapshot.
As for rolling back changes, once you’ve decided that you want to roll back to a Snapshot, select the Snapshot to which you want to roll back, and click the “Roll Back” button in the inspector. Because rolling back will destroy the current version, Scrivener will ask if you’d like to make a Snapshot of the current version of the document before rolling back the changes. If you are not 100% certain that you will not want the current version of the document, you can click “Yes” to create a new Snapshot of the current document, or “Cancel” to stop the rollback altogether.
What are some workflows that make the best use of Snapshots and other safety tools?
I can think of two primary workflows that make good use of Snapshots, automatic backups, and automatic save. Undoubtedly there are others.
One is in that “Milestone” workflow that I use myself. In this setup, automatic backups are set to occur when closing the project, and Snapshots are created when a document is ready to “graduate” to the next level of status (To Do to First Draft, First Draft to Second Draft, and so on). When I start a project, I do some basic outlining of how the manuscript will be structured, and then I go through it (not necessarily in any particular order) until I have a completed first draft. At that point, I will have finished each scene/chapter/whatever (for the first draft!), and each of them gets a Titled Snapshot. I change each document and folder to have the status “First Draft,” and then I close the project. Scrivener does a backup of the project, and once the backup is finished and the project is closed, I run my Automator action to make another backup (on external storage … actually, off-site storage, through Google Drive), so I have an additional copy of that project with all of the Snapshots. This is my First Draft milestone. I repeat that procedure for each draft that I write.
Another is to use Snapshots and backups as a fall-back (an extension of the “Experiment” idea earlier). Set the backup to run when the project is opened, and before you start editing a document, make a Snapshot of it (you can’t make a Snapshot of a blank document so you won’t start with a Snapshot in that case). Work on it, make changes, make additional Snapshots if you like, and then when you’re done, close the project. If at any point you decide you don’t like how a document has turned out, you can roll back the changes (making a Snapshot of the current document, if you wish)—a “revert,” if you like.
If you decide you don’t like how anything turned out, you can do that to every document you changed, or you can just close the project. Since Scrivener autosaves, you can put the current project in the trash (or move it somewhere temporarily, like your Desktop), and move the most recent backup to whatever location you keep your works-in-progress. If necessary, uncompress it from the ZIP file. Now, your project is in the state it was when you opened it, before making the changes that you ended up not liking. The formerly-current project is now just an experiment that didn’t work out, so you can safely trash it (or, compress it and move to storage).
Unquestionably, these are not the only two ways these tools can be combined. One thing I didn’t mention in the Automator article was the idea of using a Folder Action. Basically, this is using an Automator app or AppleScript to watch a given folder, which will automatically perform actions when certain criteria are met (usually, when items are added to the watched folder, but there are other watchable actions).
An example workflow for using a Folder Action in addition to other workflows would be to create an Automator app that watches the Backup folder for your Scrivener project, and every time a new file was added to that folder—i.e., any time Scrivener created a backup—the Automator app would make a copy of that backup and move the copy to other storage. Another option might be to have a Folder Action that watches the /Volumes/ folder for your USB Flash Drive. When it detects that your USB Flash Drive has mounted, the action could compare a folder on the USB against the Scrivener Backups folder, and copy any files or folders it sees in the Backups folder that are not present on the USB. Bam! Instant backup and all you had to do was create one Automator script (you don’t even have to run the script in this case, it runs itself when you plug in your USB drive).
Final thoughts
There are myriad ways to make autosave, automatic backups, Automator, and Snapshots work to help save you from the practically inevitable technology malfunctions that can drive writers insane, and help you recover from any such problems that may occur.
If you have other workflows that leverage these tools to make your life easier or any questions about Snapshots (or any of the other topics), feel free to comment below!


