Scrivener itself has supported an automatic backup system since at least version 1.5, a system that offers the option for you to backup to a specific location, and when. It has also offered an auto-save feature as long as I’ve been aware, and I believe offered that from the very beginning. The automatic backup feature is optional, and fairly flexible. The auto-save feature is always-on, with a few configuration options.
With that, let’s take a look at auto-save and automatic backups in Scrivener 3 (which incidentally also work in Scrivener 2, although the preferences window will look slightly different).
Auto-save
 Auto-save in Scrivener is always-on, but the amount of time it waits before saving is configurable, and it also offers a couple of options for the writer who doesn’t particularly care for auto-save (I know there are some, although I am not among them).
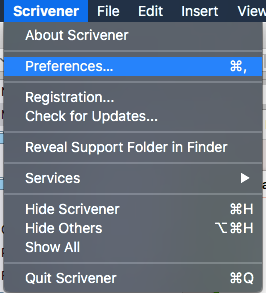
To access the settings for both auto-save and automatic backups, open a project in Scrivener and select the Scrivener menu, then click “Preferences …” (or, hold the command key and type a comma):

Once open, click the “General” tab, and click on the “Saving” item.
In this pane, you can tell Scrivener how long to wait before auto-saving, as well as whether to create Snapshots of any changed text documents when the “Save” command is manually invoked. There is also an option for notifications when an auto-save kicks off, if you’re in composition mode.
The latter two options may need a little exposition. The second one, “Show notifications when saving in composition mode,” will generate an on-screen display when a save occurs if you are writing in composition mode. That one is pretty straightforward, and if you want to be notified each time that happens, click that checkbox on.
The first of those two, “Take snapshots of changed text documents on manual save” allows you to essentially create backstops for your work each time you save manually. Although the Snapshots feature deserves (and I will give it) its own blog post, the short of it is that within a Scrivener project, you can save a copy of any of the elements of your manuscript at a given point in time. A Snapshot is basically just a “frozen” copy of a document, and continued editing on a document is done in the current version of the document, with one or more Snapshots acting as fall-back points.
If you enable that checkbox, then auto-save continues as normal by saving the current state of any changed documents whenever Scrivener is idle for the number of seconds listed in the Preferences. Then, anytime you manually save (with either a Command-S/Control-S or by selecting "Save" under the File menu), instead of just saving the changed files it will create a Snapshot of each changed document.
I have seen some discussion in the Literature and Latte forums about the auto-save, including requests to make it optional (which the developer has ruled out, so that’s just the way it goes). I myself rely on that auto-save (I have ADHD, and sometimes get hyper-focused on writing—when I do, I often forget to save!). So, I am glad it is there but if you really dislike it, you can set the auto-save to a ridiculously long time. Just keep in mind that the longer you set it, the more work you could potentially lose.
The most often cited reason for this is that with this auto-save setup there is no "Revert" option for Scrivener, and there are some writers who don't like that. I understand that perspective and it makes sense, but allow me to try to summarize the main reason there is no "Revert" feature, and how to effectively replace it. First, "Revert" in Word, or Pages, or Acrobat (among many, many others) works there because there is only one document open to which the "Revert" command can apply (yes, those applications can have several documents open at a time, but any "Revert" command almost always—and maybe actually always—only applies to the front-most document). Scrivener projects are project files, with multiple files open. In fact, if you write or edit (as I sometimes do) in Scrivenings mode, where multiple items selected in the Binder are all displayed in the Editor as an editable single "document," what does "Revert" mean in that case? Because of how Scrivener views projects, the "Revert" option doesn't make a lot of sense, but by creating Snapshots with manual saves and extending the auto-save time a bit you can create a replacement option to allow you to go back to a previous version of any edited document.
As a test of the manual save time, I put one hundred fifty thousand seconds in that field, and Scrivener didn’t crash. I don’t know for sure if that will actually translate to a nearly 2-day delay. There may be an internal maximum that I can’t override, but the manual doesn’t specify any such thing. So, it could very well be that it will accept any valid integer value up to the maximum size of a signed integer, which I believe is 9,223,372,036,854,775,807 on 64-bit macOS. That’s nine quintillion, two hundred twenty-three quadrillion, three hundred seventy-two trillion, thirty-six billion, eight hundred fifty-four million, seven hundred seventy-five thousand, eight hundred seven seconds, or more than 106 trillion years. If anyone finds out the actual maximum, let us know in the comments!
So, in any event, if you are not a fan of the auto-save, you can effectively disable it if you put in a value that is larger than you ever expect to actually keep Scrivener open. I suspect most people are fine with the auto-save feature, and turning on the checkbox to create Snapshots on manual save will help ameliorate any concerns about auto-saving garbage if the cat jumps on the keyboard and accidentally selects all and replaces it with gobbledygook.
Automatic backups

Also in the Preferences for Scrivener is the option to turn on automatic backups:
This feature is awesome, and has been available since version 1.5. As you can see, there are a lot of options here, so let’s take a look at them.
First, the checkbox to turn them on at all is at the top. When this box is checked “on,” Scrivener will automatically create backups according to the instructions in the next four options. It will either automatically backup projects:
• When a project is opened,
• When a project is closed,
• Every time you “Save” the project manually
• Or before syncing with mobile devices
Or any combination of these options (including all four).
Below these four are three settings which control whether or not to compress (zip) the backups, use dates in the name of the backup file, and how many backup files to keep.
Below those three are two more items, the Backup location and a button to select a backup folder, as well as a button to open that folder.
By default, automatic backups are turned on, and set to backup when a project is closed and before syncing with mobile devices. If you don’t use a mobile device (iPad, iPhone), the last option won’t have any effect (it only kicks in when you go into the File menu and select Sync->with Mobile Devices). Even though I don’t right now use my iPad as a writing tool, I might in the future (like, when I replace my current MacBook Air with what will likely be an iMac Pro, I may switch to using the iPad as my portable writing platform again), so I keep it ticked on. I also keep the “Backup on project close” option ticked on. Other people might prefer to have Scrivener backup the project when they open it, so that if they make a bunch of changes in a session and decide to scrap them, they can just recover from the project state as it existed before they started working. Either way it kind of amounts to the same thing, since a backup-on-close looks like the project did before opening it, so it’s really more about your personal preference and workflow.
The other option here is the “Backup with each manual save” option, which ties the backup process to the File->Save action (either by selecting "Save" in the File menu or by typing the keystroke shortcut). This means that whenever you either type Command-S (or Control-S in Windows) to "Save," or you click on the File menu and select the "Save" option, it will create a new backup for you. This is another way to create a fall-back point if you are one who doesn't like the auto-save feature. By combining the use of Snapshots on manual save with backups on manual save, you can create a series of intermediate fall-back points.
Depending on your circumstance, your computer, the size and available space of your backup drive, and so on, you may want to enable compressing backup files. If so, check “on” the checkbox for “Compress automatic backups as zip files (slower).” This will first backup the project, and then compress it. Beneath that is the option to add the date to the title of the backup file, which inserts the current date and time of the backup into the file name. Although the macOS Finder (and Windows) can sort folder items by created date, having the date and time in the title of the file can be helpful if you use other, external solutions for backing up these items.
Beneath that option is the option to control the number of backup files to maintain. If this checkbox is enabled, Scrivener will make a maximum of 3, 5, 10, or 25 backups of this project inside the backup folder. Once Scrivener has backed up a project the number of times equal to the one selected in the popup menu, the next time it tries to create a backup it will locate the oldest one, delete it, and create the new backup. How many of these backups you want to maintain will largely depend on how you write and work. I tell Scrivener to keep 5 backups. Since I have Scrivener backup on close, the amount of time it takes to backup is less relevant to me, so I tell Scrivener to compress those backups, and I also tell Scrivener to put the date in the file title.
If you tell Scrivener to backup on open, and close, and sync, and manual save, you may find that 25 better suits your style. If you find that 25 is still too few, you will need to implement some other kind of backup feature, such as a modification of the Automator action that I’ll discuss in part 2 of this series.
At the very bottom are the Backup location and “Open backup folder” items. Here, the “Choose…” button will enable you to select what folder Scrivener uses to store your backup files, and then to open that folder in the Finder (or Windows Explorer) if you need to access it. You can, of course, also open that folder normally in the Finder/Explorer if you need to. By default, this location is in your home folder, at ~/Library/Application Support/Scrivener/Backups (on Windows, I believe this is in your account’s AppData folder). You can change that location here if you wish. In my case, I have an external USB disk drive (“Backups”) that I use specifically for backup purposes (not just for Scrivener). I tell Scrivener to use a folder on that disk, instead of the default setting.
A word of caution about the backups. If you find you need to open a backup copy of a project, drag it out of the folder with the other backups. This can be by dragging it to the desktop, or making a copy in another folder, or (what I do) by holding down the option key and dragging the zip file to the desktop and then opening the zip file from there. Holding option while dragging a file or folder (or disk, or anything else really) in the Finder will create a copy of the dragged item. If you open a Scrivener project from within the folder it uses for automatic backups, you will get a warning dialog that the project is not in a recommended location. This will also happen if you tell Scrivener to use a folder for automatic backups where you are also saving your normal projects.
There’s a discussion about this on the Literature and Latte forums, but the short version of how to avoid the whole issue is to use a separate folder for your automatic backups. If you are like many people, and you have a separate folder in Documents for your Scrivener projects, set the “Backup location” to be anything else.
From a general perspective, the best thing to do is to have the “Backup location” be on a separate drive, such as a USB thumb drive or a Thunderbolt disk drive. If you don’t have any of these, at the very least the “Backup location” must be different from the folder where you store the projects you are working on. If you are like many writers and use Dropbox for your Scrivener projects (and if you're using Scrivener for iOS as well, you almost certainly are using Dropbox for that!), you could save your backups to your Documents folder instead. I still recommend having an external drive (SSD, Hard Disk, USB/SD flash drive, und so weiter), and keeping backups on there, because even if you use Dropbox it is still storing local copies on your internal drive. If your internal drive fails you may still be able to salvage your Dropbox from another location (assuming your drive's failure didn't trash the Dropbox folder and sync the trashed version, which is possible), but your backups are still on the internal drive if that doesn't work out. Safest thing is to do backups to an entirely different drive.
For me, I have an external hard disk drive (“Backups”) which has a subfolder (“Scrivener Backups”) where I tell Scrivener to store backups of my projects. In addition, occasionally I will drag-copy the “Scrivener Backups” folder onto a different drive, a USB flash drive, just to have an additional backup of the backups. Finally, I created an Automator action that I use when I reach milestones in my projects. Although this action makes a backup of my live project, not the backups, it could easily be modified to backup the backups instead of—or in addition to—my live project.
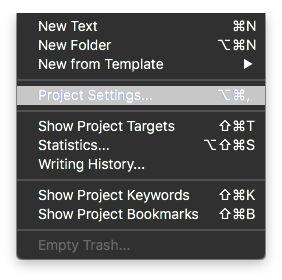 Finally, it is also possible to override a couple of the backup settings on a per-project basis (by going into the Project menu and selecting “Project Settings…”, or typing Option-Command-comma on a Mac):
 The top checkbox, if checked “on,” will tell Scrivener to not automatically backup this particular project (all other projects will still be backed up automatically, unless they also have this setting checked “on”). The second checkbox allows you to specify a different location for this project’s backup files. The other settings remain unchanged, so if you have the settings to “Only keep” the 5 most recent backups, that will still apply. It will just use the folder you set here, instead of the one in the “Backup” pane of the Scrivener Preferences, and only for this project.
If you like, you can have a different backup folder for each project (which is not a bad idea!), but if you have a lot of projects this can be a little tedious to manage. It may be worth it, though, depending on your situation.
One such option might be to create a generic backup folder on an external drive, and then inside that folder create a new folder for each project. When you create a new project, remember to go to the Project->Project Settings… menu and set this backup location. That way, each project’s backups are separate from each other. As with any backup, however, this folder needs to be separate from the one where your “live” version of the project is stored. I also recommend backing up this folder periodically (say, every Friday afternoon to a USB stick).
 In addition to the automatic backups, you can also do manual backups by going into File->Backup:
Under File-Backup you will see two selection options, one to "Back Up To…" and one to "Back Up Now":
The "Back Up To…" option will prompt you (via a standard "Save" type dialog box) for a location to save a backup, as well as a checkbox option to Back up as a ZIP file. "Back Up Now" will create a manual backup using the settings in the Backup tab of the Preferences. Even if you have automatic backups disabled, it will use whatever other settings are set in the Backup tab (whether to ZIP or not, whether to use date in the filename or not, and the location for backups) and create a backup there. Keep in mind, however, that if you are using automatic backups, a manual "Back Up Now" create a backup of the project just as if it were automatic, so if you are at the limit for number of backups it will delete the oldest to make room for the manual backup.
In any event, Scrivener offers a fairly flexible automatic backup system for your writing projects, but there is still a little management for you, the writer, to make it work the way you need for it to work.
Some things to consider, and final thoughts
Scrivener offers a few options to help a writer avoid some of the disasters (such as a loss of power or computer crash) that can befall him or her, including automatic saving of modified open projects as well as automatic backups with some user-defined or -selected parameters. By considering your own needs and preferences, you can use these built-in tools to help maintain a robust system for preserving your hard work. In part 2 of this series, I will go over the Automator action that I use to manually backup important milestone versions of my live projects, and in part 3 I will take a look at the Snapshots feature of Scrivener, and how it can be used to help make auto-save and automatic backup even more useful.
If you use the automatic backups, what is your system for keeping them safe? How do you feel about the auto-save feature, and do you have any tips from your own experience? Feel free to share them in the comments!
No comments:
Post a Comment
Note: Only a member of this blog may post a comment.