Monday, December 7, 2015
New Blog post over on Writer's Life: A Writer's Guide to FocusWriter and Write
My latest blog post, A Writer's Guide To FocusWriter And Write, is up today over at WritersLife.ORG.


Friday, December 4, 2015
Compiling in Scrivener: The Option Panes
Welcome back to my series on Compiling in Scrivener! Today, I’ll be going over the Options Panes under the “All Options” tab in the Compile sheet. I'll also explain which Options you will be able to work with, which depends on your desired output. For this post, I’ll just be discussing the sheet itself. My next few blog posts will cover every option pane in excruciating detail, focusing on the most commonly used ones.
 With the “All Options” tab selected, the top and bottom menus remain the same as they were on the Summary tab. The center area, however, changes to reveal all the options, and their settings. In the left pane is the list of the currently applicable options. The list of settings that apply will depend on the output format, which is set under the “Compile For:” menu at the bottom. The “Format As:” option at the top contains a list of possible Presets, which have default settings for the Options as well as a preferred “Compile For:” setting. You can change these within a project, and when you click the “Compile” button any changes you have made will stick to that project. You can also create new presets, and I will cover that in a separate blog entry. The key thing to remember about the Compile sheet: Compile is all about the “Compile For:” menu. The list of Options on the left pane and their actual settings in the right pane tell the Compiler how to send your project to the “Compile For:” menu’s selection. The Presets at the top simply change the settings of those options based on either the default Scrivener-created settings or with the settings you have changed—either in the project with which you’re working or by saving a custom preset. Now, let’s take a look at the "Compile For" selections.
 The selection in the Compile For menu determines the actual output format of the compiled file. This image shows a list of the options available under the Compile For menu. The available output formats in this menu do not change, but the default selection will change, depending on the preset selected and whether you’ve made changes to your project already. As an example, I have here a brand-new Novel project. When the Compile sheet is first opened, it starts with “Novel” as the preset, and by default the Compile For output is set to Print. All of the default Options settings in this Preset focus on formatting the output document in a way that makes it easy to read once the document finishes printing. Other presets have different defaults; E-Book and E-Book with parts both Compile For ePub eBook (.epub) by default, iBook Author Chapters defaults to iBooks Author Chapters (.docx) format, and so on.
 |
| List of default presets under "Format As:" |
 |
| Example Options (left side) for iBooks Author Chapters |
 |
| Example Options (left side) for E-book preset |
The default settings for the Options available to each Compile For output kind are intended to make it easier to deal with the output afterward. That is, if you leave the default settings, you will often be okay with the results. The best way to know, however, is to compile the document once and then examine the result. Then, you can see what things you may like to change based on the actual output. Sometimes, the default output works fine. Other times, not as much. In particular, Word output can be troublesome. This is not a unique problem to Scrivener; indeed, it is a problem with Word itself! In his book APE: Author, Publisher, Entrepreneur—How to Publish a Book, Guy Kawasaki notes that some of the beta readers of that book had problems with the Word 2007 output from their Word 2011 applications. And the Microsoft developers working on Word have gigabytes of existing code, comments, and documentation to get it right, but still can’t! For that reason, Scrivener recommends compiling for RTF output if you intend to open the file in Word, rather than the .docx or .doc formats.
With that in mind, let’s take a look at what Options there are, and for which Compile For output types they are available. First, the following Options are available to all output types:
• Contents
• Formatting
• Transformations (though, not all settings are available to all output types)
• Replacements
• Statistics
The following are available to almost all output types, except as noted:
• Separators (all except .fcf, .fdx, and .fountain)
• Layout (all except .fcf, .fdx, and .fountain)
• Tables (all except MultiMarkdown or .fcf, .fdx, or .fountain)
• Footnotes (all except .fcf, .fdx, or .fountain)
• Quick Font Override (all except .txt and MultiMarkdown formats)
The Page Settings option is available to many output types. Essentially, any kind of output that admits of page sizes and header/footer or margin settings will have this Option available. This excludes all E-book formats, Web output (page or archive), MultiMarkdown, or .txt, .fcf, or .fountain formats.
The following are available to certain output types only:
• Print Settings (Print and PDF only)
• Cover (.epub and .mobi only)
• Title Adjustments (all output types but only if certain criteria are met in the Formatting options)
• Script settings (.fdx & .fountain only, but .fountain only has a few plaintext settings available)
• HTML (Web page but not Web archive, .epub, .mobi only)
• PDF (only to PDF, and only if the Publishing layout engine is selected under the “Print Settings” Option)
• Compatibility (only certain MultiMarkdown output types: MultiMarkdown without further clarification, MultiMarkdown .tex, & MultiMarkdown .html)
• Meta-Data (excludes iBooks Author Chapters, Print, .txt, .fcf, .fdx, .fountain); however, certain output types have different Meta-Data settings than others
• RTF Compatibility (.rtf only, except if you have changed your .doc formatting to use RTF-based code, in which case it appears under .doc as well)
• Kindle Gen (only .mobi output)
It is understandable why Scrivener compiling can seem overwhelming, there are a lot of options! While this is true, it is worthwhile to note that for most projects, you will only need to work with a few settings at a time when Compiling your project. Learning how to master just a couple of these Options can go a long way to easing the anxiety of working with Compiling in Scrivener, and that’s what I’ll help you with over the next few posts. Next, I’ll go over the five Options that are available for all output types and their settings. I'll pay special attention to "Formatting" since it is the one that has the most impact on most output formats. As always, if you have questions or comments leave them below.
New Writer's Life blog post up: Google Docs Guide for Writers
My new blog post for WritersLife.ORG has been posted, a writer's guide to Google Docs. It's a short intro to Google Docs and some tips on how to set up and use Google Docs, particularly if you want to use it to write your own work but need to interact with non-Docs users later.
Thursday, December 3, 2015
Compiling In Scrivener: The Basics
Now that NaNoWriMo 2015 is over and done, many of us who participated are looking at options for reviewing and editing our works. For some, the process will involve third parties. If you wrote your novel in Scrivener, that may require you to export your document to send off to an agent, publisher, or another reviewer who doesn't use Scrivener. In that case, you will probably want to Compile the project into a different format, and then you click the Compile button … and stare blankly at all the options, settings, and output formats. It can be overwhelming!
Starting today, I'm going to go over the options in Scrivener's Compile in great detail, going over each setting and formatting option. This will probably take several blog entries, so bear with me as I get to them all!
Today, I will go over the Compile sheet, identify each of the elements, and show the various options under the first layer of the UI for this sheet.
 To start, bring up the Compile sheet in your project. To bring up this sheet, click the Compile button on the toolbar of the project, or type Command-Option-E.
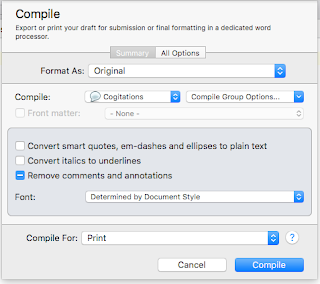 Once you have the sheet up, this is the initial default setup, the Summary. It is relatively quick and straightforward, with only a couple of options. There is the "Format As:" menu, the "Compile:" menu, the "Front Matter" checkbox and menu, a few settings checkboxes, the "Font" menu, and the "Compile For:" menu.
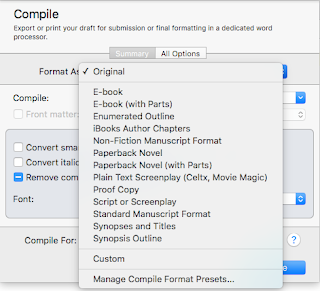
The "Format As:" menu shows all of Scrivener's basic formatting presets, and are designed each of them for a different kind of output. They are not the same as the "Compile For:" menu at the bottom. The "Format As:" menu is for selecting settings for the kind of manuscript output you want. Some of these are presets for manuscript submission for novel writers, some for creating eBooks, others for outlines or screenplays. The settings here will determine most of the settings as far as page breaks, fonts & styles, page sizes, and etc.
 The "Compile:" menu allows you to select what parts of the current project will be included in the compile. If you are working on a novel, for example, and only want to compile one chapter or one part of the whole manuscript, you can select that here. Next to it is the Compile Group Options…" menu. Here, you tell Scrivener whether to treat the group (in this case, "Cogitations") as the entire draft. Selecting that option enables the "Front Matter" checkbox. By default, if you have selected the entire manuscript, the "Front Matter" checkbox is enabled. Also, if you select a container (a folder or other object in the Binder that contains other objects), you can deselect "Include selected container in contents" to compile only the sub-objects of that container. Here, I want the entire "Cogitations" compiled, including the actual container "Cogitations" itself.
 The Front Matter checkbox, if enabled, allows you to tell the compiler where to look for the Front Matter for the compiled output. Often, a project will have multiple Front Matter pages, some of which are dictated by format. Certain e-books, for example, may need to have only a title and copyright page, with no forward, while a paperback novel may also need to include acknowledgment pages, a forward, an intro, and so forth.
In the center are three checkboxes and the "Font:" menu. Selecting the topmost will convert smart quote, em-dash, and ellipses characters to their plain text cousins (", --, and ..., three period characters in a row) if any are present in the compiled text. The second one will change any italicized text into underlined text. The third will keep comments and annotations out of the compiled output. Finally, the "Font" menu allows you to select an output font for the compiled document. By default, this is set to be the same one used in the Style(s) defined in the document, but you can set it to any of the installed fonts.
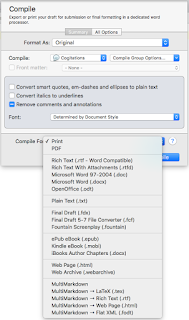 At the bottom is the "Compile For:" menu. Here, you will select what format to output. Some options include Print, PDF, .DOCX (Word), .RTF (Rich Text), .MOBI (Kindle e-book), and a whole slew of others. This controls the actual format of the output file.

And finally, there is the "All Options" tab in the sheet. Here, you can see the very detailed set of options available to tweak and modify the output of the compiled document. The next few blog entries I make here will cover all of these items, in detail, hopefully empowering you as a writer to create the best-compiled documents that you can, ready for printing, submitting to an agent, or sending to Kindle Direct Publisher (or a host of others!) for publication.
Starting today, I'm going to go over the options in Scrivener's Compile in great detail, going over each setting and formatting option. This will probably take several blog entries, so bear with me as I get to them all!
Today, I will go over the Compile sheet, identify each of the elements, and show the various options under the first layer of the UI for this sheet.
 To start, bring up the Compile sheet in your project. To bring up this sheet, click the Compile button on the toolbar of the project, or type Command-Option-E.
 Once you have the sheet up, this is the initial default setup, the Summary. It is relatively quick and straightforward, with only a couple of options. There is the "Format As:" menu, the "Compile:" menu, the "Front Matter" checkbox and menu, a few settings checkboxes, the "Font" menu, and the "Compile For:" menu.
The "Format As:" menu shows all of Scrivener's basic formatting presets, and are designed each of them for a different kind of output. They are not the same as the "Compile For:" menu at the bottom. The "Format As:" menu is for selecting settings for the kind of manuscript output you want. Some of these are presets for manuscript submission for novel writers, some for creating eBooks, others for outlines or screenplays. The settings here will determine most of the settings as far as page breaks, fonts & styles, page sizes, and etc.


In the center are three checkboxes and the "Font:" menu. Selecting the topmost will convert smart quote, em-dash, and ellipses characters to their plain text cousins (", --, and ..., three period characters in a row) if any are present in the compiled text. The second one will change any italicized text into underlined text. The third will keep comments and annotations out of the compiled output. Finally, the "Font" menu allows you to select an output font for the compiled document. By default, this is set to be the same one used in the Style(s) defined in the document, but you can set it to any of the installed fonts.
 At the bottom is the "Compile For:" menu. Here, you will select what format to output. Some options include Print, PDF, .DOCX (Word), .RTF (Rich Text), .MOBI (Kindle e-book), and a whole slew of others. This controls the actual format of the output file.
And finally, there is the "All Options" tab in the sheet. Here, you can see the very detailed set of options available to tweak and modify the output of the compiled document. The next few blog entries I make here will cover all of these items, in detail, hopefully empowering you as a writer to create the best-compiled documents that you can, ready for printing, submitting to an agent, or sending to Kindle Direct Publisher (or a host of others!) for publication.
Wednesday, December 2, 2015
New blog entry on Writer's Life—Storyist guide
My latest entry in the Tools series on Writer's Life is live. It covers the application "Storyist", go check it out!
Monday, November 30, 2015
New blog post—covering Ulysses—up on Writer's Life
I've got another blog entry up on WritersLife.ORG, this one covering some tips and tricks for writers using Ulyssess.
Sunday, November 29, 2015
5 NaNoWriMo Authors share their week 4 thoughts, on Lectitio.ME
Lectito.ME has the week 4 update from the 5 authors they've been following for NaNoWriMo 2015. Read all about it!
Saturday, November 28, 2015
New posts up on WritersLife.ORG
The second blog post, as well as the third, in my series for Writer's Life is up, go check them out!
Monday, November 23, 2015
NaNoWriMo updates from the 5 Lectito.ME writers
Website Lectito.ME has posted their week 3 update on the 5 writers they're profiling for NaNoWriMo 2015, go have a look!
Blogging for WritersLife.ORG
For the next couple of weeks, I'll be posting some blogs for writerslife.org, a website dedicated to helping writers of all kinds make the most of their craft. First post, 5 Tools For Writers: A Roundup, is up now, go check it out!
Subscribe to:
Posts (Atom)